

GitHub Actions are GitHub’s solution to CI/CD. The pipelines are written in YAML, and are very similar to Azure DevOps Pipelines – in fact, Actions was forked from Azure Pipelines. There are many similarities, and also many differences, for example, while Azure DevOps uses agents to run CI/CD, GitHub Actions refers to them as “runners”.
It’s not perfect, but to help with migrations, I have created a small converter: https://pipelinestoactions.azurewebsites.net/. There are millions of combinations, but this converter handles the basics. If you discover a bug, please email your YAML to samsmithnz at gmail, as this website does not capture or store any YAML.
The earlier GitHub posts from this series:
- Part 1: Moving code to GitHub
Let’s dive into the main differences between the two systems.
Name and Triggers
Let’s look at the basics, bit by bit. First name of the workflow and the trigger. In Azure DevOps, we have:
name: 'My Azure DevOps CI/CD'

trigger:
- master
In Actions, we end up with this:
name: 'My GitHub Actions CI/CD'

on: [push]
If we need to specify a branch for the trigger, we can do that too, but we need to use multiple lines, as the simple verb in an array can’t handle the more complicated details. This example will only trigger the build if there is code pushed to the main branch.
on:
  push:
    branches:
    - master
Variables
For variables, in Azure DevOps we had this:
  variables:
    buildConfiguration: 'Release'
    buildPlatform: 'Any CPU'
    buildNumber: '1.1.0.0'
In Actions, we end up with a very similar data structure, but with the “env” keyword:
 env:
   buildConfiguration: 'Release'
   buildPlatform: 'Any CPU'
   buildNumber: '1.1.0.0'
Looks almost the same, but how we use the variables is a bit different. In Azure DevOps, we would typically use “$(variable)”, but in Actions, it’s “${{ env.variable }}”.
Jobs and Stages
Let’s get straight to it: There are no stages in Actions, the concept doesn’t yet exist. Instead, you need to use multiple jobs. Jobs are very similar between the two systems, but again some minor differences. Azure DevOps jobs:
 jobs:
   job: Build
   displayName: 'Build job'
   pool:
     vmImage: windows-latest
   steps:
In Actions, it looks similar. Instead of specifying “job”, we just name it. “displayName” becomes “Name”, and the “pool-vmImage” becomes “runs-on”. That is the basics.
jobs:
   Build:
     name: 'Build job'
     runs-on: windows-latest
     steps:
Note that another job is similar, here I’ve named one ‘deploy’, running on an ubuntu agent/runner, and I’m requiring that the build job completes successfully before this job with the “needs” keyword.
  deploy:
    runs-on: ubuntu-latest
    needs: build
    steps:
Steps/ Tasks
Steps and tasks have the most amount of variation, and is where you will see the biggest maturity differences between Azure DevOps and GitHub Actions. For example, you build a .NET Core project in Azure DevOps, you use the DotNetCoreCLI@2 module:
- task: DotNetCoreCLI@2
  displayName: 'Build .NET Core project'
    inputs:
      command: build
      projects: FeatureFlags/FeatureFlags.Web/FeatureFlags.Web.csproj
      arguments: '--configuration $(buildConfiguration)
This same code in Actions, needs to be done manually from a script:
- name: 'Build .NET Core project'
  run: "dotnet build FeatureFlags/FeatureFlags.Web/FeatureFlags.Web.csproj '--configuration ${{ env.buildConfiguration }}'"
  shell: PowerShell
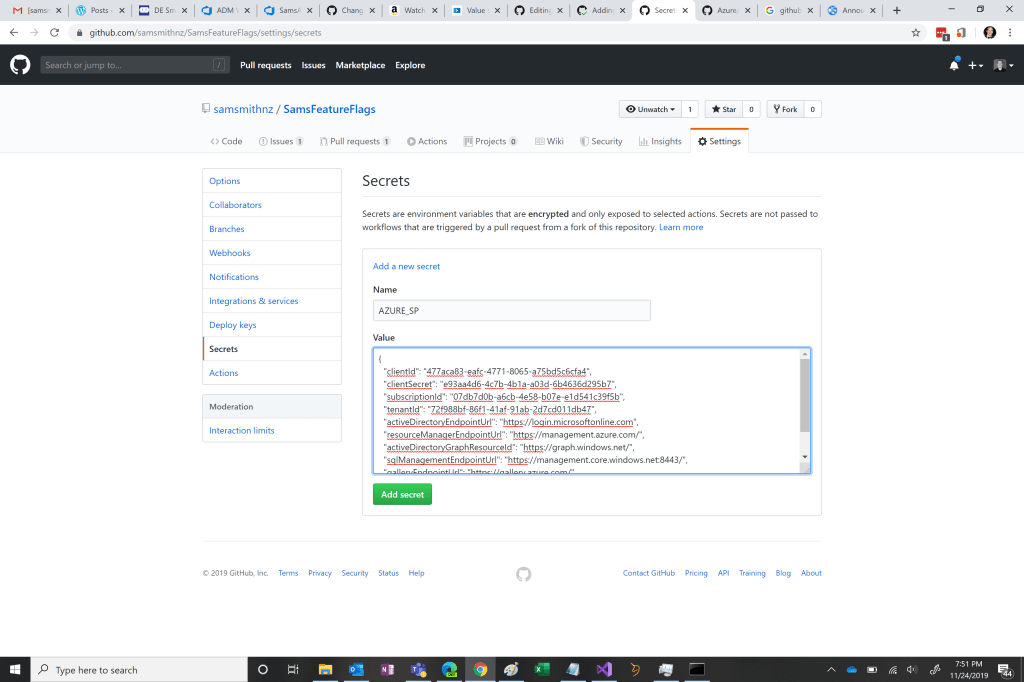
Secrets
What if we need a secret? We can access secrets, within settings. Here we can create any secret, and then reference it in our code like an environment variable, for example ${{ secrets.AZURE_SP }}
Deploying to Azure
So how to we deploy to Azure? First we need to log into Azure. We do this by running this code in the Azure portal command line to create a service principal, scoped to a particular resource group
az ad sp create-for-rbac --name "SamsFeatureFlagsServicePrincipal" --role contributor --scopes /subscriptions/[enter your subscription id]/resourceGroups/SamLearnsAzureFeatureFlags --sdk-auth
This creates some code we can paste into a GitHub secret, we are going to call “AZURE_SP”. Logging into Azure is as simple as:
- name: Log into Azure
  uses: azure/login@v1
  with:
    creds: ${{ secrets.AZURE_SP }}
Now that we have that context, we can deploy our application:
- name: Deploy website to Azure WebApp
  uses: Azure/webapps-deploy@v1
  with:
    app-name: featureflags-data-eu-web
    package: webapp
Note about editing YAML in Visual Studio
Note: you can’t currently push YAML files from Visual Studio to GitHub because of a known issue. To work around it, currently you need to edit the YAML in GitHub directly in a web page, or use the Git command line to force a push. The error is similar to:
Error encountered while pushing branch to the remote repository: rejected AddingCIAndCD -> AddingCIAndCD (refusing to allow an integration to create or update .github/workflows/aspnetcore.yml)
Wrap-up
There is a ton of potential for GitHub Actions, once you get around some of the syntax changes. For the completed pipeline, you can view it in GitHub here. For a number of samples, check out https://github.com/sdras/awesome-actions, or the GitHub Actions marketplace.
References
- .Net core setup in GitHub actions: https://github.com/actions/setup-dotnet
- GitHub Actions documentation: https://help.github.com/en/categories/automating-your-workflow-with-github-actions
- Abel’s blog post: https://abelsquidhead.com/index.php/2019/09/02/github-actions-2-0-lets-do-something-a-little-more-involved/
- Awesome actions: https://github.com/sdras/awesome-actions
- More actions: https://github.blog/2019-10-01-new-workflow-editor-for-github-actions/?utm_campaign=1569944972&utm_medium=social&utm_source=twitter&utm_content=1569944972
- Secrets: https://help.github.com/en/github/automating-your-workflow-with-github-actions/virtual-environments-for-github-actions
- apps installed on the GitHub Runners: https://help.github.com/en/actions/automating-your-workflow-with-github-actions/software-installed-on-github-hosted-runners
- vstest: https://docs.microsoft.com/en-us/azure/devops/pipelines/tasks/test/vstest?view=azure-devops#yaml-snippet
- vstest.console.exe: https://docs.microsoft.com/en-us/previous-versions/jj155796(v=vs.140)?redirectedfrom=MSDN
- default environment variables: https://help.github.com/en/actions/automating-your-workflow-with-github-actions/using-environment-variables#default-environment-variables
- Command line properties for vstest.console.exe: https://github.com/Microsoft/vstest-docs/blob/master/docs/RunSettingsArguments.md
- Creating Azure LogIn credentials: https://azure.github.io/AppService/2019/08/10/Github-actions-for-webapps.html

4 comments