

This week we are going to demonstrate how to setup manual approvals to our multi-stage YAML pipelines. This is achieved through the use of “environments” in Azure Pipelines.
Setting up Azure DevOps
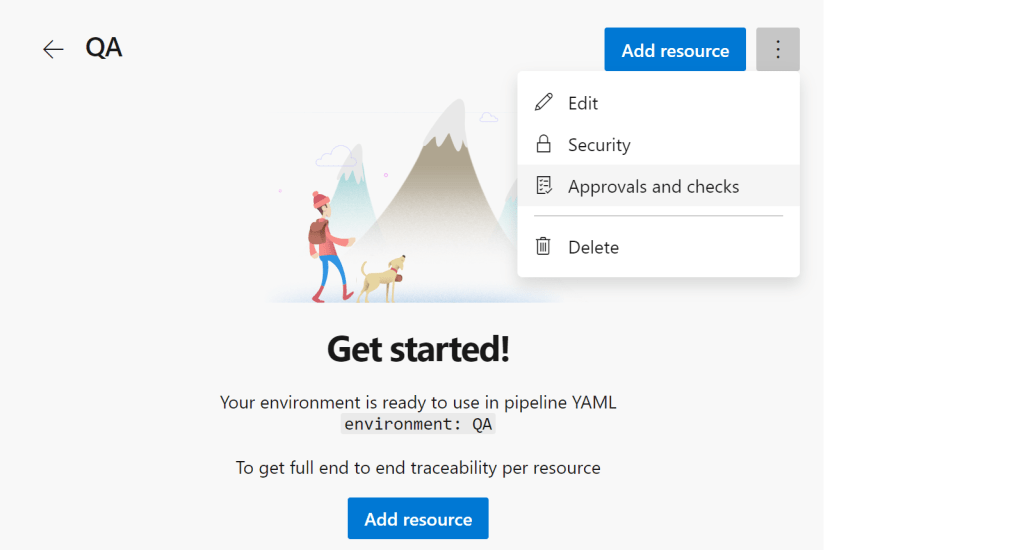
We can add/create environments in two ways. The first is from the environments menu item in the Azure “Pipelines” menu. The second is from the YAML itself – the YAML will create an environment when deployed if it doesn’t already exist. (We saw this first hand when a wry, missing “(“, in our YAML caused us to make a $Dev environment on our first deployment.)

After an environment has been created, we can edit its name, description, security, and approvals, and checks. Let’s click on the approvals and add one to Dev.
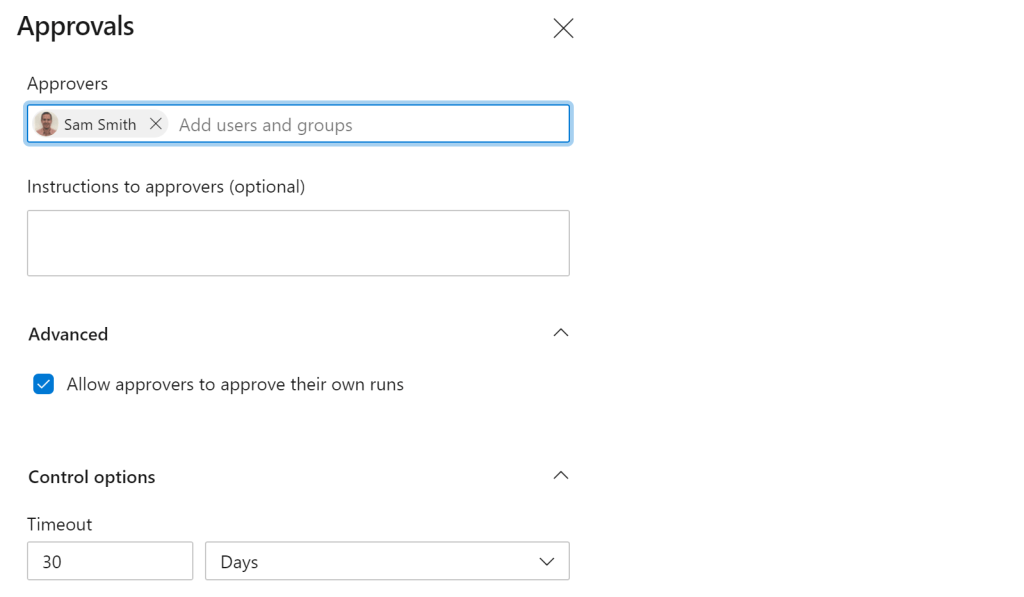
In the Add check section, we will select “Approvals”. Note that the “evaluate artifact”, often known as “checks”, only work on artifact container images and aren’t relevant for this project.

We specify who is required to approve the environment. Since most of the time it’s just Sam, we let him approve his own runs, and check the “Allow approvers to approve their own runs”. This is critical for smaller teams, who don’t want to be waiting for one particular approver.
Setting up the YAML
Let’s dive into the YAML changes required to setup a manual approval.
- We need to use a “deployment” job (in red), instead of the regular “job”
- We need to specify the “environment” (in green)
- We need to specify a deployment strategy (in blue). In all of our examples here we are going to use “runOnce”, which fits most small-medium deployments perfectly. If you have a really large deployment, check out the other “rolling” and “canary” strategies. The YAML below is a very simple example, our full deployment YAML can be viewed in our public repo.

We run a pipeline, and when it reaches the dev stage, it stops for approval.
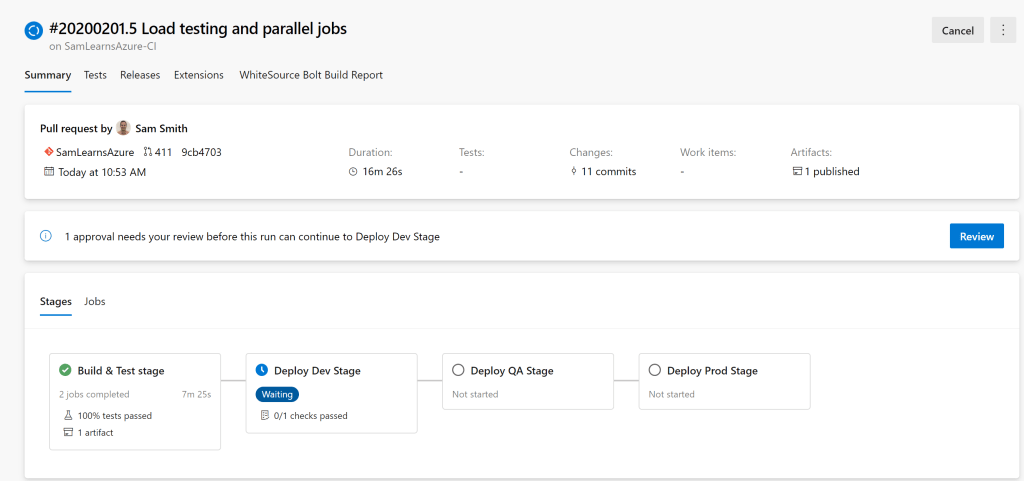
When we click on the “Review” button, we can add comments, and approve or reject the deployment.

Wrapup
Today we’ve shown how to setup manual approvals with a multi-stage YAML pipelines. In general, these manual approvals should be used sparingly, as we don’t want to create too many waiting states in our workflow.
References
- Environments: https://docs.microsoft.com/en-us/azure/devops/pipelines/process/environments?view=azure-devops
- Approvals and checks: https://docs.microsoft.com/en-us/azure/devops/pipelines/process/approvals?view=azure-devops&tabs=check-pass
- Artifact policy checks: https://docs.microsoft.com/en-us/azure/devops/pipelines/process/artifact-policy?view=azure-devops
- Deployment Jobs: https://docs.microsoft.com/en-us/azure/devops/pipelines/process/deployment-jobs?view=azure-devops

Love your website by the way. Just wanted to point out a little error. The environment is circled (squared?) in green in the example, not blue. Unless I’m colour blind. Keep up the great work! Really enjoy your posts.
LikeLike
Thanks for the feedback, really appreciate it. Fixed the wrong color comment, thanks!
LikeLiked by 1 person
Is there a way to add post deployment approval
LikeLike
Not directly, as far as I’m aware, there are only pre-deployment approvals in YAML. However, you could add another stage after a deployment with an approval to act as a post-deployment approval, before moving to the next stage. For example, QA stage deploys, and then there is a QAApproval stage, with a predeployment approval.
LikeLike
Well, we had the same setup and someone approved production instead of QA, now we are left to wondering who approved it. We looked at Audit Log but it just says Azure service deployed but no log of who approved it? Is there a way we can find it?
LikeLike
It should be right there in the build, it will say “One check passed”, under the title “Jobs”, and you can see who the approver was.
LikeLike
Is it possible to query for environments and their properties (i.e. approvers) using azure cli?
LikeLike
I’m not aware of a way to do with with the Azure CLI, but the REST API seems to have some options:
– Environments: https://docs.microsoft.com/en-us/rest/api/azure/devops/distributedtask/environments/list?view=azure-devops-rest-6.0#environmentinstance
– Approvers: https://docs.microsoft.com/en-us/rest/api/azure/devops/release/approvals/list?view=azure-devops-rest-6.0
LikeLike
extremely useful! I’m just wondering if you can also set an auto cancel time(out). I don’t want my pipelines to stay on waiting for approval forever, they should time out after x time. Is that possible? Didn’t manage to find it anywhere.
LikeLike
Yes – in the environments you deploy to, in Azure Pipelines > Environments, you can configure timeouts there in the “controls” section
LikeLike
Great post! Are you manually creating an environment in Azure DevOps each time you deploy a new PR environment? I’ve tried to follow the code in repo around setting a variable as the prId, passing it into the template as a parameter and then using it as the environment on the deployment but all I get is Job DeployApp: Environment $(prUC) could not be found. The environment does not exist or has not been authorized for use.
LikeLike
Hello Sam, Great post.. I have an issue.
Before adding the approval process the script was working fine. It is a Terraform apply script
But after adding the approver process like in this blog. The pipeline couldn’t find the working directory
Here is my script
jobs:
– deployment: terraform_apply
environment: ‘production’
strategy:
runOnce:
deploy:
steps:
– task: TerraformInstaller@0
displayName: ‘install’
inputs:
terraformVersion: ‘latest’
– task: TerraformTaskV2@2
displayName: ‘init’
inputs:
provider: ‘azurerm’
command: ‘init’
backendServiceArm: ‘${{ parameters.backendServiceArm }}’
backendAzureRmResourceGroupName: ‘${{ parameters.backendAzureRmResourceGroupName }}’
backendAzureRmStorageAccountName: ‘${{ parameters.backendAzureRmStorageAccountName }}’
backendAzureRmContainerName: ‘${{ parameters.backendAzureRmContainerName }}’
backendAzureRmKey: ‘${{ parameters.backendAzureRmKey }}’
workingDirectory: ‘$(System.DefaultWorkingDirectory)/Terraform/’
– task: TerraformTaskV2@2
displayName: ‘apply’
condition: and(succeeded(), eq(variables[‘Action’], ‘Apply’))
inputs:
provider: ‘azurerm’
command: ‘apply’
commandOptions: ‘-input=false -auto-approve -var-file=”../${{ parameters.environment }}/${{ parameters.environment }}.tfvars”‘
environmentServiceNameAzureRM: ‘${{ parameters.backendServiceArm }}’
workingDirectory: ‘$(System.DefaultWorkingDirectory)/Terraform/’
LikeLike
I had a similar issue. I resolved this by adding checkout before running the first task to pull down the repo.
strategy:
runOnce:
deploy:
steps:
– checkout: self
– task: TerraformInstaller@0
LikeLike
What if I want manual approval on QA and Staging but not on Dev?
LikeLike
You can configure each environment to have a manual approval or not – so only enable this on QA + Staging, but not Dev.
LikeLike
Hello,
Great article. Just what I was looking for. Thank you for this article. I have also some questions about the deployment.
In your azure-pipelines.yml in different stages you have defined the parameters for each stage (QA / Dev / Prod).
Is it possible to make use of a variables template for each environment and refer to it?
Because in that case I can make use of the same variable names in the build pipeline and manage the variables for each environment from an independent file.
– Stage: deploymentProd
displayname: ‘Deployment to Production’
jobs:
– template: azure-pipelines-build-template.yml
– template: variablesprod.yml
STage: deploymentTest
displayname: ‘deployment to test’
jobs:
– template: azure-pipelines-test.yml
– template variablestest.yml
LikeLike