

It’s time to talk about the benefits of automated testing.
We have created infrastructure and a simple web service with automatic releases to production. How can we increase our confidence that anything that changes will not break everything? The answer is automated testing.
The evolution of automated testing for many development teams generally requires much more transformation than teams expect, especially as most projects move to a more Agile process. In the past, most teams had a dedicated QA staff who tested the projects and confirmed the quality of a project. It was time consuming, but fit into the long project schedules of months or years that the waterfall process was good for.
When teams started to switch to Agile, it was logical that QA teams would automate these tests with UI testing tools such as Selenium. These test solutions were developed quickly, and became large and complex. Unfortunately, UI testing is a slow process, and these tests need many hours or days to run.
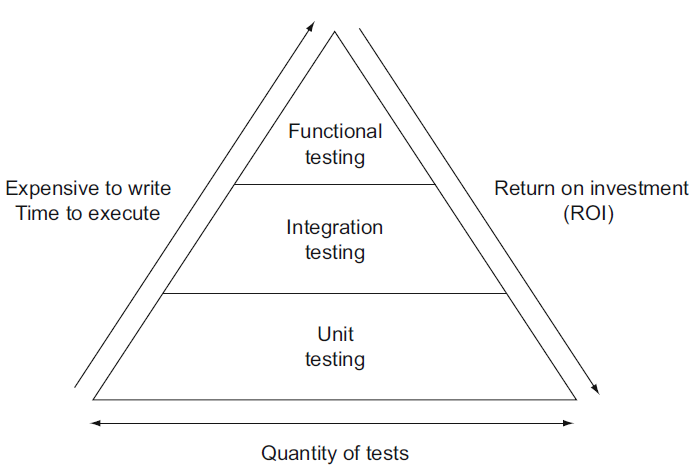
Enter the test pyramid. The test pyramid is not a new concept, but it’s value has been renewed as teams try to follow DevOps and Agile practices. The idea is that functional tests should be used as a last resort, and the focus should be on unit tests. (Note that we like “functional tests” as a better name for “UI tests”, as it allows us to focus on scenarios and complicated tests, not where the test is running). Unit tests are so self contained and fast, you can run thousands in a few minutes. Azure DevOps itself runs tens of thousands of unit tests in a few minutes. Let’s look at all of the types of tests in our pyramid:
- Unit tests: Tests run within the current project context, often with a mock framework, that does not rely on any dependencies (databases, services, etc). Can run in JavaScript, C#, and/or the database.
- Typically a single test runs in fractions of a second
- Example languages/frameworks:
- C# with MSTest, nUnit, or xUnit
- JavaScript with Jasmine
- SQL
- For example: calling an adding function in a class, and confirming the result of a + b = c
- Typically a single test runs in fractions of a second
- Integration tests: Tests run within the current solution context.
- Typically a single test runs in seconds
- Example languages/frameworks:
- C# with MSTest, nUnit, or xUnit
- JavaScript with Jasmine
- For example: called a database function with parameters a and b, and confirming the database returns c.
- Functional tests: Tests run against the entire stack, and often include complete end user scenarios
- Typically a single tests runs in minutes
- Example languages/ frameworks
- Selenium
- For example: Selenium opens a web page and enters inputs a and b, triggers the calculation, (for example, pressing a button), confirming the result displays correctly on the result page.
Given this, and our test pyramid below, we have a few takeaways. When writing a test, we should attempt to write it as a unit test first. We should be able to test approximately 70% (or more) of our feature in as unit tests. If we can’t write a unit test, we should try to write an integration test. As a rough estimate, about 20% of our tests will be written here. As a last resort, we write functional tests, which should be no more than 10% of our tests.
To achieve these testing goals in our project, we are going to build two new projects. For our unit and integration tests we will create a .Net Core MSTest project, and for our functional tests .Net Core MSTest Selenium test project.
The tests project runs in our continuous integration process, giving us constant feedback in Visual Studio and feedback in pull requests before we merge with master. We also have functional tests we can run as a smoke test to confirm that each environment has been deployed without breaking something else. A smoke test is just a quick test to make sure there isn’t anything seriously broken – like making sure a page loads. It comes from the metaphor that if there isn’t smoke, there won’t be fire. This is our initial test strategy. It will evolve, but will meet our initial needs.
Creating unit and integration tests
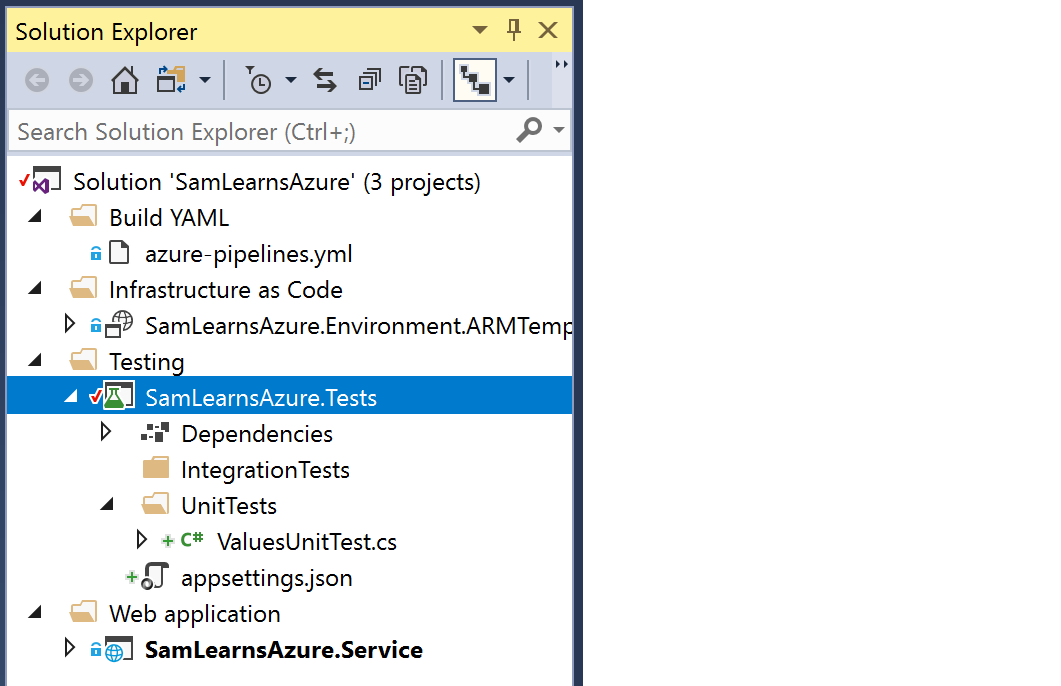
We create a new branch and open it in Visual Studio. We then create a new “Testing” solution folder and create a new unit test .Net Core MSTest project, “SamLearnsAzure.Tests”. To this project, we add:
- a project reference to “SamLearnsAzure.Services”
- the NuGet package “Moq”
- the NuGet package “Microsoft.AspNetCore.Mvc.Core”
- an appsettings.json file, (press F4 to display the properties), and set the “Copy to output directory” property, to “Copy if newer”. Later we will add configuration properties, but for now we will leave the file empty with just an empty {} inside the file.
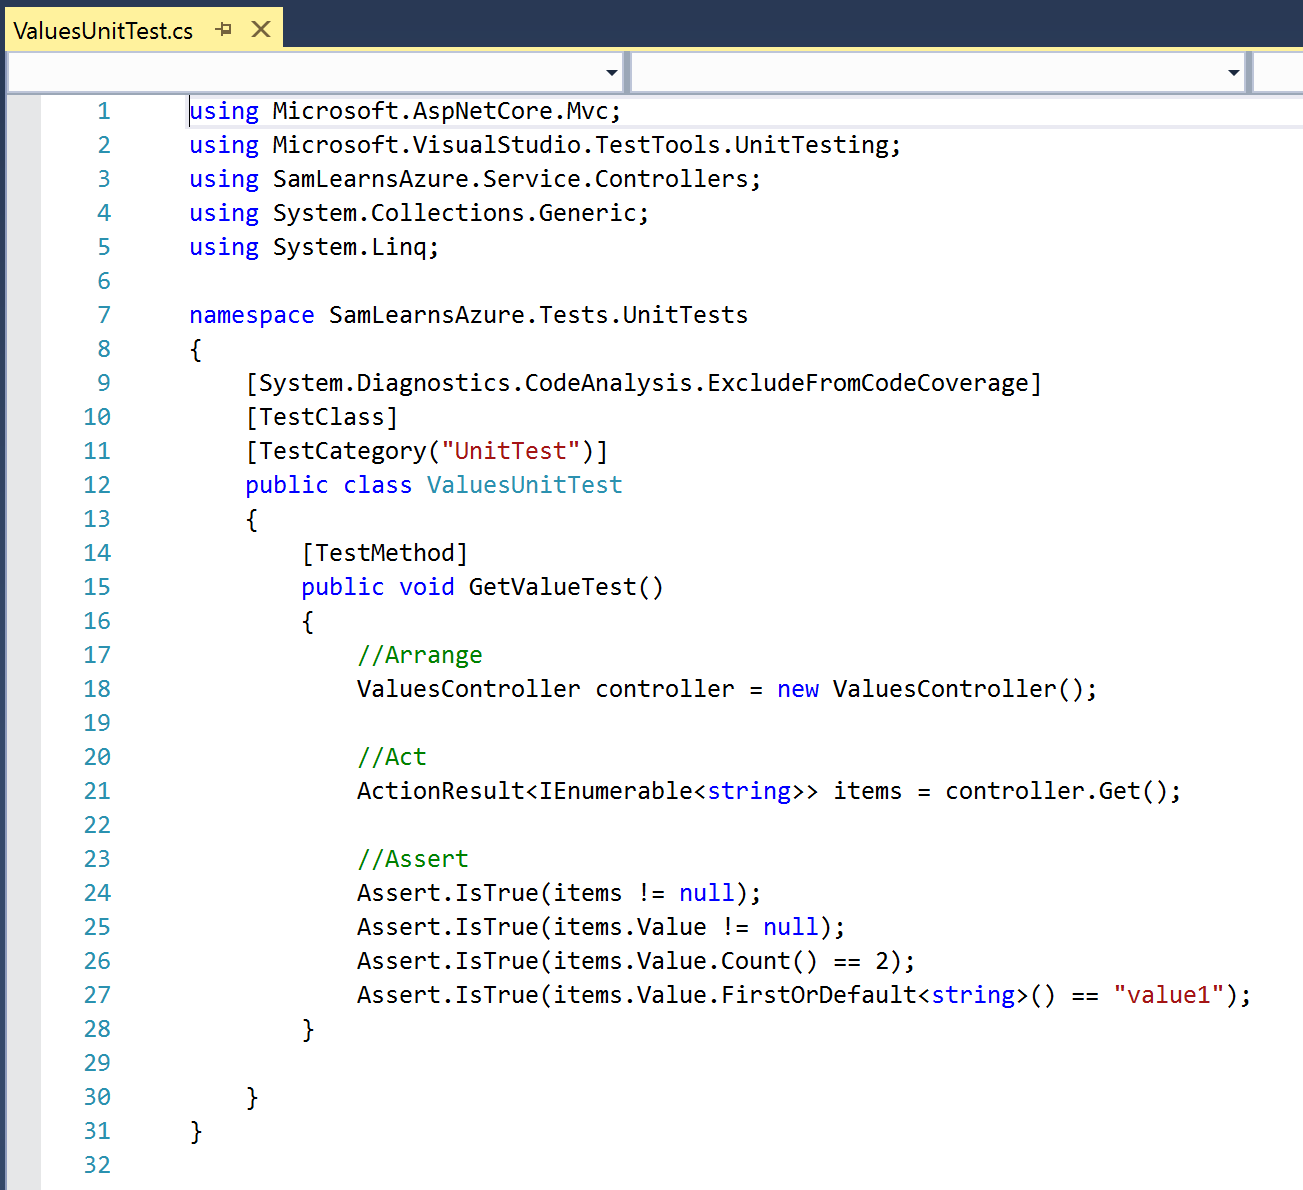
We are going to create basic tests against the ValuesController – the default controller created in the web service project. We can see the code below, the controller is very simple, and as such integration tests don’t really fit here today.

A simple unit test to validate the “Get” action is below. We write all of our tests in a three part format:
- Arrange: setup all variables and objects required for the test
- Act: perform the action, using the items defined in the last step
- Assert: confirm the results of test completed as expected
In our Values test , we initialize the “ValuesController”, call the Get function to return values, and finally confirm that we received the results we expected.
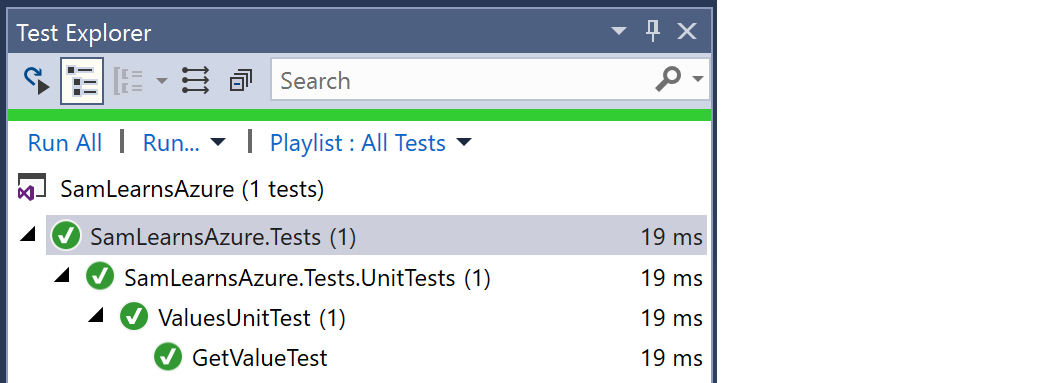
Using the test explorer, we run this test and it runs successfully and quickly -in just 19ms.
Code Coverage
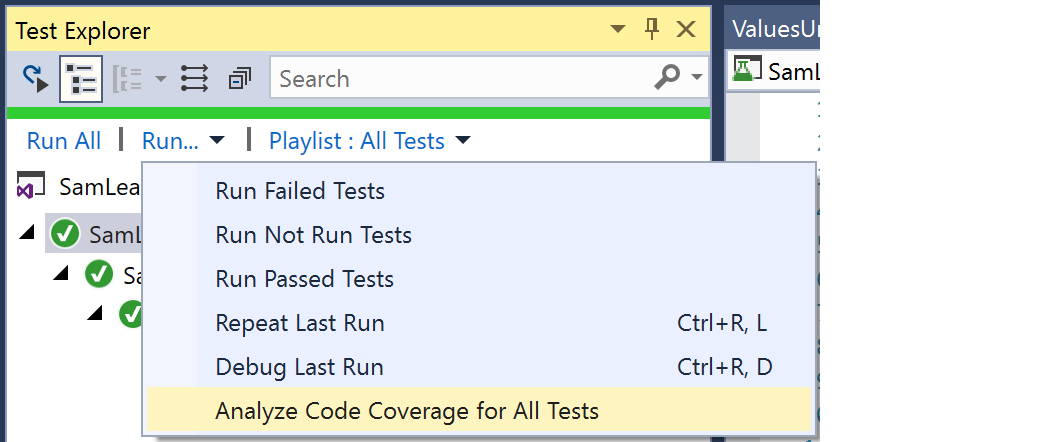
“Code Coverage” is a concept we can use to help us measure how much of our code is (or isn’t) being tested by our tests. Code coverage is not everything, as it doesn’t measure the quality of tests and like any metric, can be manipulated. We are going to use Code coverage to help us confirm we have written tests for all of our custom code. We can run code coverage from the test explorer:
We can see the code coverage results in the code coverage output window. With this one test, we have nearly 10% code coverage – but let’s look at what the uncovered 90% code coverage involves. Code coverage is calculated using a concept called a “Block”, a piece of code with one entry and exit point. Looking at the results below, we can see that 22 of the 28 uncovered blocks are from generated code in the Program.cs and Start.cs files in the service.

We generally want to ignore generated files and only use code coverage for our custom files. We can ignore generated files these with the attribute “[System.Diagnostics.CodeAnalysis.ExcludeFromCodeCoverage]”:

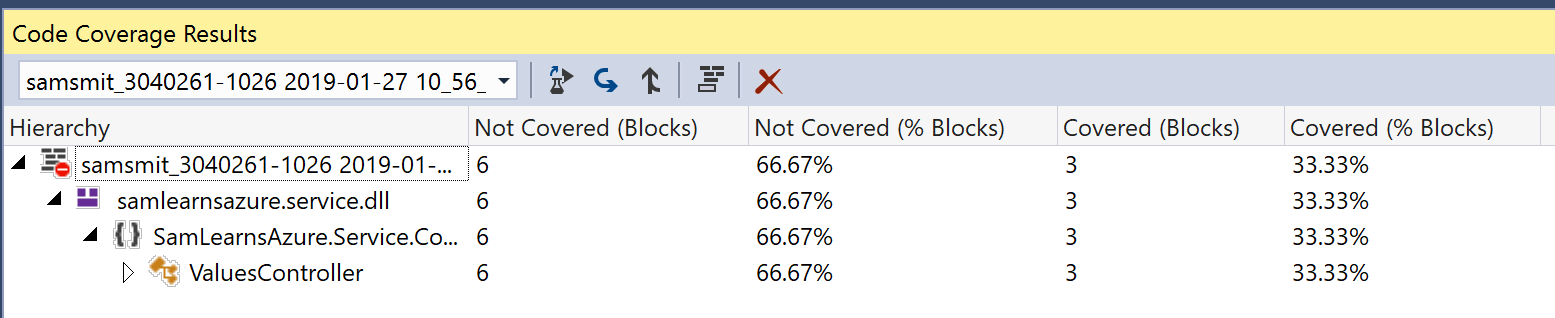
Running the code coverage analysis again with only our custom code, shows 33% code coverage. This is a better indicator of what we need to write tests for – those 6 blocks in the ValuesController.
Live unit testing
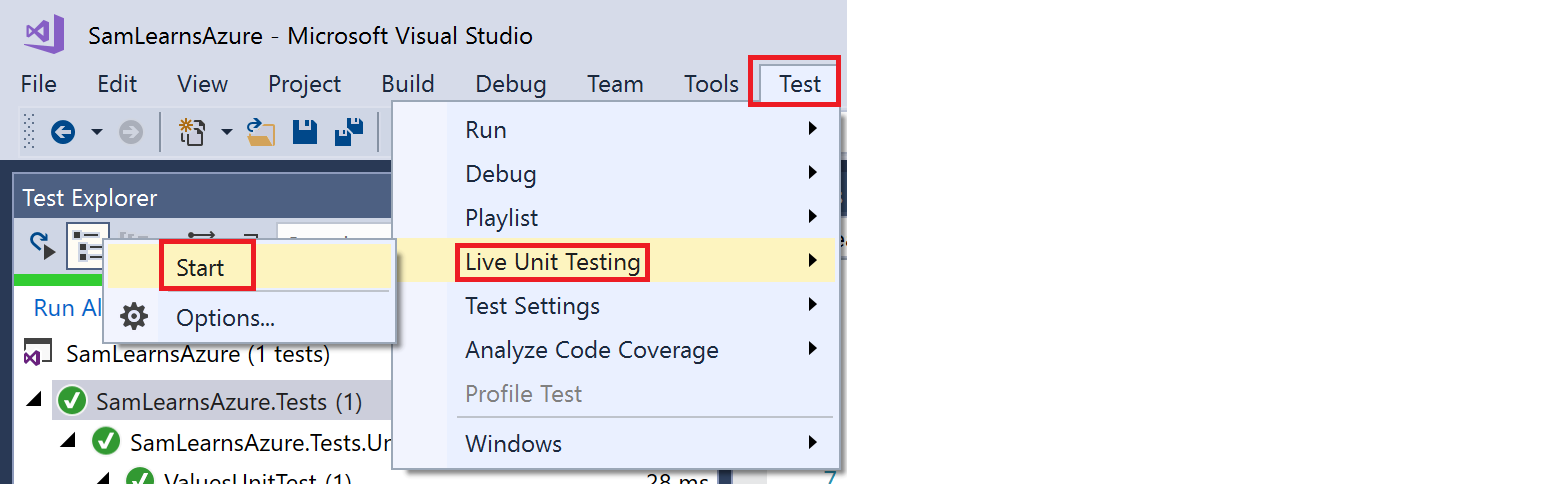
Visual Studio has a relatively new feature “live unit testing”, which allows our tests to run as we type, giving us instant feedback as we develop. This is really important – the sooner we can get feedback, the quicker we can resolve the issue, especially if it’s something we are changing right in this very minute. You enable Live Unit Testing by selecting Test > Live Unit Testing > Start from the top-level Visual Studio menu.
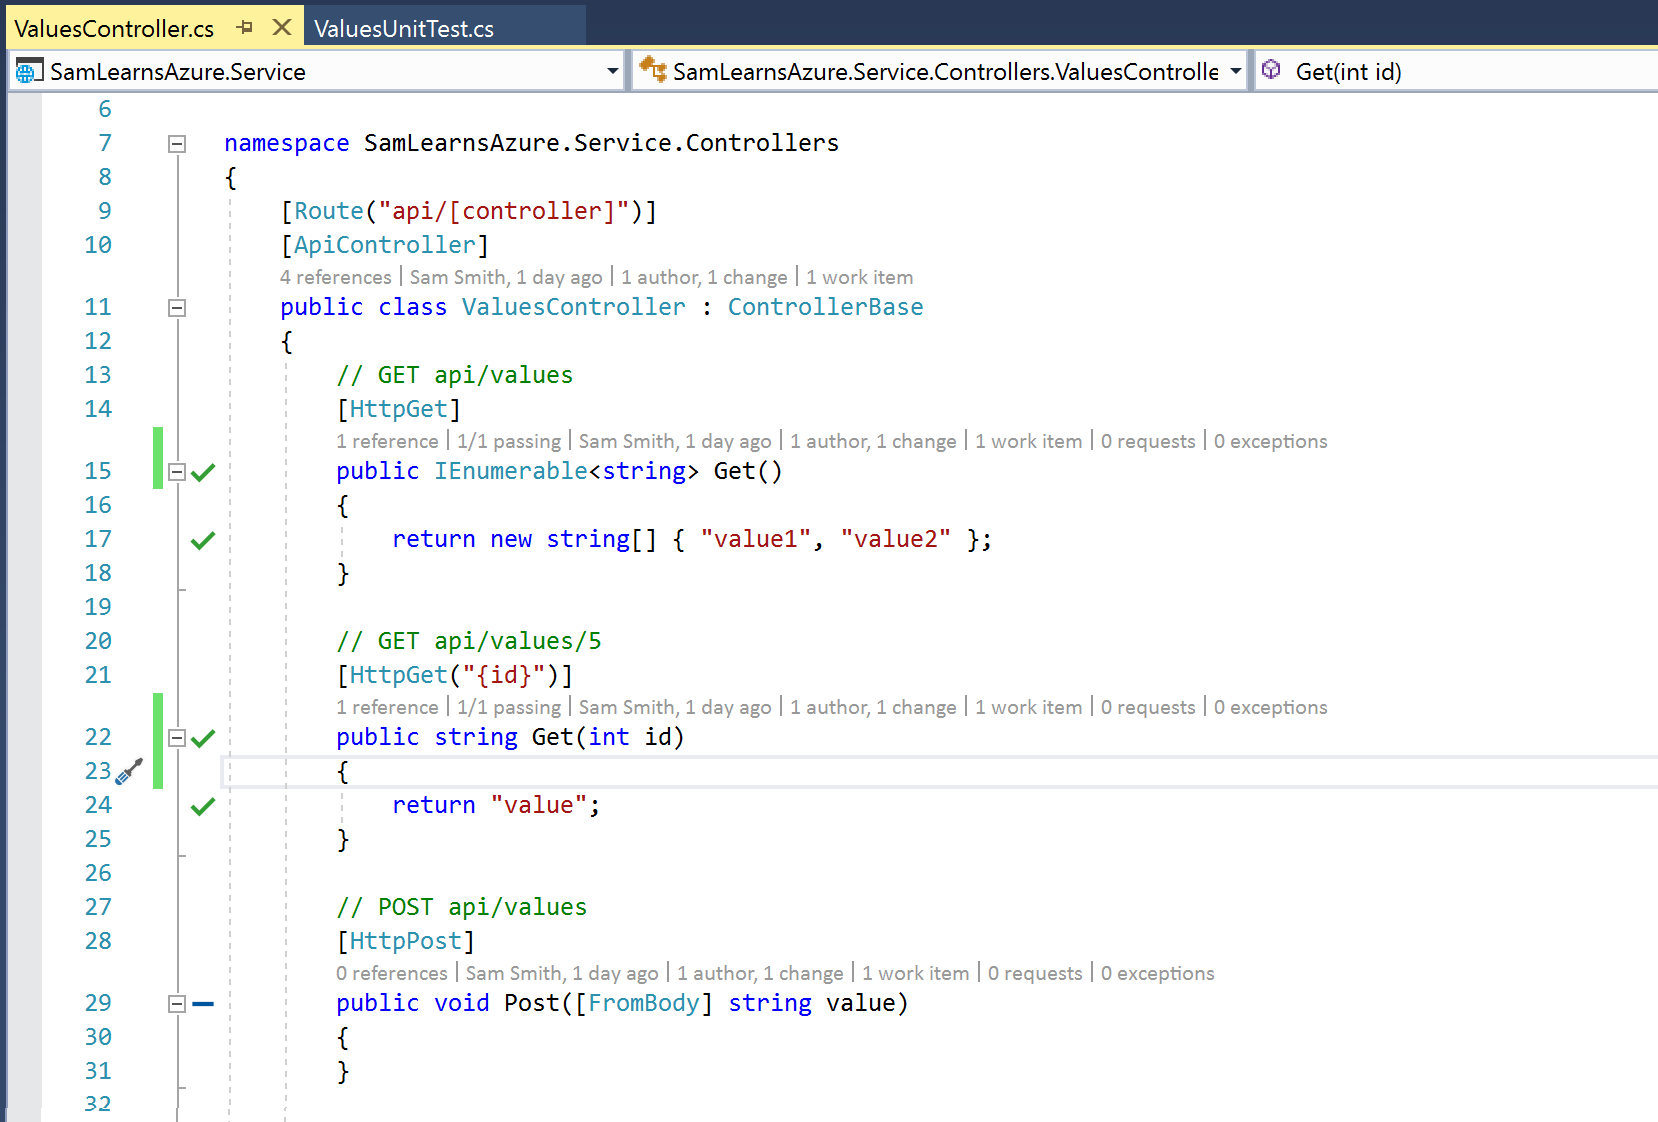
Live unit testing is shown visually in the left column of our code in Visual Studio editor with the green checkmarks (test running successfully), red crosses (test failing), and blue dashes (no test covering this code). We write a quick (purposely failing) test to verify the Get(id) function, to help demonstrate this in the ValuesController.

As the user types, live unit testing calculates what tests cover the edited code and reruns the affected tests to ensure that the test still passes. This changes all of the live unit test icons to add a little clock icon to the bottom right corner of the icon. We correct the unit test error we made above, and the test now passes successfully.
There are some tests that don’t make sense to run with live unit tests, including all our functional tests, and later, possibly some long running integration tests. By adding the test category attribute “SkipWhenLiveUnitTesting”, the test will not be run with live unit testing. We will use this shortly, when we write our functional tests.
Creating functional tests with Selenium
Next we are going to write our Selenium functional tests. We start by creating a new DotNet core MSTest project, naming it “SamLearnsAzure.FunctionalTests”. We add the following NuGet packages:
- Selenium.WebDriver
- Selenium.Chrome.WebDriver
Then we add a “test.runsettings” xml file to our project. Pressing F4 on the file, we will open the properties window and change the “Copy to output directory” property to “Copy if newer”. This file helps to define our runtime properties. The contents of the file include the url of the web service:
<?xml version="1.0" encoding="utf-8"?>
<RunSettings>

  <!-- Parameters used by tests at runtime -->
  <TestRunParameters>
    <Parameter name="SamLearnsAzureServiceUrl" value="https://samsapp-dev-eu-service.azurewebsites.net/" />
  </TestRunParameters>

</RunSettings>
Next, we are going to rename the default unit test class in the project to “SmokeTest.cs”. At the top of this class, we will add the using statement:
using OpenQA.Selenium.Chrome;Then we will add two private variables. The chrome driver and test context variables will be used to run our tests. The web service url variable will be used to configure our test for various service URL’s.
private ChromeDriver _driver;
private TestContext _testContextInstance;
private string _samLearnsAzureServiceUrl = null;
Next we add the test initialization code, using the “headless” option, which allows us to run Chrome without the full UI – and hence gives us a performance boost. We are then reading the arguments for the test from the “test.runsettings” xml file.
[TestInitialize]
public void SetupTests()
{
    ChromeOptions chromeOptions = new ChromeOptions();
    chromeOptions.AddArguments("headless");
    _driver = new ChromeDriver(Path.GetDirectoryName(Assembly.GetExecutingAssembly().Location), chromeOptions);

    if (TestContext.Properties == null || TestContext.Properties.Count == 0)
    {
        _samLearnsAzureServiceUrl = "https://samsapp-dev-eu-service.azurewebsites.net/";
    }
    else
    {
        _samLearnsAzureServiceUrl = TestContext.Properties["SameLearnsAzureServiceUrl"].ToString();
    }
}

public TestContext TestContext
{
    get
    {
        return _testContextInstance;
    }
    set
    {
        _testContextInstance = value;
    }
}
Next we add the test clean up code, to close the Chrome driver
[TestCleanup()]
public void CleanupTests()
{
    _driver.Quit();
}
Now we build our first test. The attributes are important at the top.
- The first, “TestMethod”, defines it as a test.
- The second, “TestCategory(“SkipWhenLiveUnitTesting”)”, is a built-in MSTest category that will ignore the test when live unit testing is enabled
- the third, “TestCategory(“SmokeTest”)”, is a custom category we created to define this test as a “smoke test”
- The test continues to use our standard test pattern to prepare our test, “Arrange”, “Act”, and “Assert”
- The actual test is browsing to our service and ensuring that the service loaded correctly – it’s a simple smoke test that we could perform manually by browsing to the API, if needed.
[TestMethod]
[TestCategory("SkipWhenLiveUnitTesting")]
[TestCategory("SmokeTest")]
public void GotoSameLearnsAzureServiceTest()
{
    //Arrange
    bool serviceLoaded = false;

    //Act
    string serviceURL = _samLearnsAzureServiceUrl + "api/Values";
    _driver.Navigate().GoToUrl(serviceURL);
    serviceLoaded = (_driver.Url == serviceURL);

    //Assert
    Assert.IsTrue(serviceLoaded);
}
To test the project, we need to select the test.runsettings file. Open the “Test” menu in Visual Studio, select “Test Settings” and then “Select Test Settings File”. When running the tests locally, it will now use this file to configure the tests, and in this case, the web service url defined in this file.

Updating the build definition with testing
Now it’s time to update the build definition so we can build the projects and run the tests. We will need to add the test projects to the “dotnet restore” and “dotnet build” sections, and a new section for “dotnet test”.
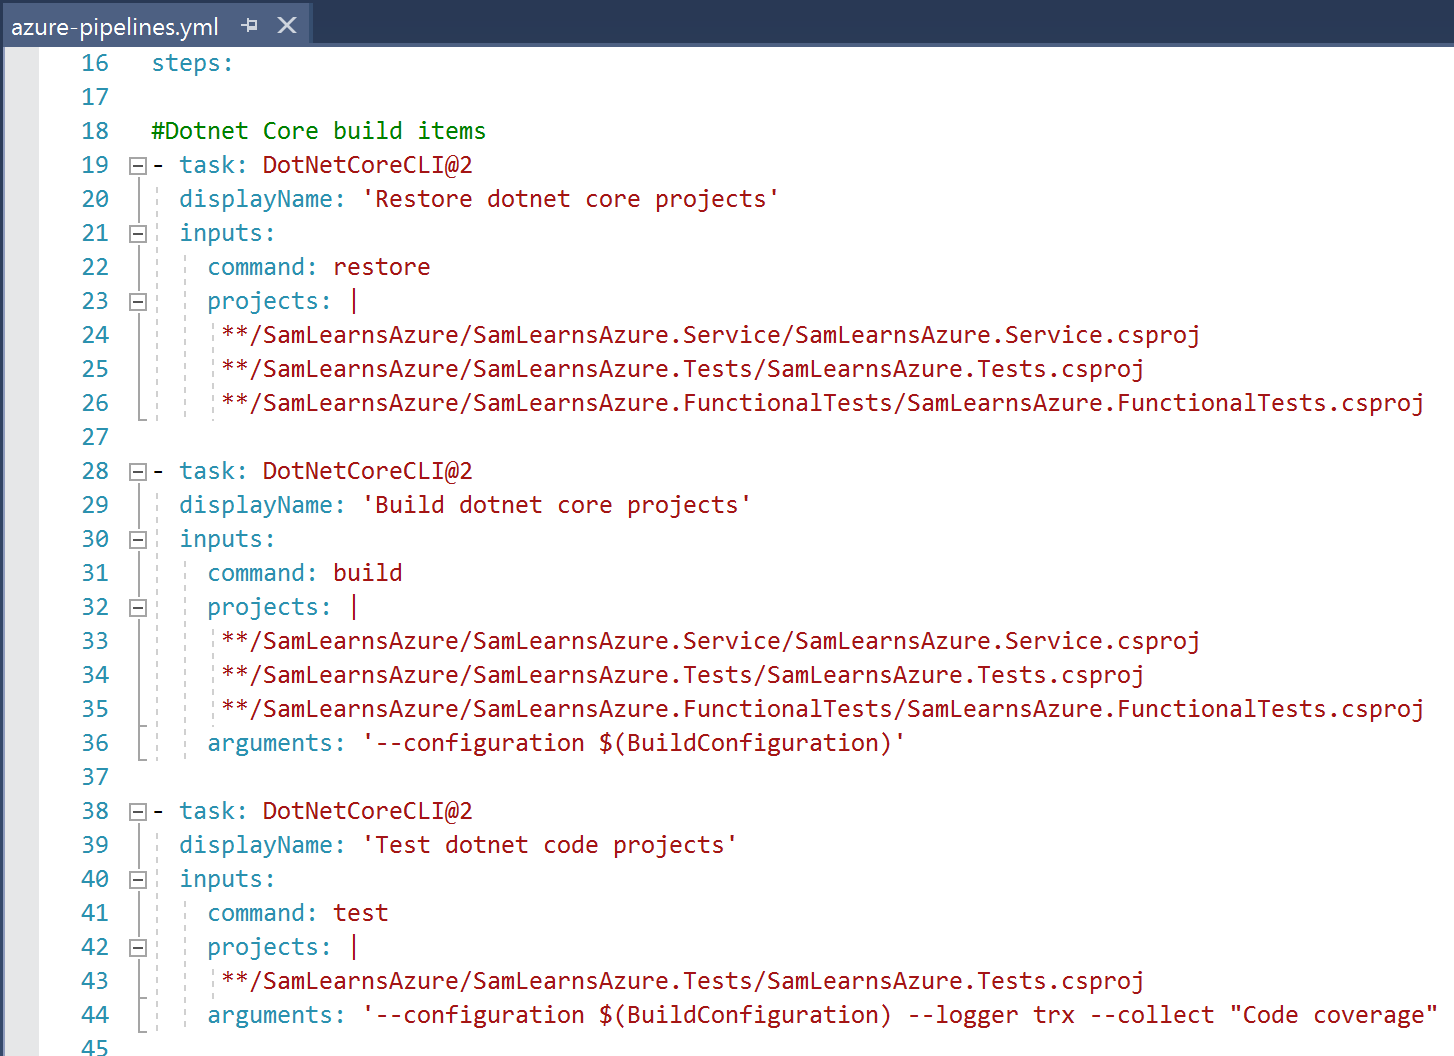
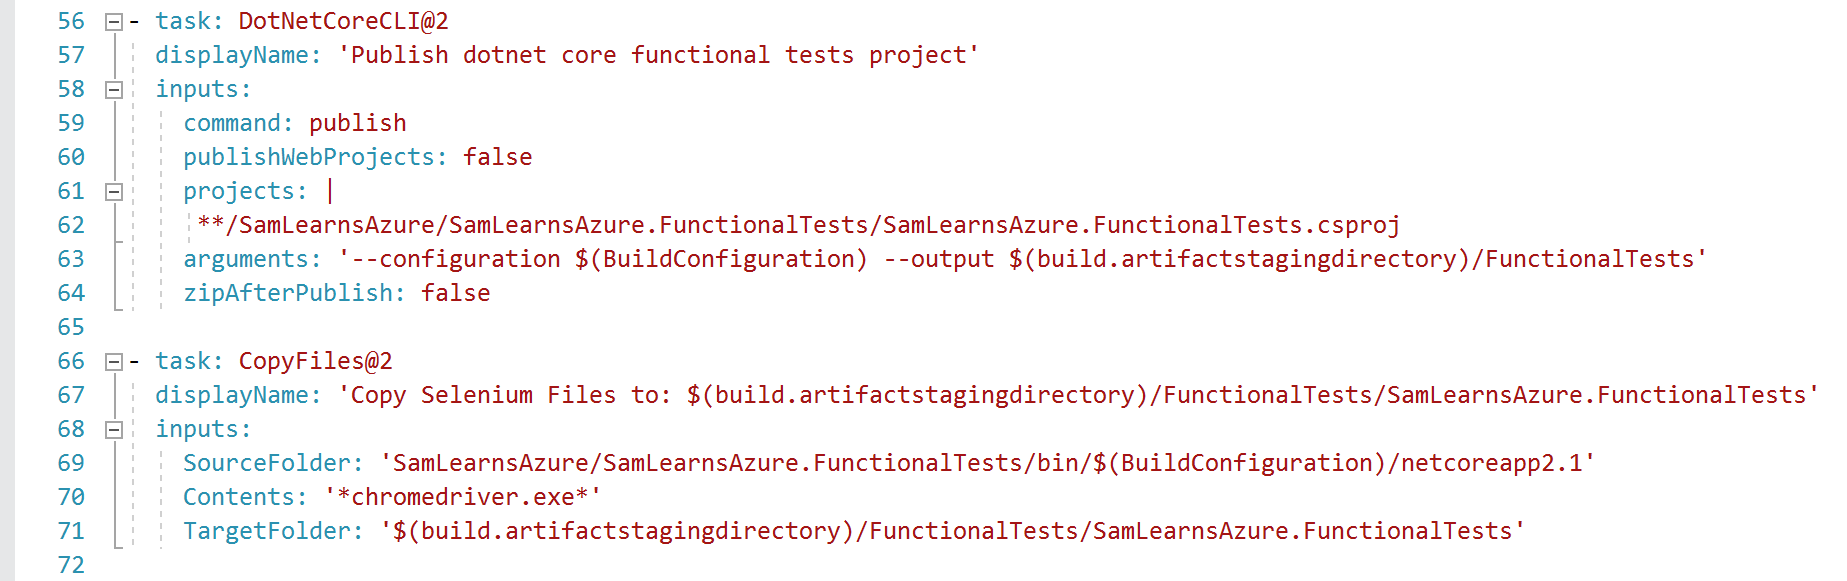
For the Selenium functional tests project we need some extra YAML to publish the project without zipping it, and to copy the chromedrive.exe file – which is not otherwise copied. This allows us to reconfigure the project configuration and run it on each environment easily.
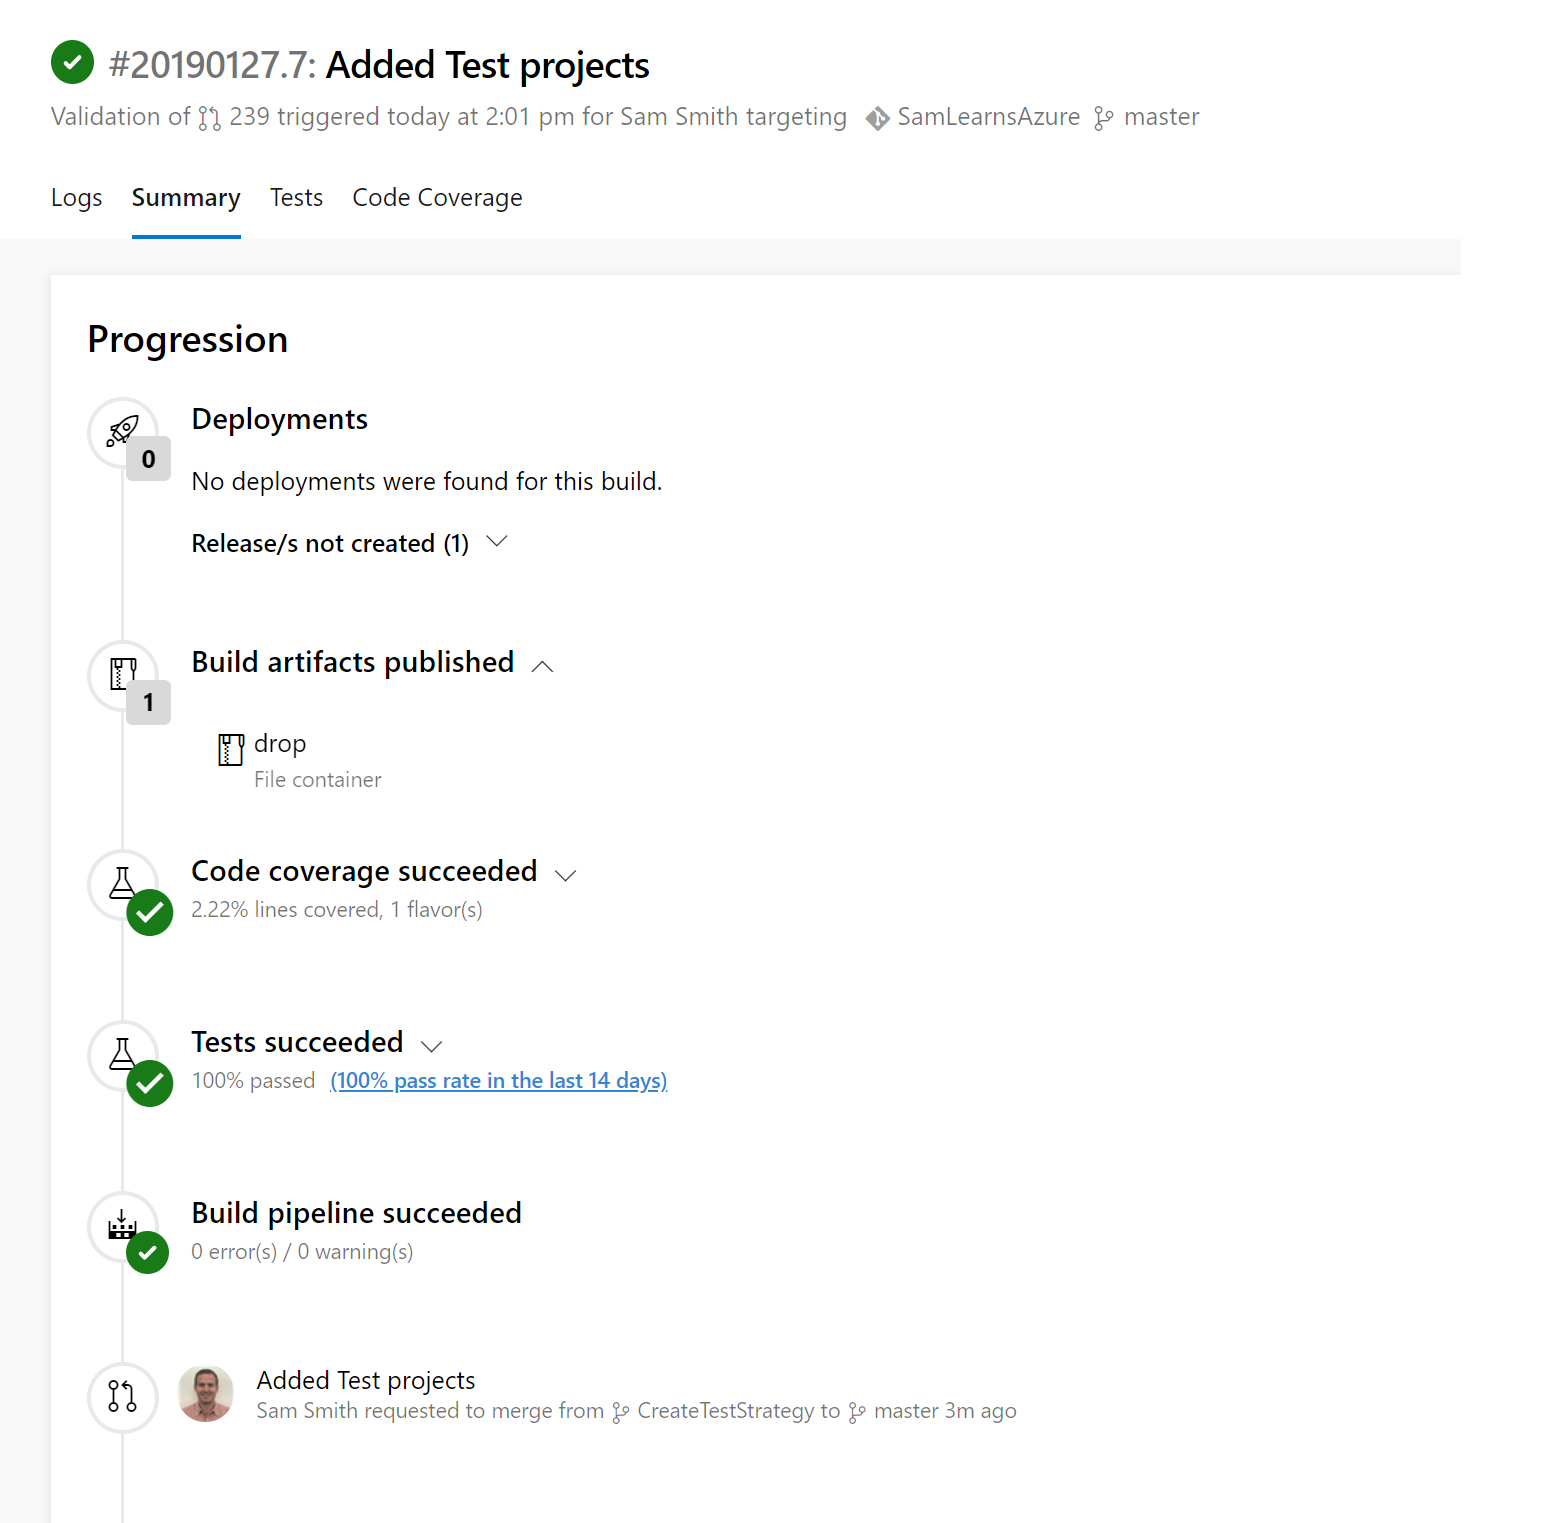
Pushing those changes and examining the build summary, we are seeing a lot of detail now. This is a pull request build, so no deployment is created. The build artifacts contain the web service zip and the functional test files. All of the tests passed – but what happened to the code coverage? Even though we reached 100% in Visual Studio, this is showing the code coverage as only 2.22%!?!
By clicking on the “Code coverage succeeded” item of the build, we can download a code coverage “.coverage” file, that we can open in Visual Studio. Looking closer at the code coverage, we can see the moq.dll is showing 6,179 uncovered blocks – this is what is ruining our statistics. Unfortunately, code coverage in .Net Core is still not quite complete yet.

Fortunately, there is a workaround. We can add a “CodeCoverage.runsettings” xml file to the “SamLearnsAzure.Tests” project. Inside this file we can add the following text – the important parts are
the “<Exclude>” tag, where we can exclude moq.dll. If we had other external files affecting our code coverage we could add them here too.
<?xml version="1.0" encoding="utf-8" ?>
<RunSettings>
    <RunConfiguration>
        <MaxCpuCount>0</MaxCpuCount>
    </RunConfiguration>
    <DataCollectionRunSettings>
        <DataCollectors>
            <DataCollector friendlyName="Code Coverage" uri="datacollector://Microsoft/CodeCoverage/2.0" assemblyQualifiedName="Microsoft.VisualStudio.Coverage.DynamicCoverageDataCollector, Microsoft.VisualStudio.TraceCollector, Version=12.0.0.0, Culture=neutral, PublicKeyToken=b03f5f7f11d50a3a">
                <Configuration>
                    <CodeCoverage>
                        <!-- Match assembly file paths: -->
                        <ModulePaths>
                            <Include>
                                <ModulePath>.*\.dll$</ModulePath>
                            </Include>
                            <Exclude>
                                <ModulePath>.*moq.dll</ModulePath>
                            </Exclude>
                        </ModulePaths>
                    </CodeCoverage>
                </Configuration>
            </DataCollector>
        </DataCollectors>
    </DataCollectionRunSettings>
</RunSettings>
We also need to amend our build definition to use the code coverage file:

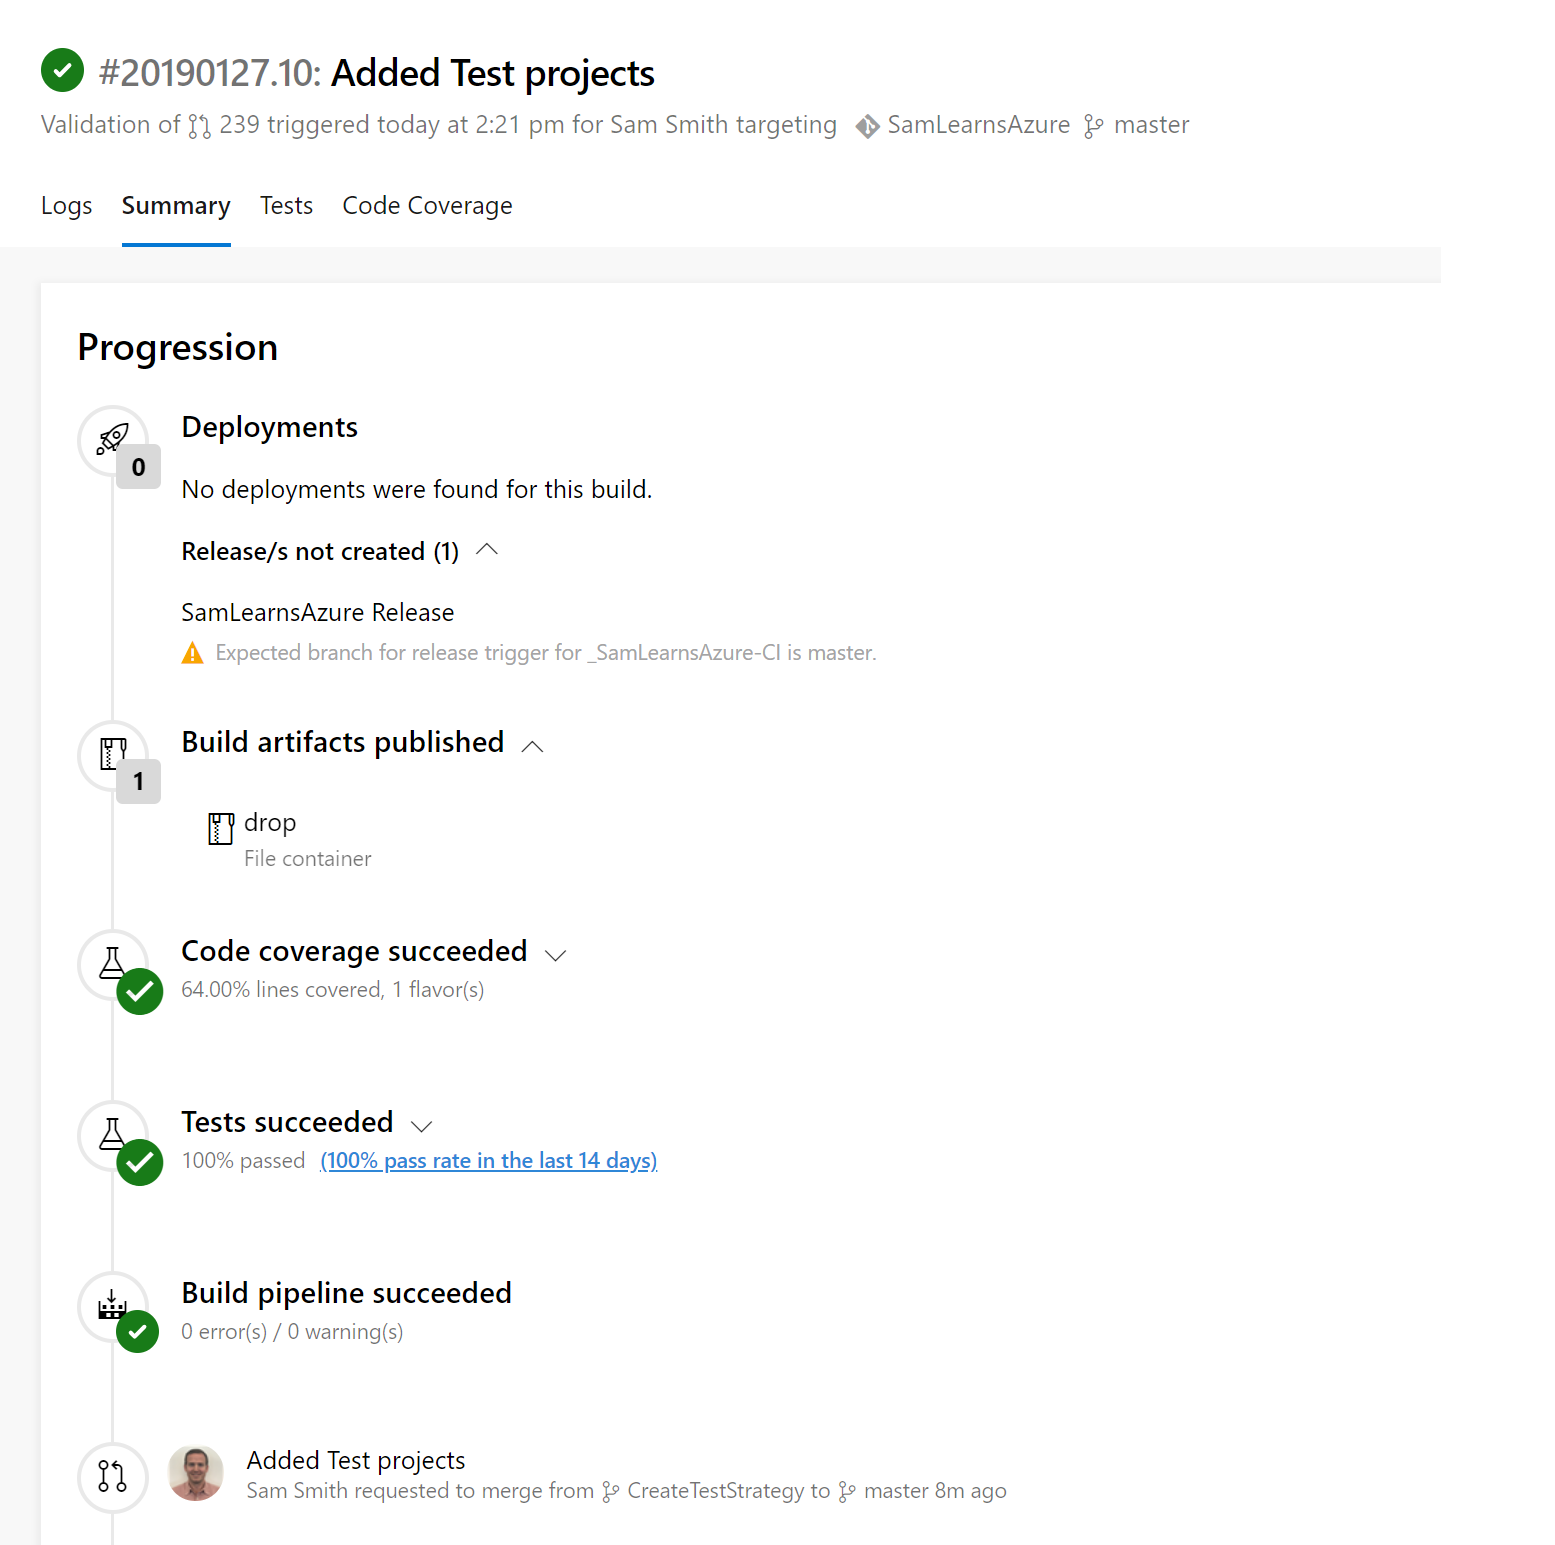
With this in place, we push our code and check the Pull Request build again, where we see the code coverage calculations are now working much better, and not including Moq.dll. Unfortunately, while Visual Studio Test Explorer uses “Blocks” to measure code coverage, Azure DevOps uses “Lines”, and this creates a disconnect. Still 64% is a lot better than 2.22%, so we will take this for now, until .Net Core is updated to fully support these scenarios. At the end of the day, the actual code coverage isn’t important, it’s more an indicator that we aren’t adding code without tests. For example, if we add a feature and note that the code coverage has a significant drop, we can conclude that the testing for this feature needs further investment.
Adding testing to the release definion
Now that we have unit testing as part of our build, we need to add smoke testing to our release. We will deploy our service to the staging slot, and then run the functional tests on the staging slot. If the test passes correctly, we will swap the staging and production slots.
In the past, we would have copied the files to the web server manually, tested the end point to ensure the service was functioning – for each of the three environments. This automation is an important step for our confidence in the continuous deployments, as we are beginning to add automated testing to ensure the service still works as expected.
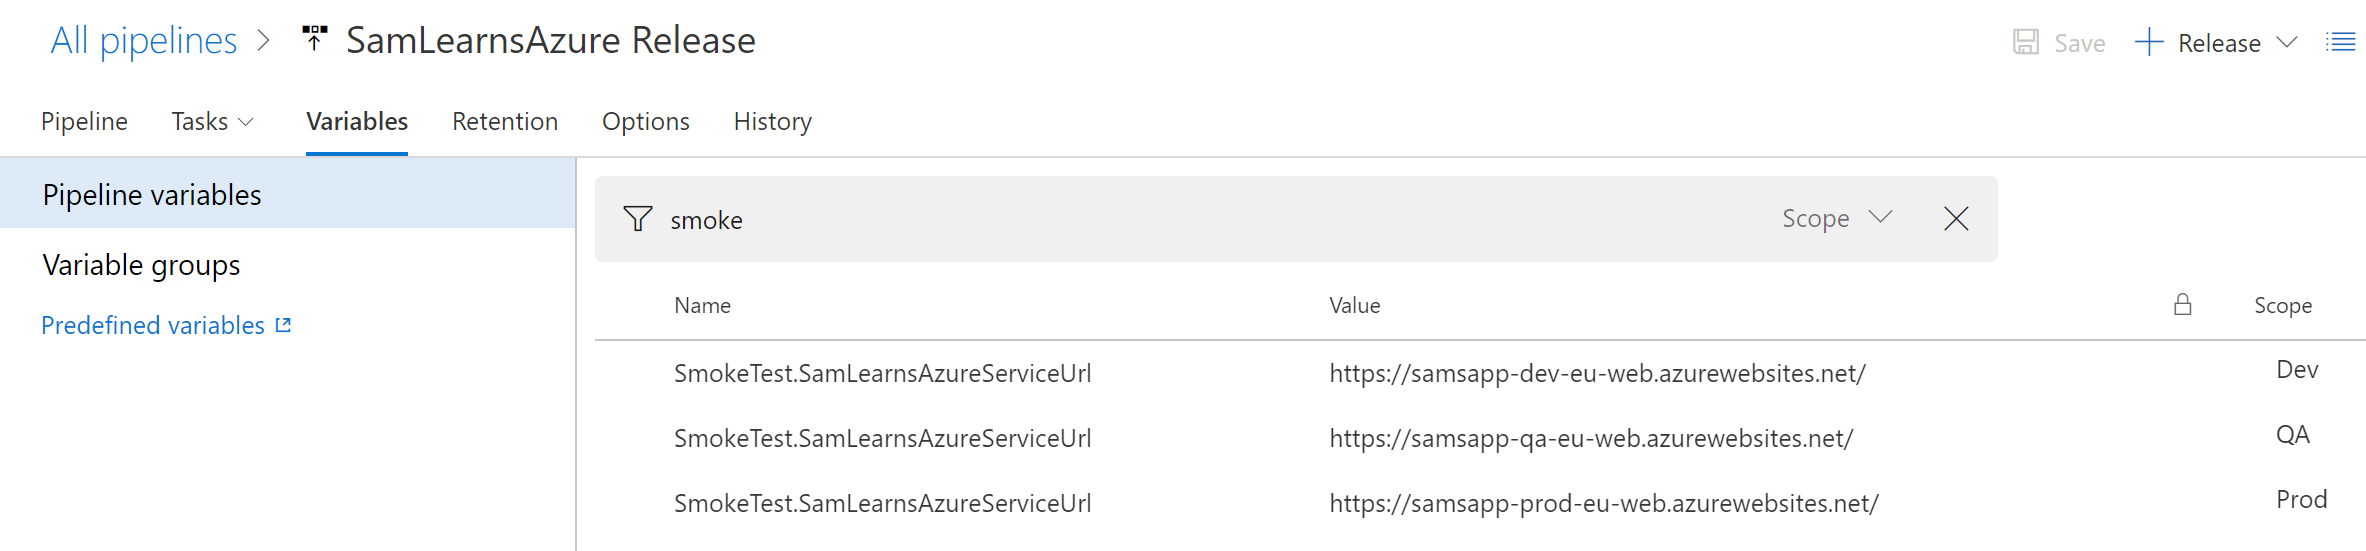
The first step is to add new variables for each environment, naming the variable “SmokeTest.SamLearnsAzureServiceUrl”.
Next we add the “Visual Studio Test” task

In the “Visual Studio Test” Task, we update the “Test files” property to only match our functional tests (we don’t want this to run any unit or integration tests), and check the box to indicate that the “Test mix contains UI tests”.

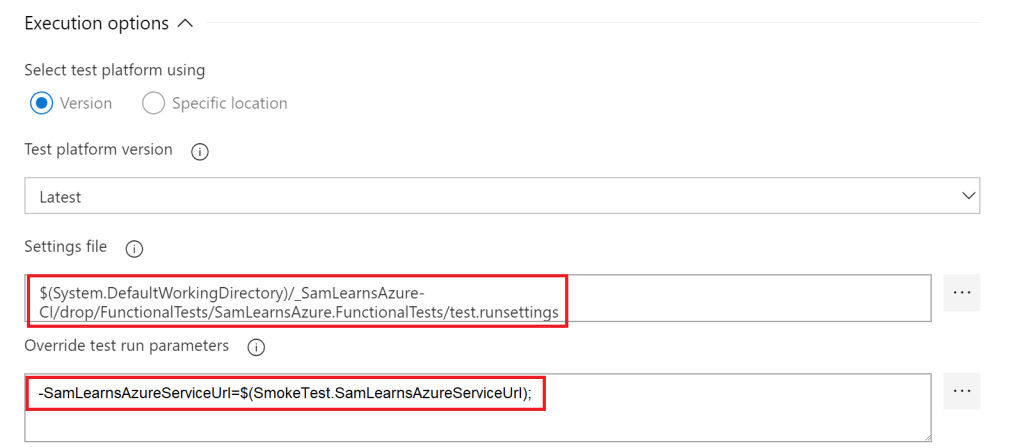
In the “execution options” of the “Visual Studio Test” task, add the settings file from the build, and use the variables we just created to pass in the path to the web service we are going to run the tests against.
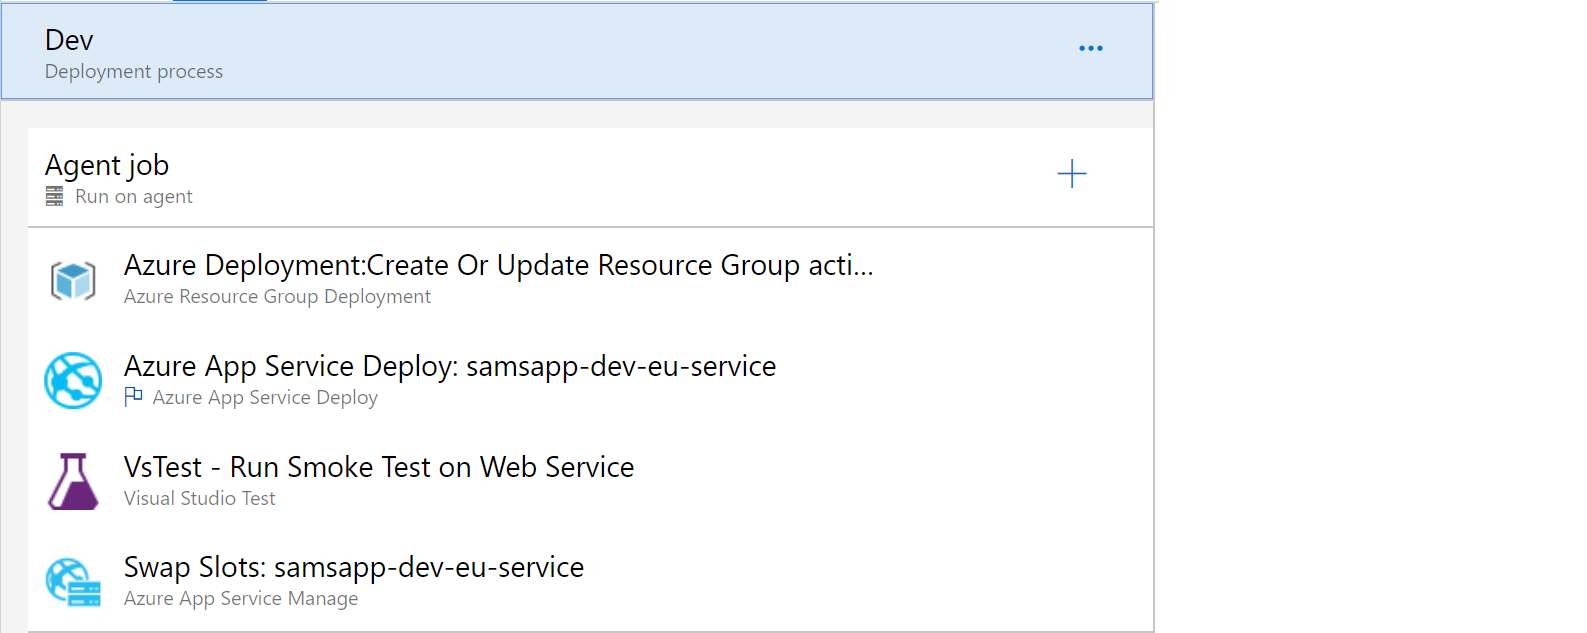
Here is what the release looks like with the Smoke test task between the deployment task and the swap slots task
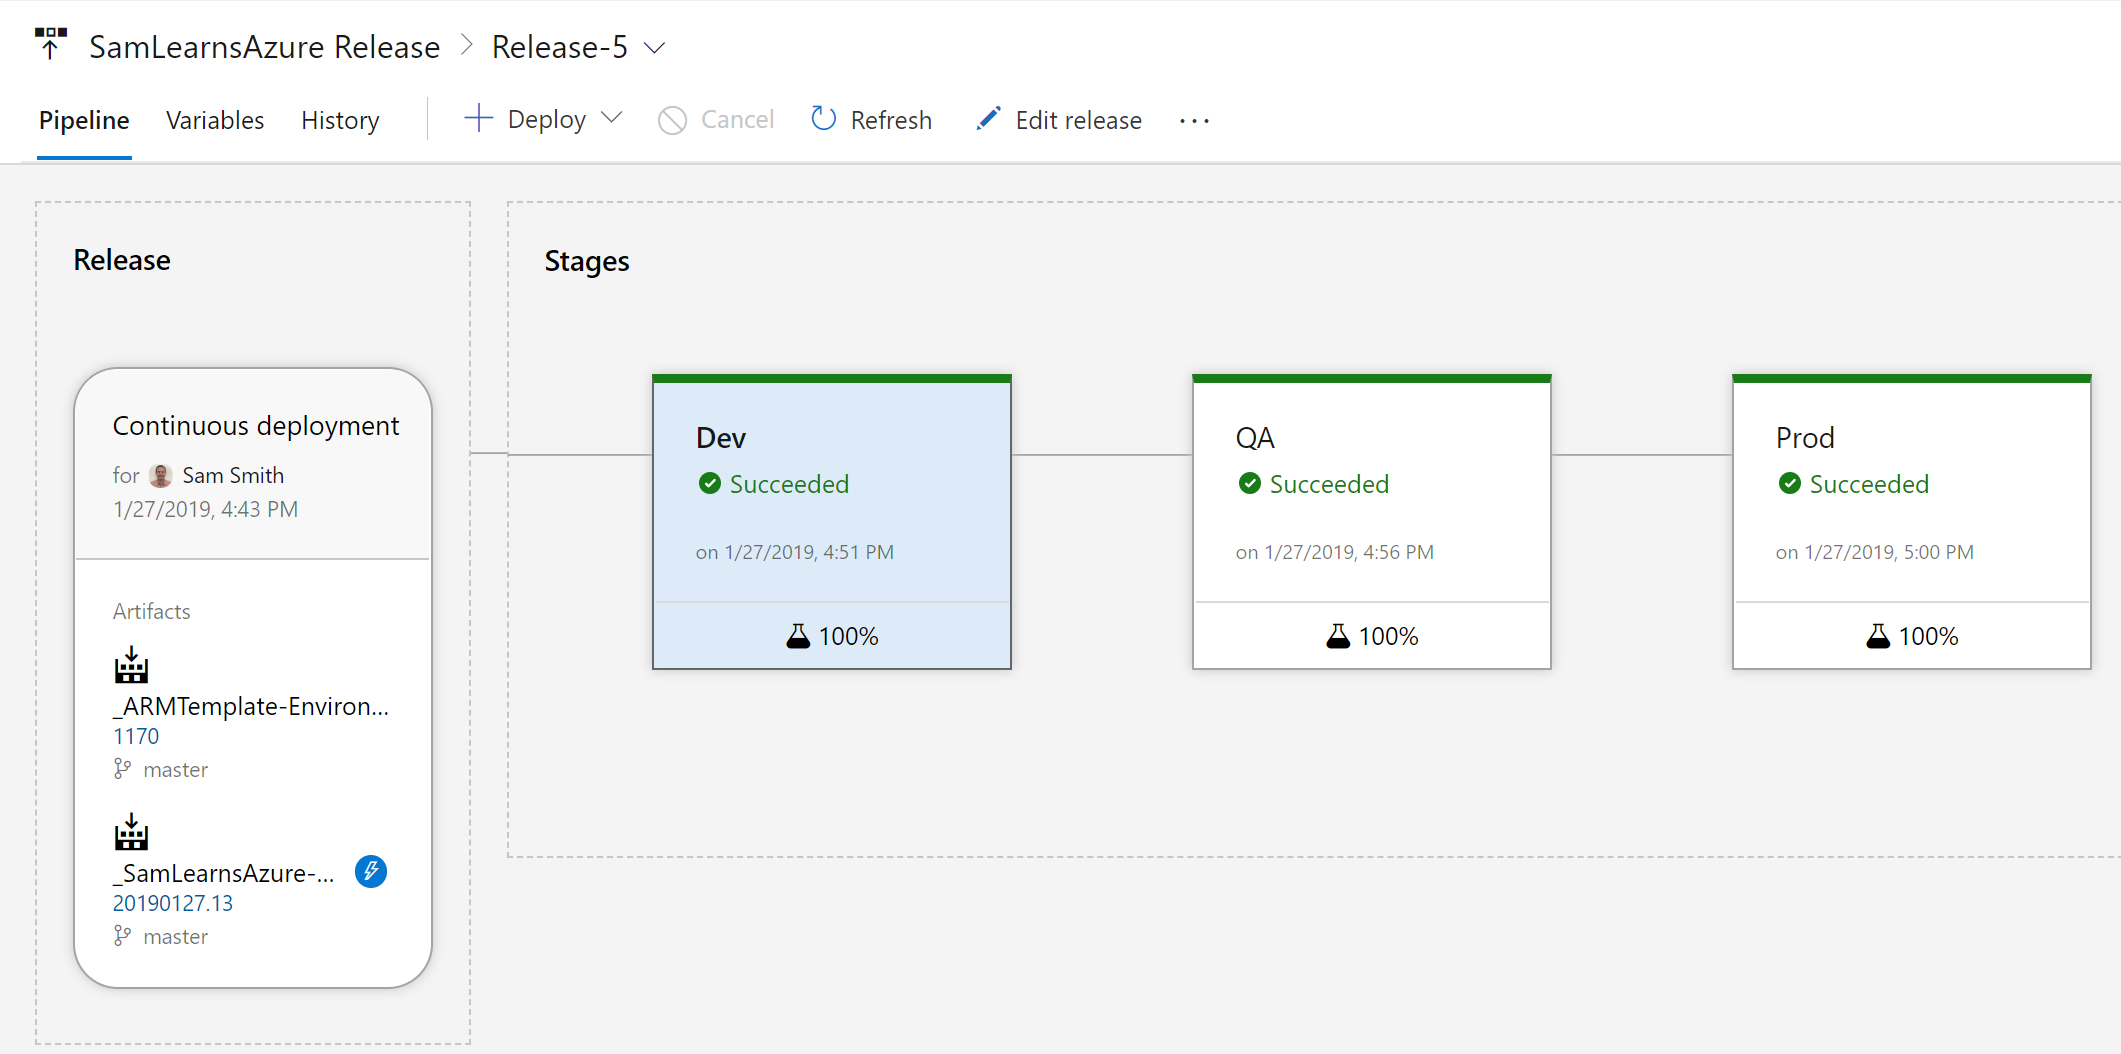
With the release successful, every environment now has automated smoke tests!
Wrapup
Today we built a robust testing infrastructure that will serve our project well going forward. We created a unit and integration test project for our build, and a functional tests project with Selenium for our release. We looked at why the test pyramid is important and how code coverage and live unit testing can be used as useful testing tools in our DevOps toolkit.
References
- Selenium: https://docs.microsoft.com/en-us/azure/devops/pipelines/test/continuous-test-selenium?view=vsts
- Test pyramid image: http://testerstories.com/2016/10/test-to-put-pressure-on-design/
- Code Coverage: https://docs.microsoft.com/en-us/visualstudio/test/using-code-coverage-to-determine-how-much-code-is-being-tested?view=vs-2017
- Featured image: https://cdn0.tnwcdn.com/wp-content/blogs.dir/1/files/2015/04/usertesting-730×356.jpg

One comment