

Most systems typically require some sort of input, interaction, and then output, workflow. Today we are going to setup our SQL database, add in some data, setup database DevOps, and round it off by writing some automated tests to confirm it all works. As we are creating the database in Visual Studio, Azure DevOps helps us to manage the database objects in source control, allowing us to track history, approve changes, and manage our database closer than in the past. This is a big change in thinking if you haven’t done this before, as you need to ensure that every change is repeatable. For example, an insert statement to add data to a lookup table needs to confirm that it hasn’t already run, or run a delete first to ensure that we don’t try to add the same data twice (and spawn a primary key violation).
Creating the database project in Visual Studio
We are going to start by adding a database project to Visual Studio, naming it “SamLearnsAzure.Database”. We need the “Data storage and processing” feature to be installed in “Visual Studio Installer” to use this project template.

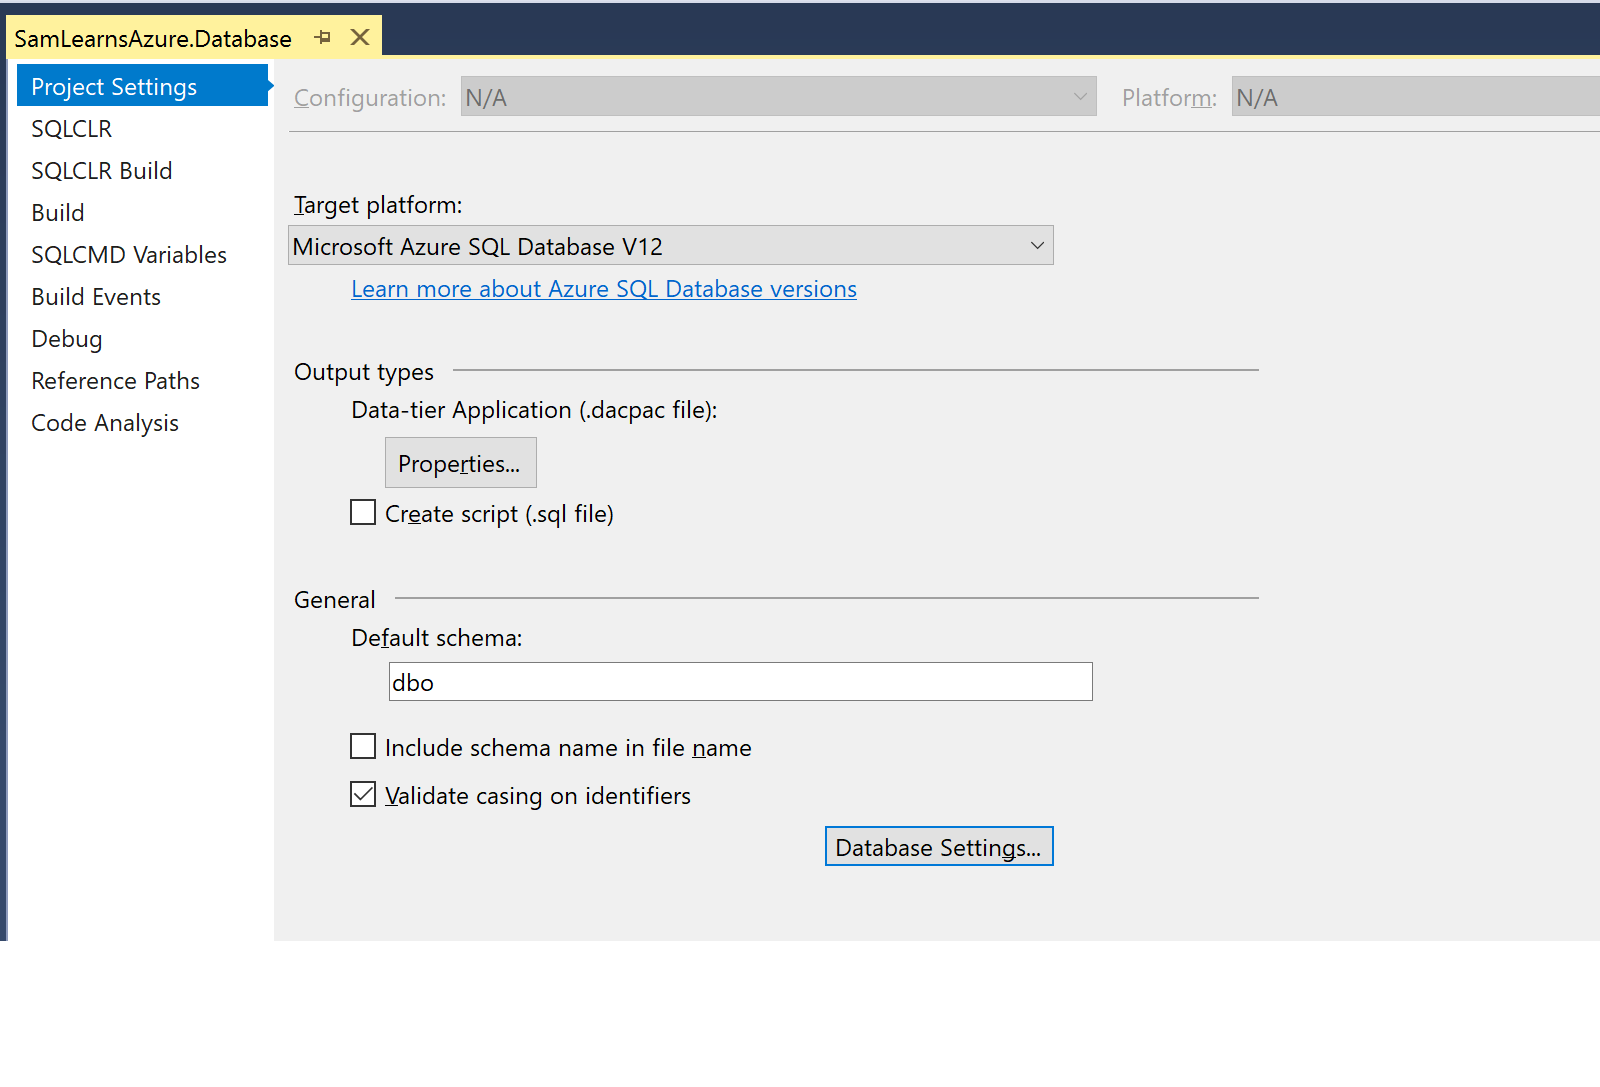
In the project properties of our new project, we change the database version from “SQL 2016”, to “Microsoft Azure SQL Database V12”, this is the version we are using inside of Azure. In the build tab, we also upgrade the .Net Framework version to 4.7- yes, this is a .NET Framework project, which we will need to work through when we get to the YAML build.
Next we add a “dbo” folder, and folders for “Stored Procedures” and “Tables”. We can hear the groans from here – yes, the world does still use stored procedures, but with EF Core, we can minimize it. There are occasions when it’s easier to write a stored procedure, particularly a complicated report with many group by’s.

What are we going to build in our database? This schema, which is from
https://rebrickable.com/downloads/, a site about Lego. Why Lego?
- We can download a big data set: even a small set has hundreds of pieces, large sets have thousands… We will need to optimize, load and display these large sets, providing scale and performance optimization opportunities with Redis
- Lego is very visual: this creates some interesting challenges and opportunities. We will need to utilize storage blogs and CDN’s.
- we think there is a lot of potential for this project to enhance and inventory my children’s Lego collection
- Lego is fun! Need we say more?
We create the tables as shown in the schema below:

We are going to use the same naming for our tables. We have to manually select data types as these aren’t published, and also create our own primary and foreign keys to match the table structure above. I also create two additional tables “owners” and “owner_sets”, which will contain information for owners to track which sets they own.
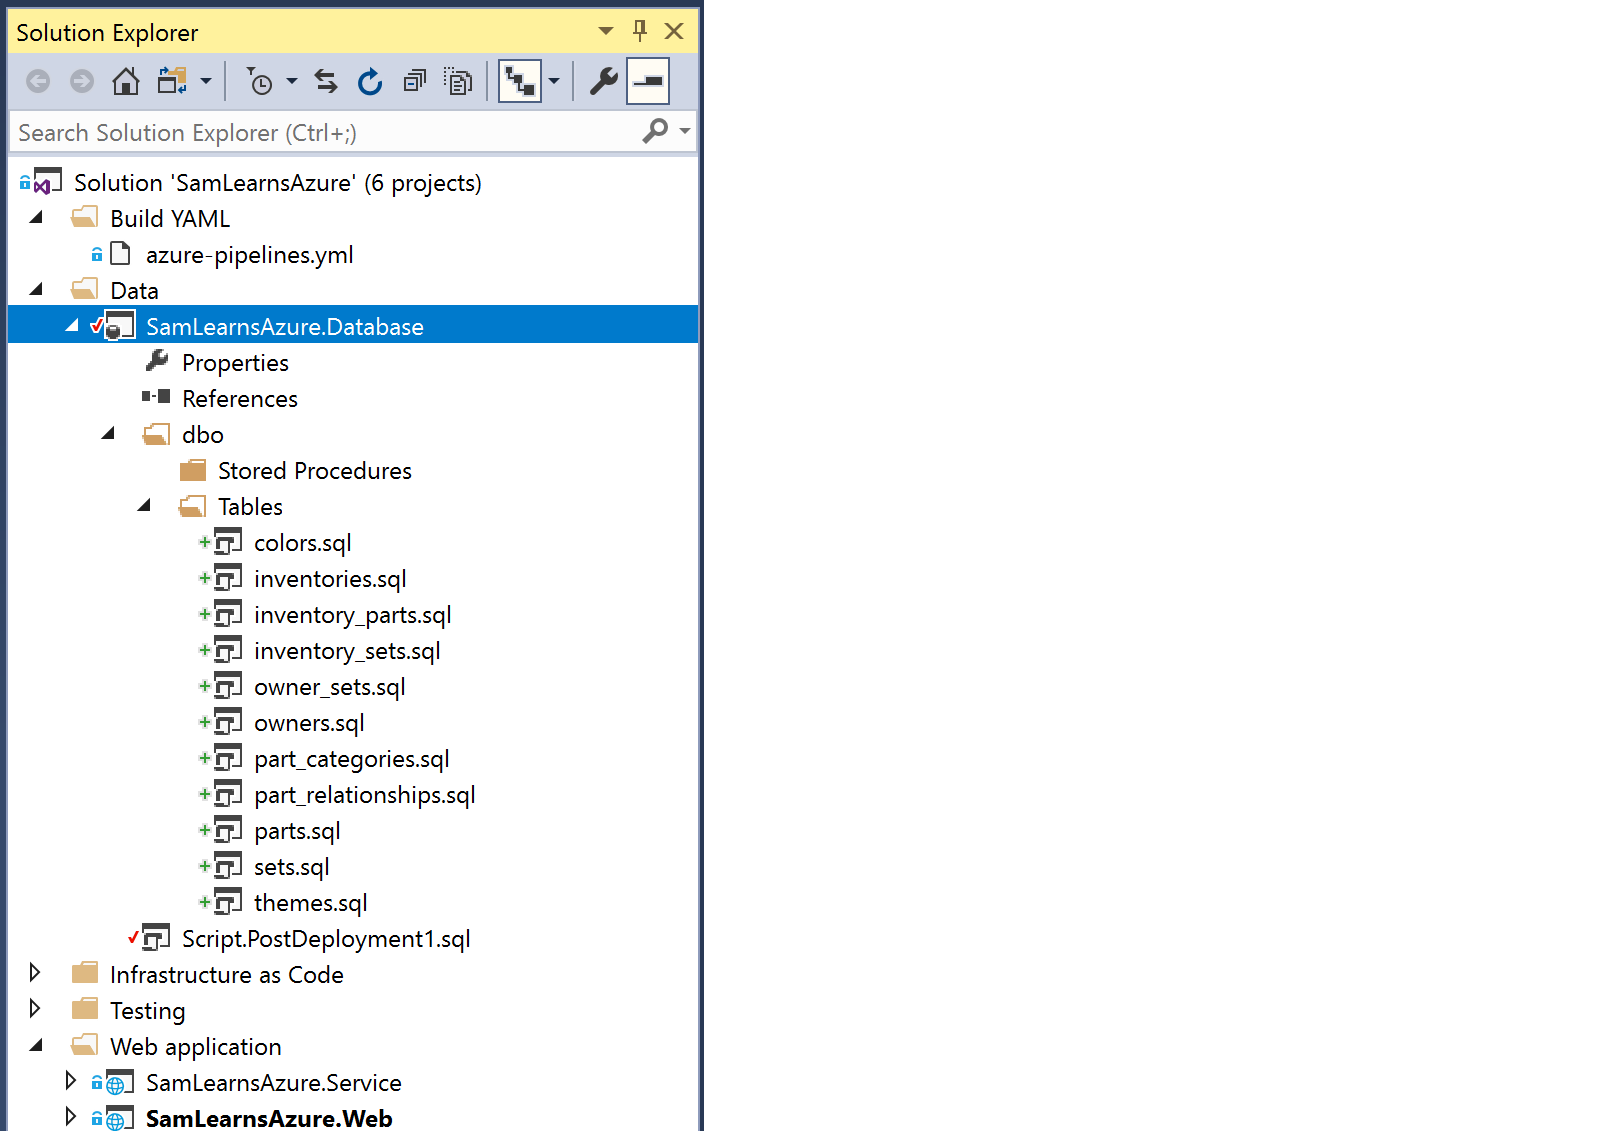
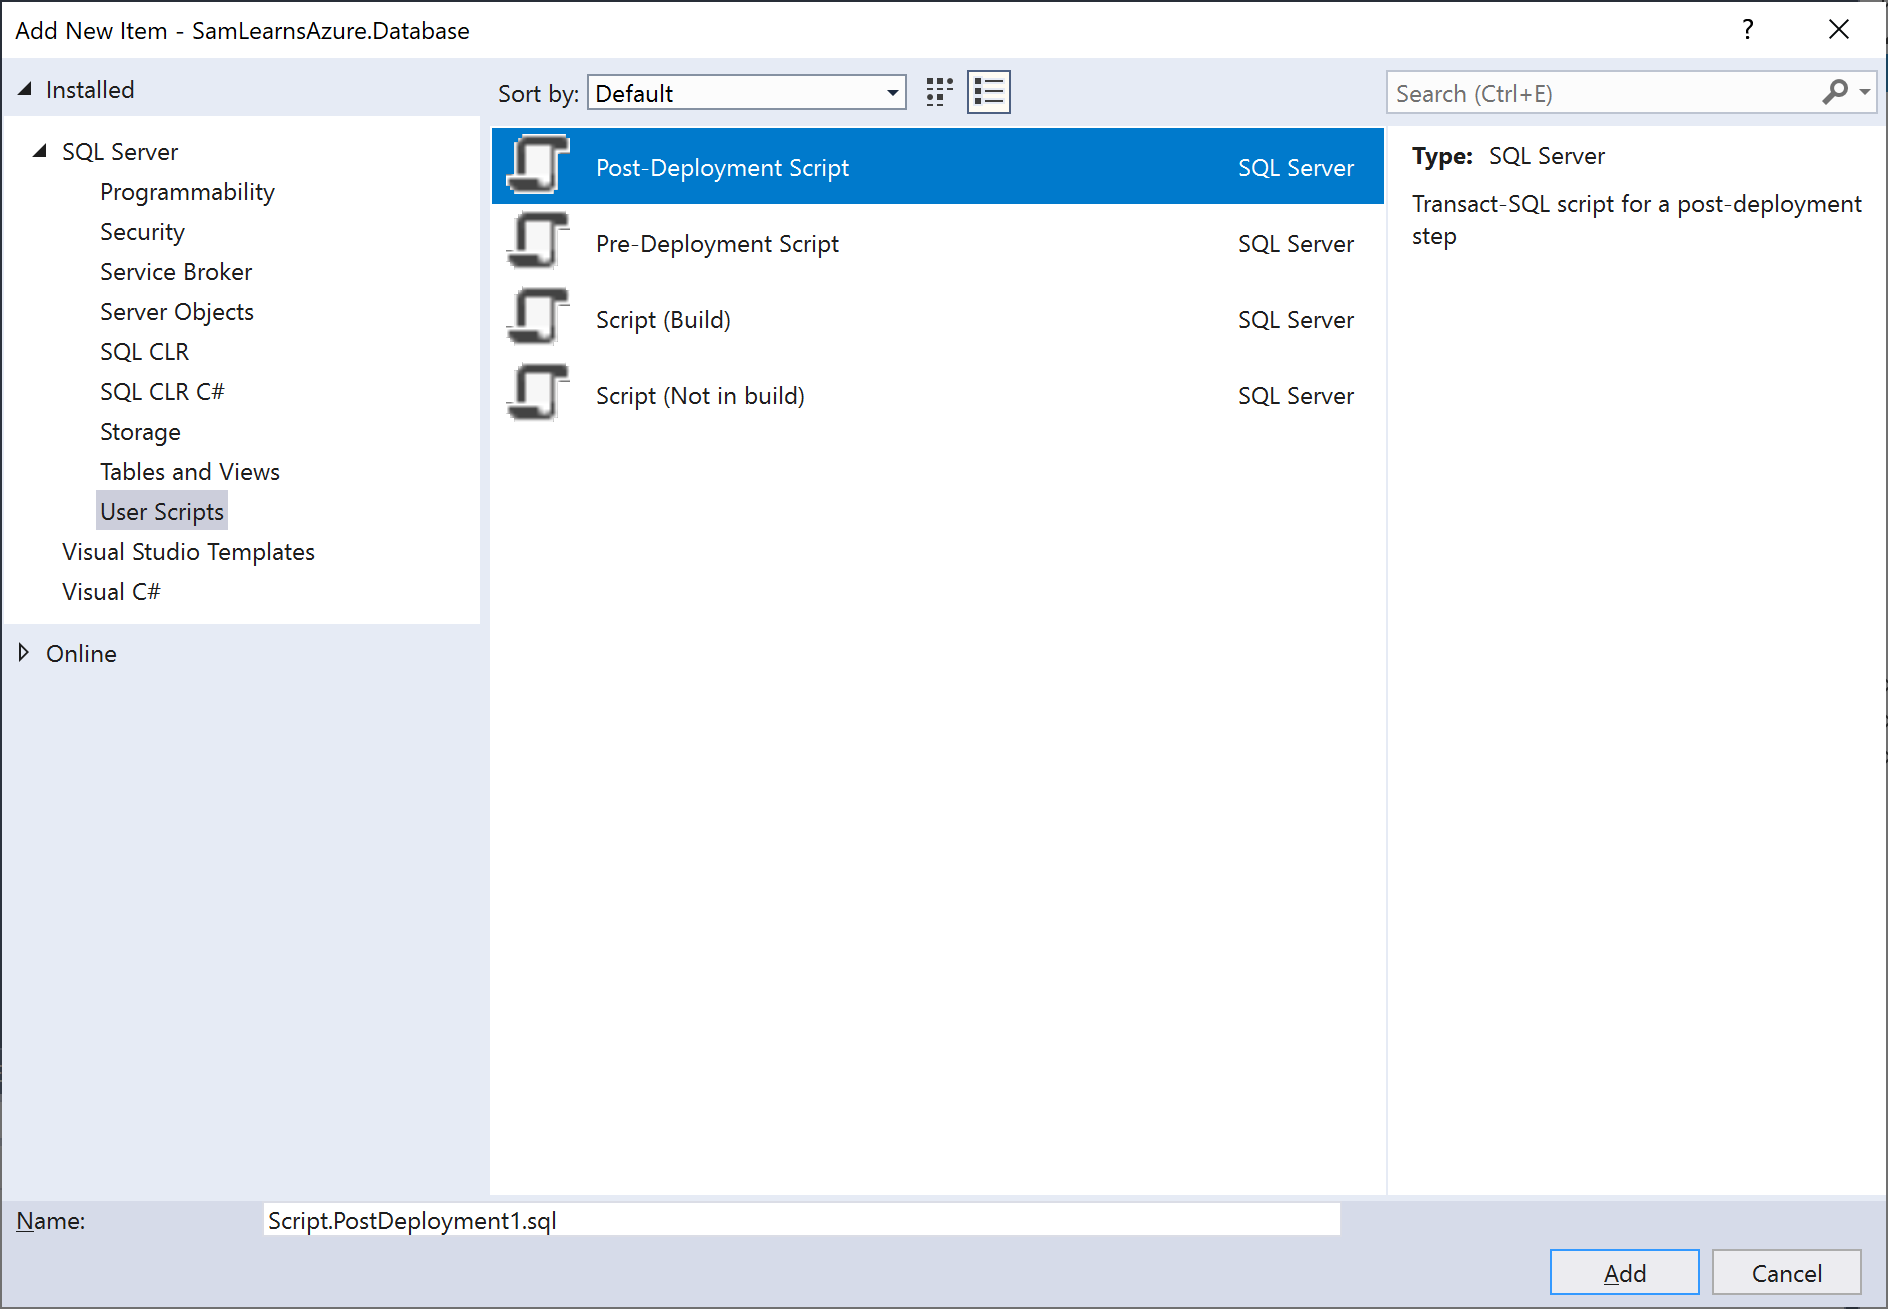
We need a post deployment script – this will run after the database schema has been updated, and is useful for setting up test data or lookup tables.
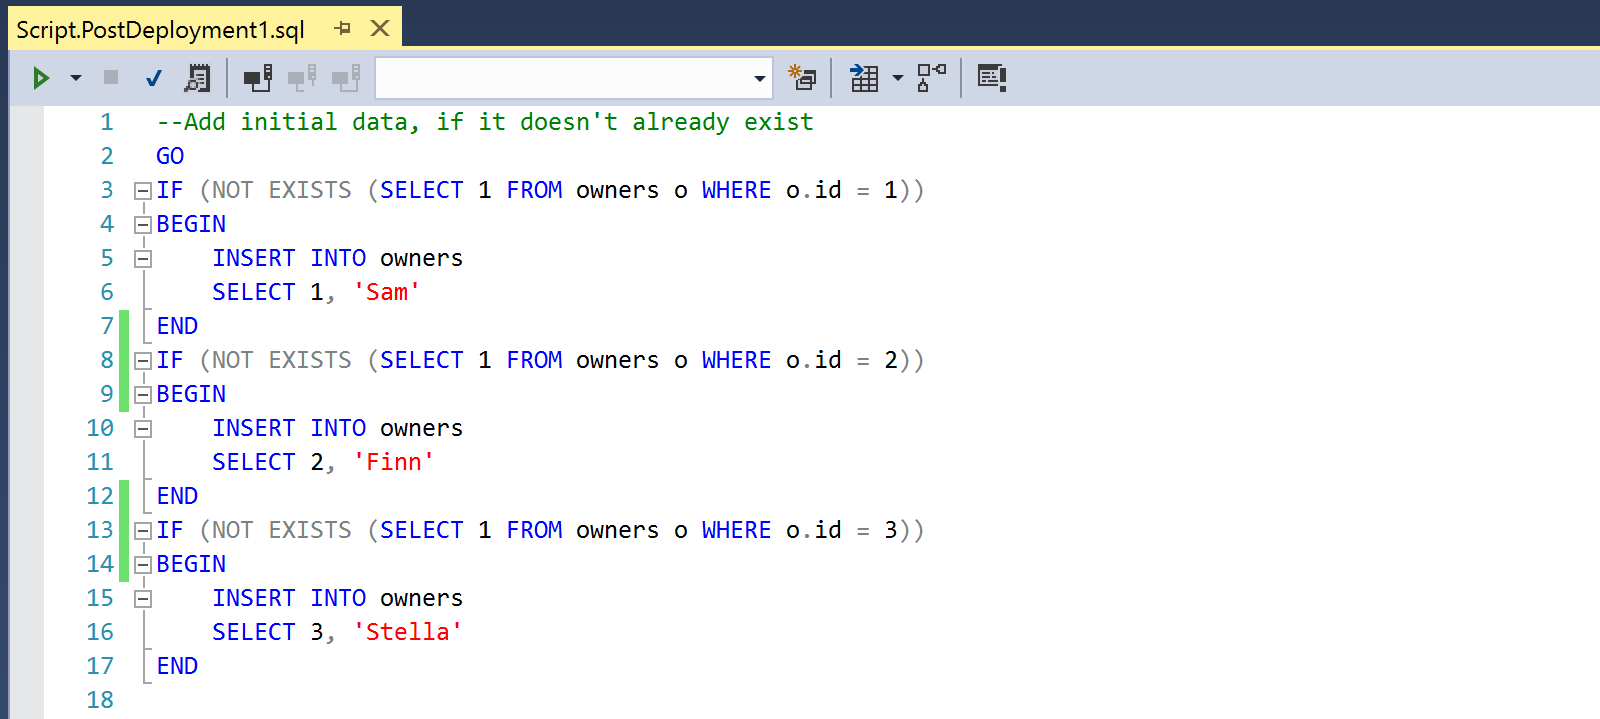
Here we are adding some very simple test data into the “owners” table, checking that the data doesn’t already exist. When we mentioned repeatable code before – this is what we meant. If the data exists (or doesn’t), the script will still be able to run successfully.
Now we can add to our YAML to build our database project to a DACPAC file. A DACPAC file is a record of the schema of the database, and any scripts that are run as part of it – this is the equivalent of right clicking on the project and publishing the database. There is no data in a DACPAC file, so they are typically pretty small, if we do need data we will use a BACPAC file – which we will talk about later. For now there are four parts of our database build, which are based on the .Net Framework. This requires separate steps from the .Net Core build tasks.
- First we need to add the 4.4.1 NuGet installer
- Second we need to run the actual NuGet restore on our database project
- Third we build our database project, using VSBuild with the .Net Framework
- Finally, we copy the database output files to a “Database” folder
With this done, we can push our changes and start a Pull Request to confirm that this all works – it does. Sort of – remember you are seeing the final product – there are often a few extra commits to tweak the files. One of the reasons we like Pull Requests and Git so much is that it isolates those changes in the Pull Request branch – these builds don’t affect anyone except the developers on that feature branch.

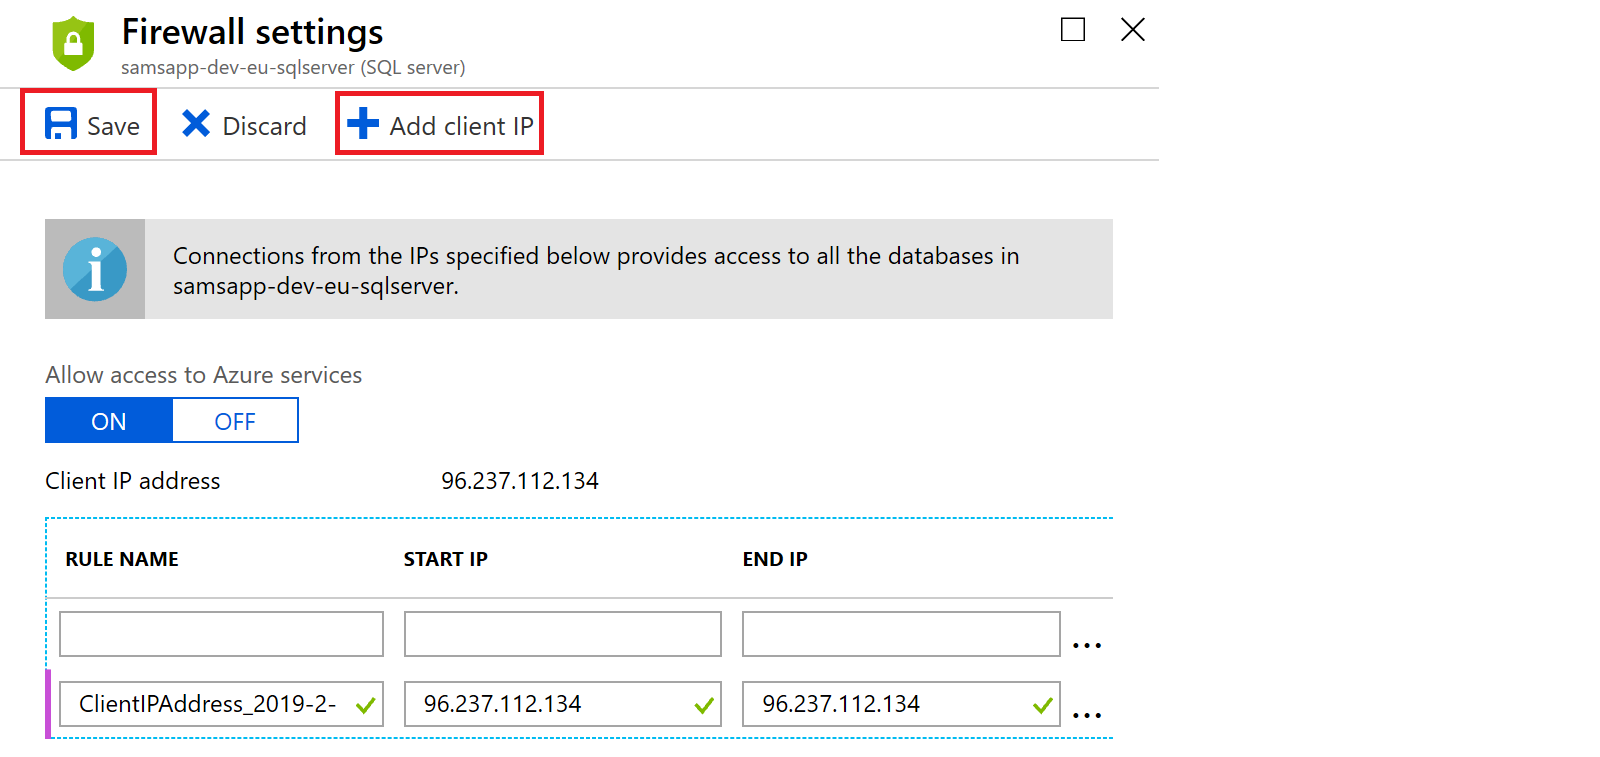
To access our database with a query engine, (we are connecting with Visual Studio, but you can use SQL Management Studio or your favorite database client), we need to open our client IP addresses on our database firewall. These client IP’s only allow access to this particular database, and helps to secure our data. In the Azure Portal, we browse to our database and click on the “set service firewall” button in the overview section.

In the “Firewall settings page”, we can add our current IP address and save it. Click the “Add client IP” button to automatically populate your client IP address, and ensure you also press the save button to commit the changes. If you physically move around, or your IP address changes regularly, you will have to regularly change this . If you are in an organization, we recommend you add the internal range(s) to streamline development.
Setting up the database release to deploy to each environment
Now we are ready to deploy the database to each of our environments. We start by adding an “Azure SQL Database Deployment” task to each environment in the release.
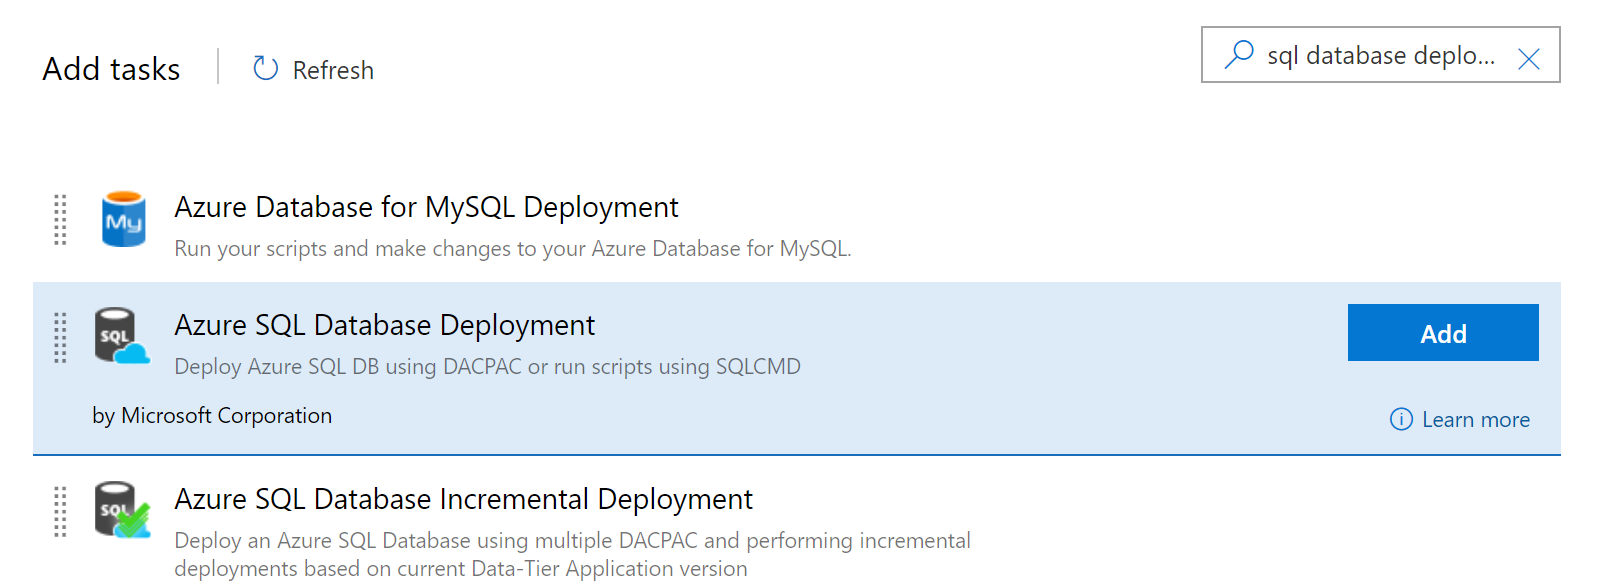
We order the deploy task to appear after the Resource Group deployment, but before we deploy the web apps. We select the correct subscription, add a new pipeline variable “DatabaseServerName” with the database server name, (remember you reference this variable with “$(DatabaseServerName)”, database name (SamsDB), the server login and password (inherited from Azure Key Vault through the Variable Groups we’ve already set up), and the DACPAC file – referencing the result of the YAML build.

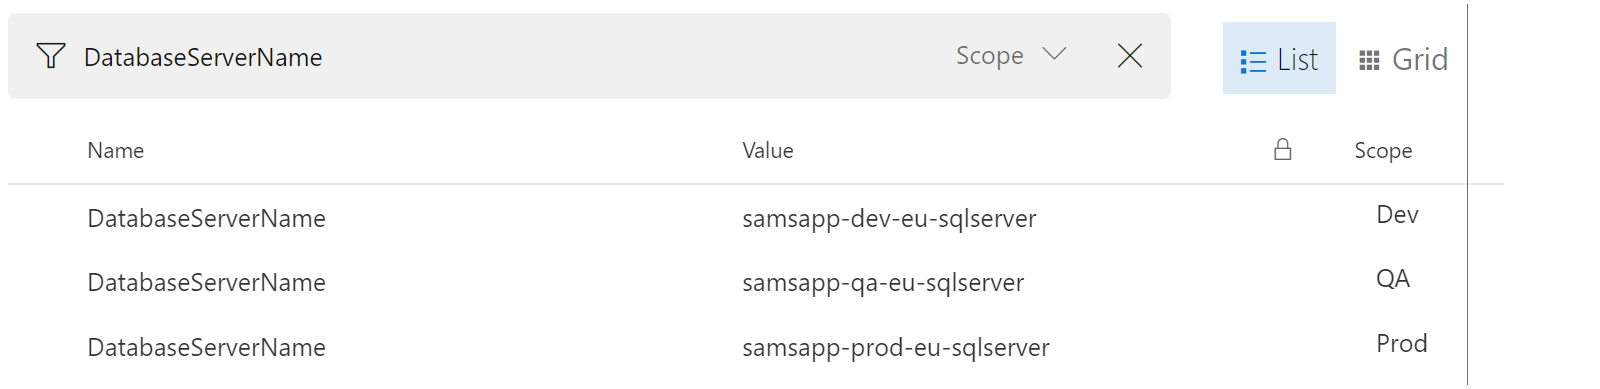
Below you can see the pipeline variables setup correctly for the server names
We complete our pull request and allow the release to successfully complete – our database is now deploying with Azure DevOps!
Adding EF Core to our web service
There are hundreds, if not thousands, of data access solutions to connect to the database and extract data, today we will use “Entity Framework Core” to return data in a repository pattern, which works well with Dependency Injection (or “DI”), to enable mock unit tests. So what is a repository pattern? A repository pattern adds an abstraction layer over the top of the data access. Anyone that needs the data can access it without needing knowledge of the database – you have probably used repository patterns before. These make our data access more reusable and testing is easier
To start, we add the “Entity Framework Core SQL Client” NuGet package, (Microsoft.EntityFrameworkCore.SqlServer), to the web service. “Entity Framework” allows us to connect our service with object-relational mapping to the SQL database. We have already added our connection string to Key Vault. We store the secret using the name “ConnectionStrings–SamsAppConnectionString”. This is translated by .NET core as “ConnectionStrings:SamsAppConnectionString”, which evaluates to the following structure in the appsettings.json file:
"ConnectionStrings": {
"SamsAppConnectionString": ""
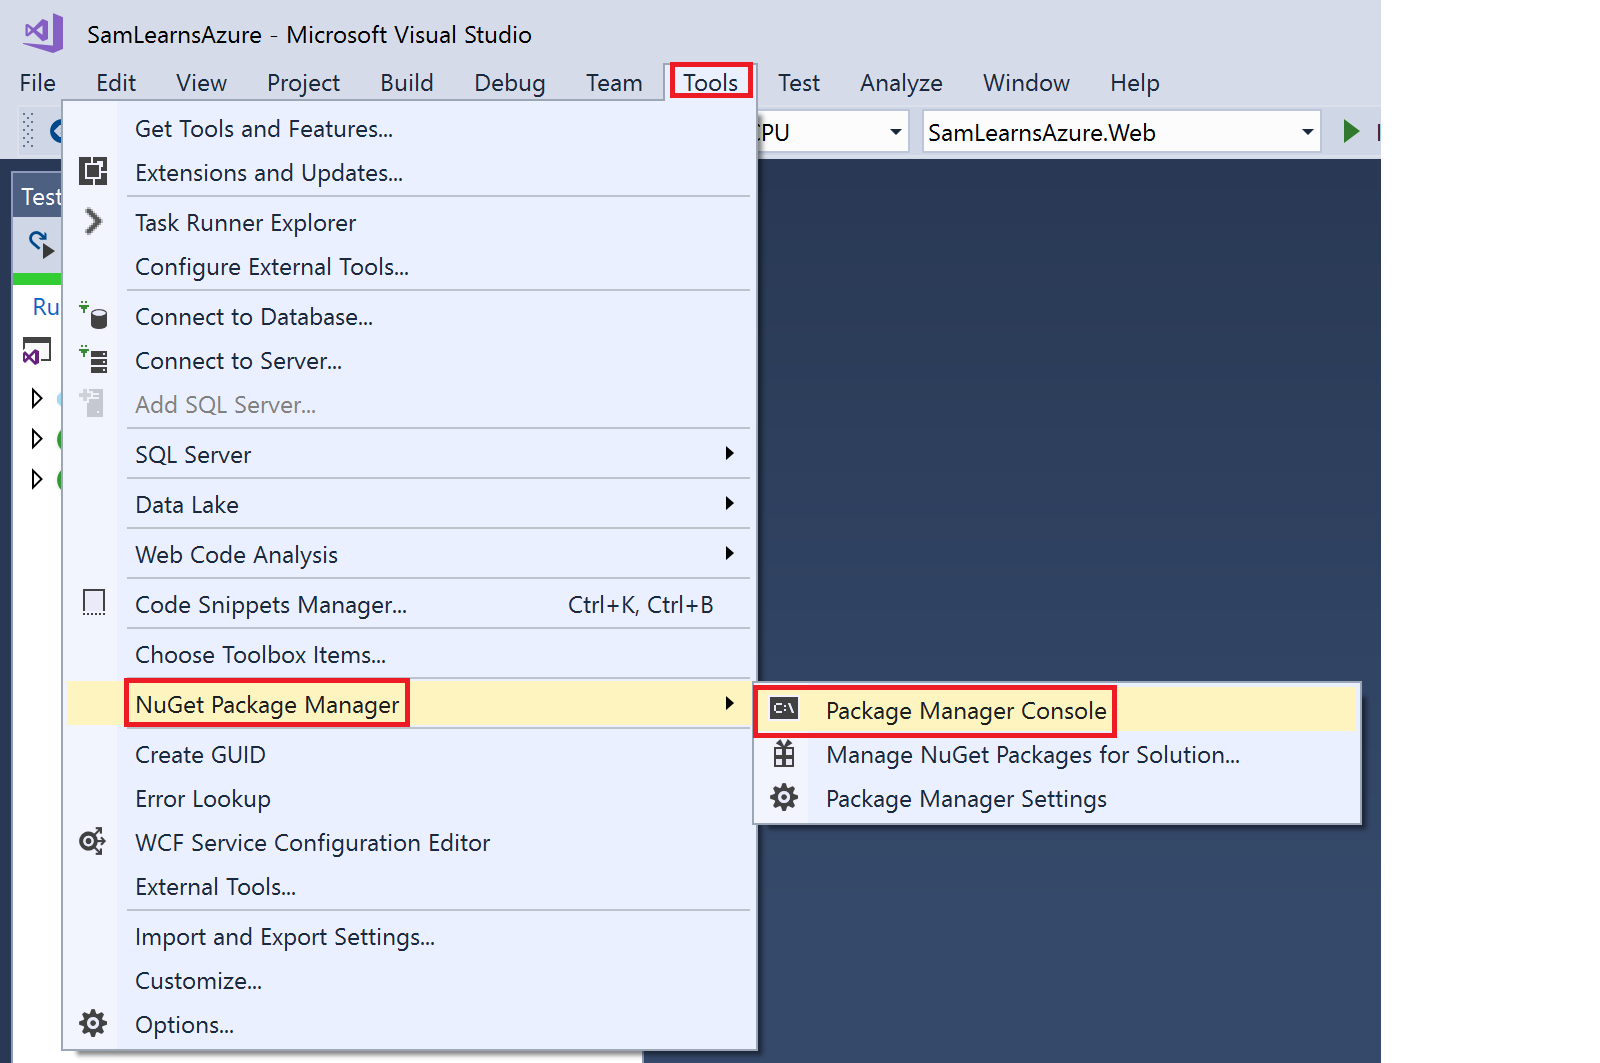
}Next we browse to this menu item in Visual Studio: Tools> NuGet Package Manager> Package Manager Console
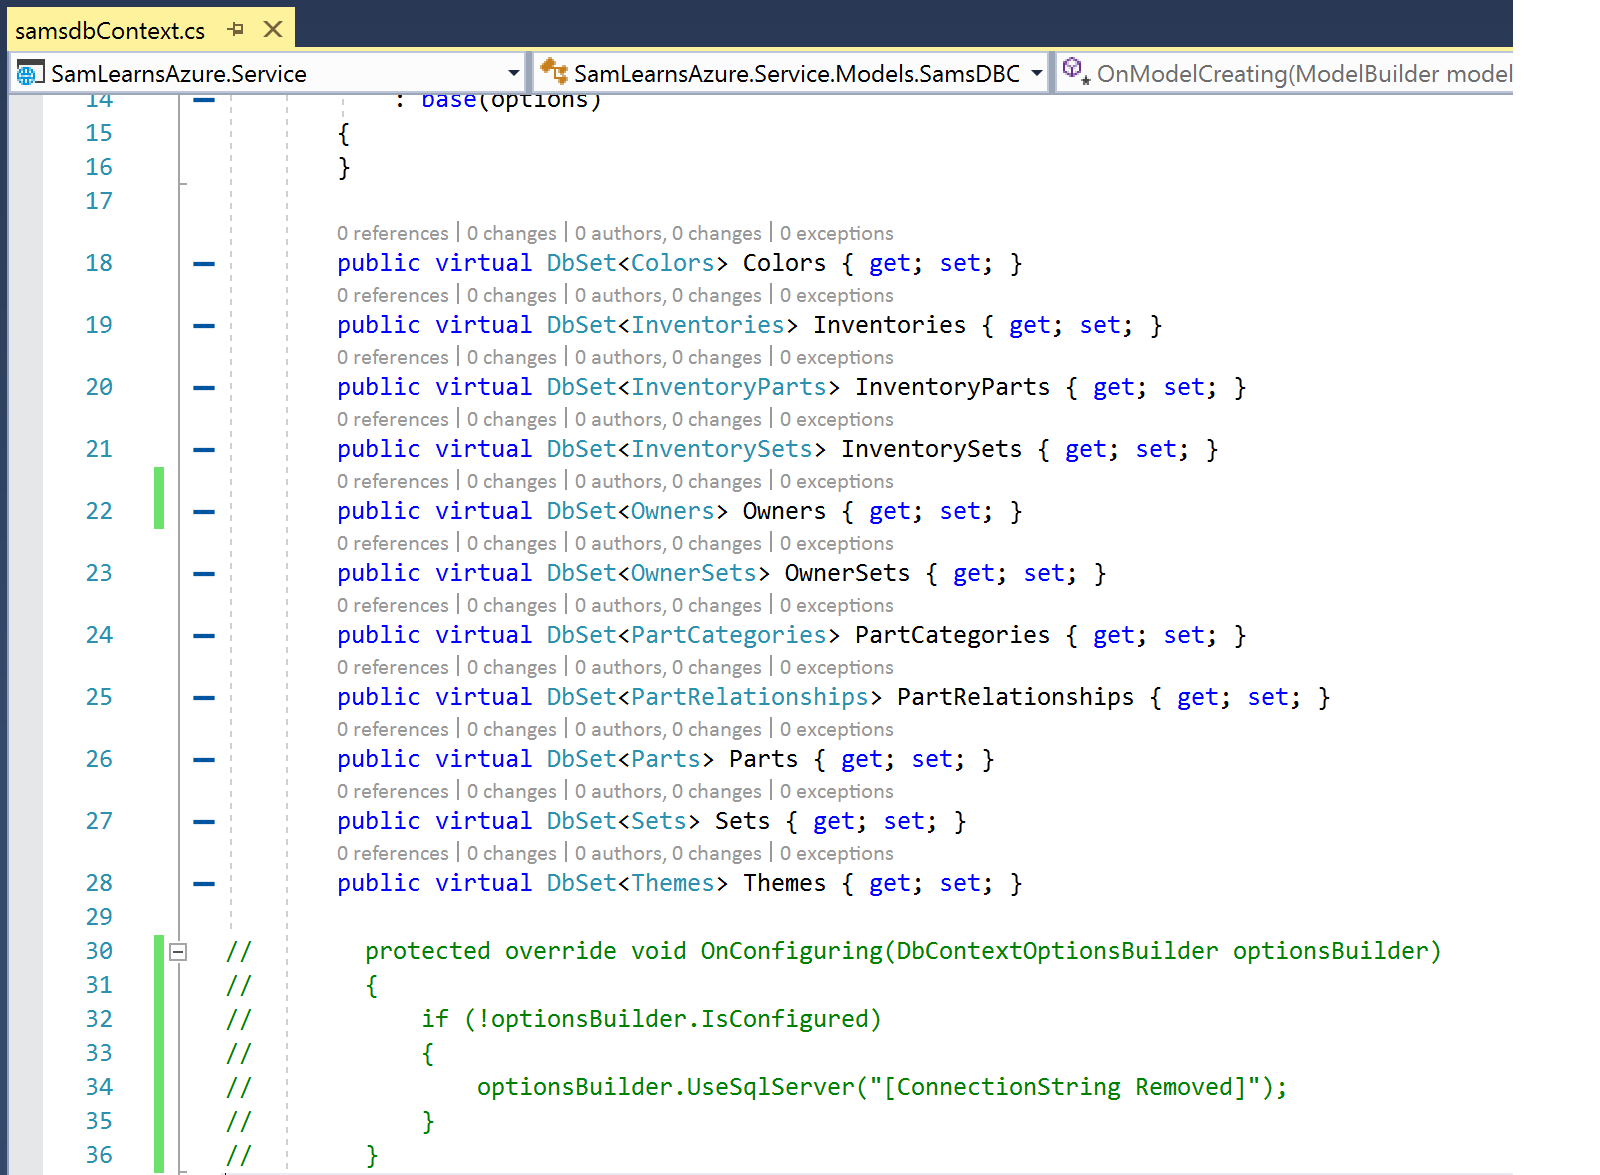
We then run this command to reverse engineer our database with EF Core into a “models” folder. Use your connection string in the area noted below. Additionally, make sure your project builds before running this step, otherwise the command won’t work. The output creates models for each of our tables, foreign keys, and a database context class with all of the mapping information in a file “samsdbcontext” – all contained in the models folder of our services project
Scaffold-DbContext "[Use your Connection String]" Microsoft.EntityFrameworkCore.SqlServer -OutputDir ModelsWe immediately rename to “SamsDBContext.cs”, to meet our coding statndards. In the code, it has embedded the connection string we used to generate it, so we browse to that (lines 30 to 36 in our screenshot), and delete the connection string. We actually don’t need the “OnConfiguring” function, so we comment out the entire function, as shown below. We are going to move this commented functionality into “startup.cs” later.
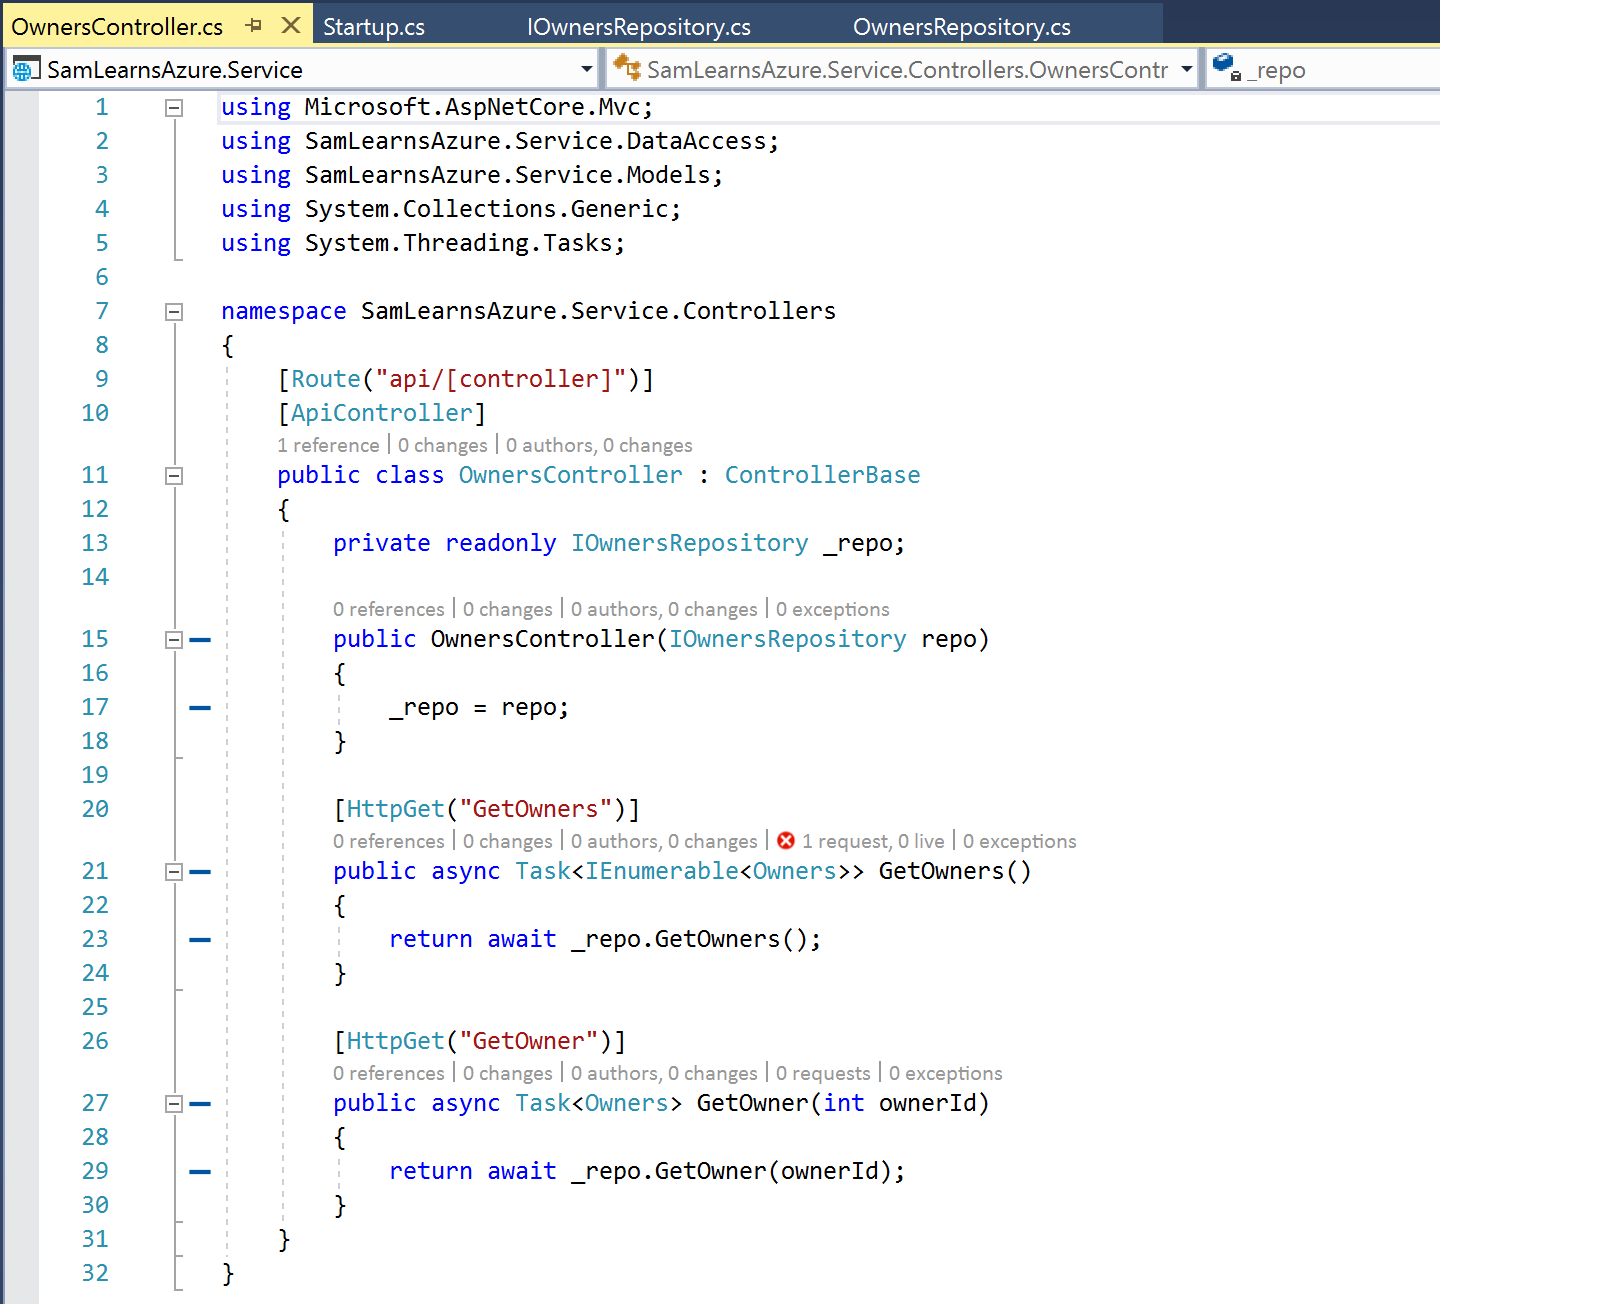
Next we need to add repositories, with matching interfaces we inherit from to enable DI. Let’s review a simple version, for owners. The interface is straight forward, showing two functions, one to get a list of all owners, the other to get just one owner with an “ownerid” identity.

In the owners repository, we write the entity framework code to get a list of owners and a single owner, based on the ID passed in. For “GetOwners”, we also add a sorting mechanism. For “GetOwner”, we have the “where” statement to filter our data to just (hopefully) one record.

Next we create the controller, exposing two functions to public API calls, calling each of the respective functions in the owners repository. Note that the constructor (line 15), also initializes the repository interface – this is dependency injection!
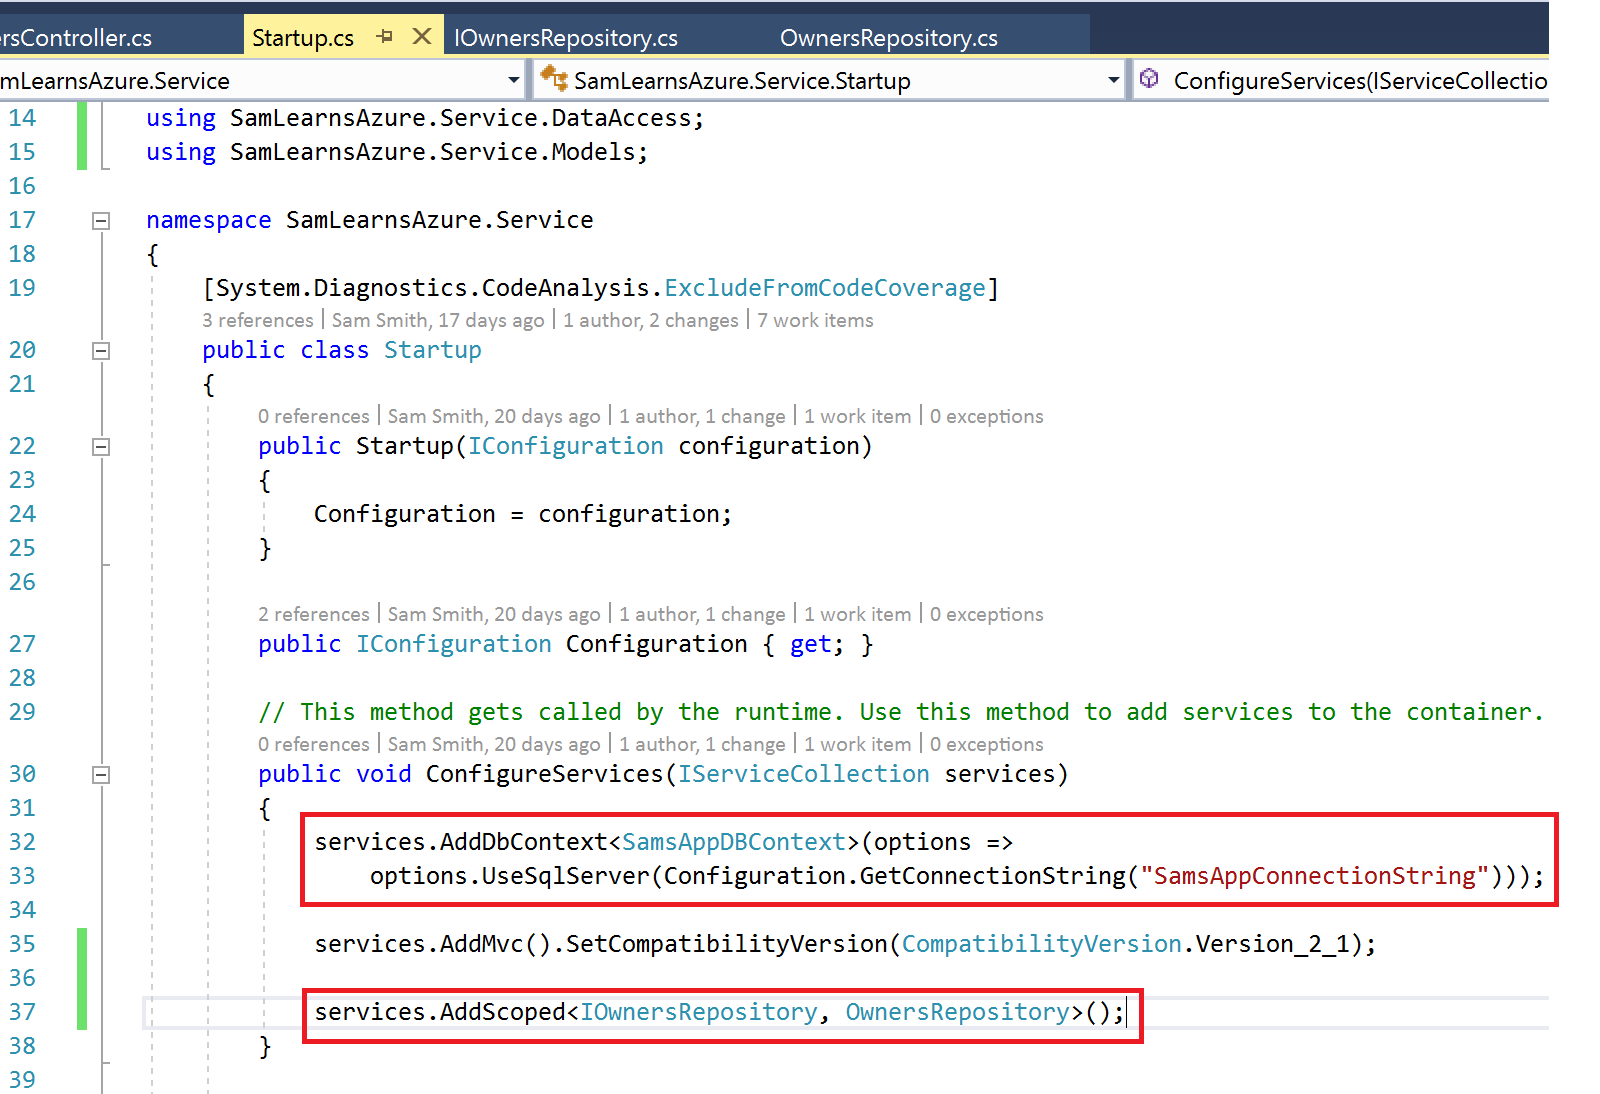
In out web service “Startup.cs” file, we add a configuration line to set the connection string for the “SamsDBContext” file using the configuration populated earlier by Azure Key Vault. This is the replacement code to “OnConfiguring” we deleted from our “SamsDBContext” earlier.
services.AddDbContext<SamsDBContext>(options => options.UseSqlServer(Configuration.GetConnectionString("SamsAppConnectionString")));We initialize dependency injection on the Owners repository, we need the following code – this creates a reference to Owners that will be available for our requests.
services.AddScoped<IOwnersRepository, OwnersRepository>();The final Startup.cs file looks like this:
That is all we need. When we run the service and browse to the api/owners/getowners path, we see the following result, confirming that our database is being successfully called:

Adding integration and unit tests
With this result, we turn to our tests. Starting with our Unit Tests, we need to write a class to initialize all of our unit tests that hit the SamsAppDBContext.

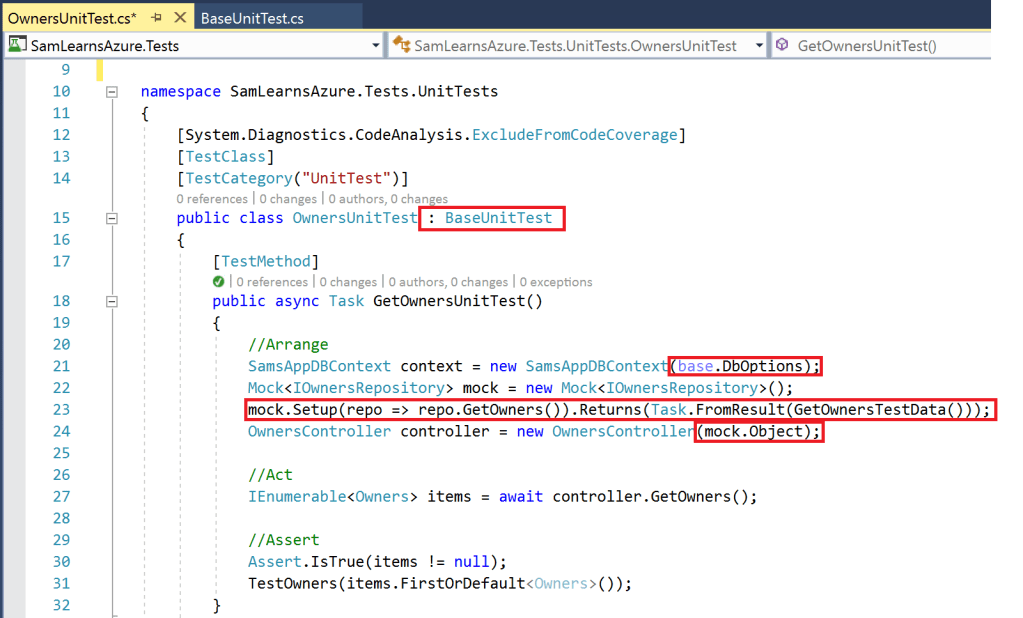
In our actual Unit Test, you can see the class is inheriting the “BaseUnitTest” to initialize the “DBOptions” variable. Then we use Mock on our “IOwnersRepository”, and then on line 23 is the hard stuff. We setup the mock to call GetOwners() in the repository, but return our “OwnersTestData” instead of going to the database. Note that we pass the “mock.Object” to the controller – which it uses to return our test data, rather than data from the database. We run the test and note that it runs in 7ms. That is not a typo – that is nice and fast.
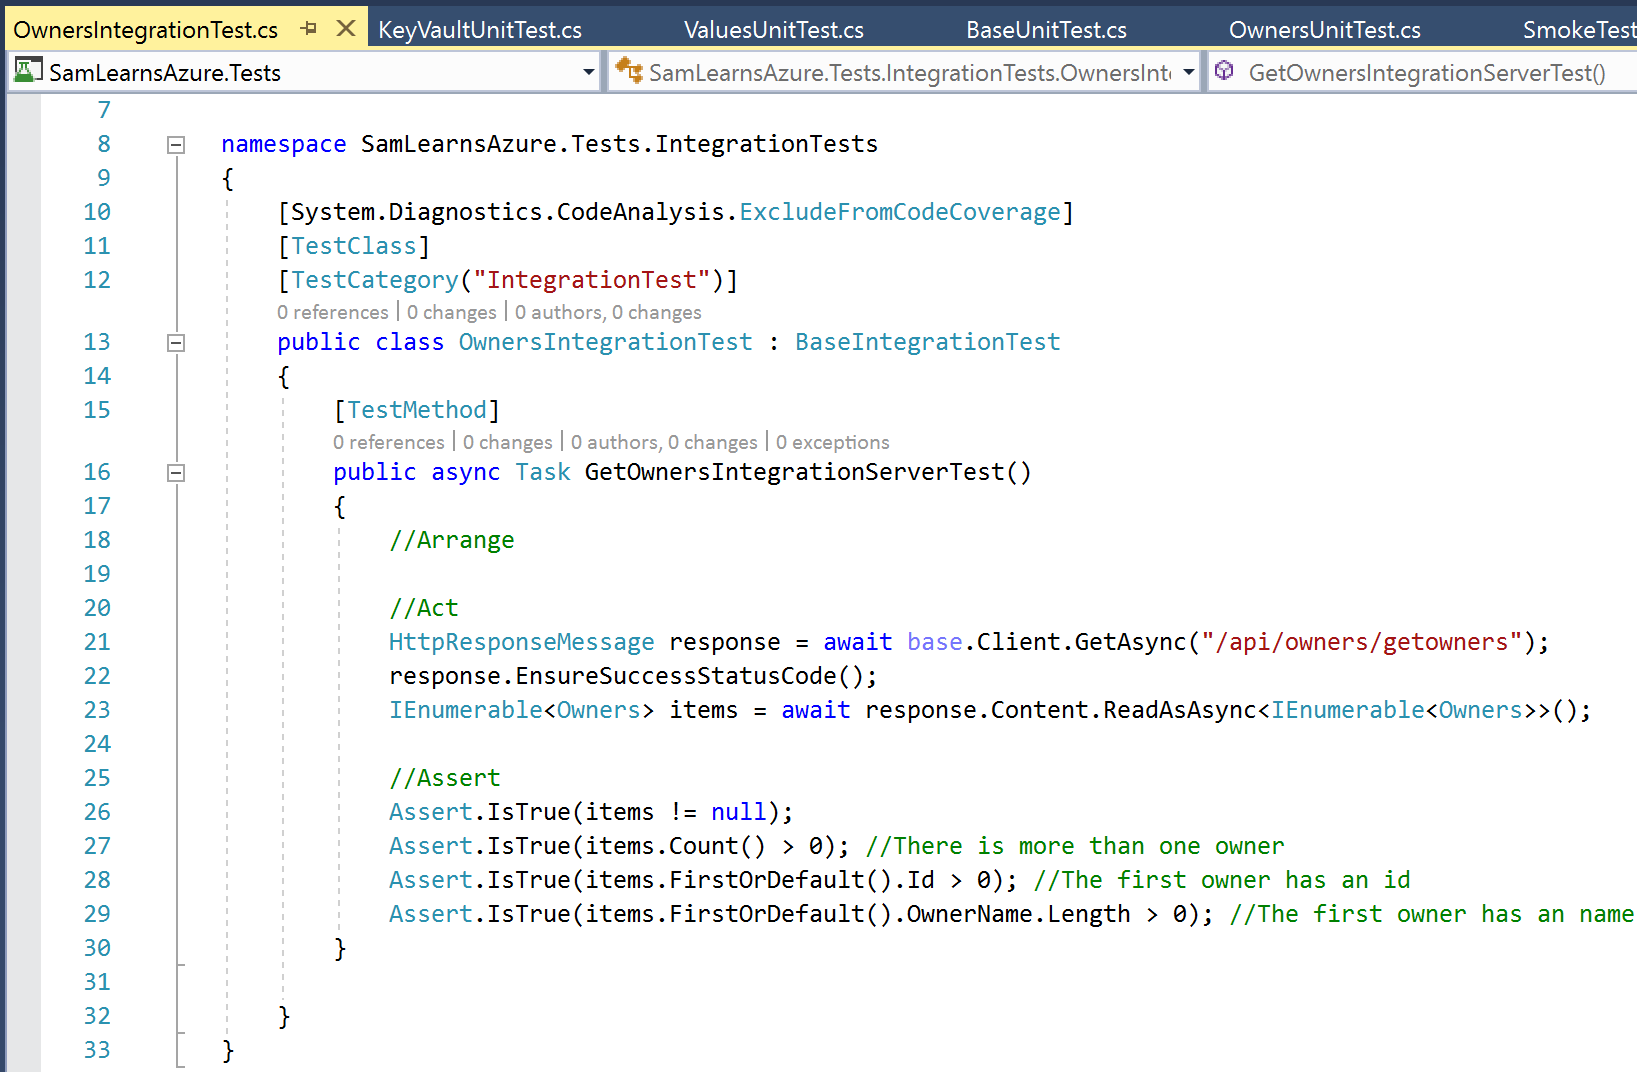
For the integration test, we inherit from the “BaseIntegrationTest” class we wrote earlier, following the same pattern we used in our testing post to call get owners and process the data. Our asserts are still very simple at this stage – we are really just verifying that some data – any date is being returned. We think it’s better to take this approach early on – it’s tempting to write integration tests that check real data, for example, “Owner 1 is Sam”. The problem is that over time, data changes, and you will find that tests will often fail and distract you – if you are busy, suddenly you’ll have 50 or 100 tests that are failing, which will overwhelm you, and suddenly we aren’t practicing Agile anymore. This is really common, but you can prevent it, by working smart now, rather than hard later.
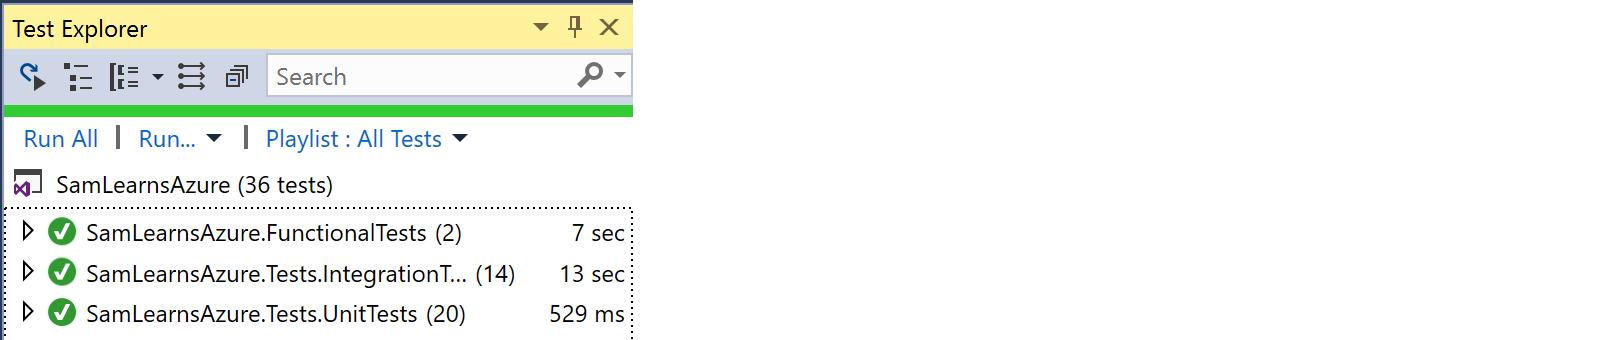
We flesh out the rest of the integration and unit tests to cover as much code as possible. We need to add some more smoke tests, but we will do this later. We commit our code and complete the pull request when it’s successful. Not that our 20 unit tests are running in about half a second, where as our 14 integration tests need nearly 15 seconds. This is the test pyramid at work again.
Restoring our databases on each deployment
As we deploy changes to production, we need to verify, with confidence, that our database updates will deploy without errors. We can achieved this by reloading the latest version of our production database to Dev and QA. In the past, this was a time consuming manual process, but with automation, it’s much easier. The more deployments we complete on a production copy of the database, the more confident we will be that this will work when it’s time to actually push to production. Note that if the Production database is particularly large, we may want to edit this process to run periodically, (e.g. daily or weekly), in a separate release pipeline. Keeping our DevOps pipeline quick and agile is a key goal, so we need to ensure our cycle time from checking in code to deployment stays in minutes, and not hours. We have three environments, let’s spend a minute to review their individual goals:
- Dev is our integration, our canary, (early warning), environment where we make sure that our code compiles, merges with the master branch without issues and deploys correctly. If this breaks, the only people that are affected are us – the developers, so the impact is low.
- QA is where our project is verified with more comprehensive tests. QA is identical in size, (but a much smaller scale), than production, and is where our load tests reside. Often this is where our stakeholders and QA testers focus on testing features before they are released to production.
- Production is where all of our end users live, and our application needs to the most stable.
To accomplish this reloading task, we would like to use the “Azure SQL Database Restore” task – however, there is a restriction, the task only allows us to restore to the same server, so this task will not work, (but we did log a feature request!)

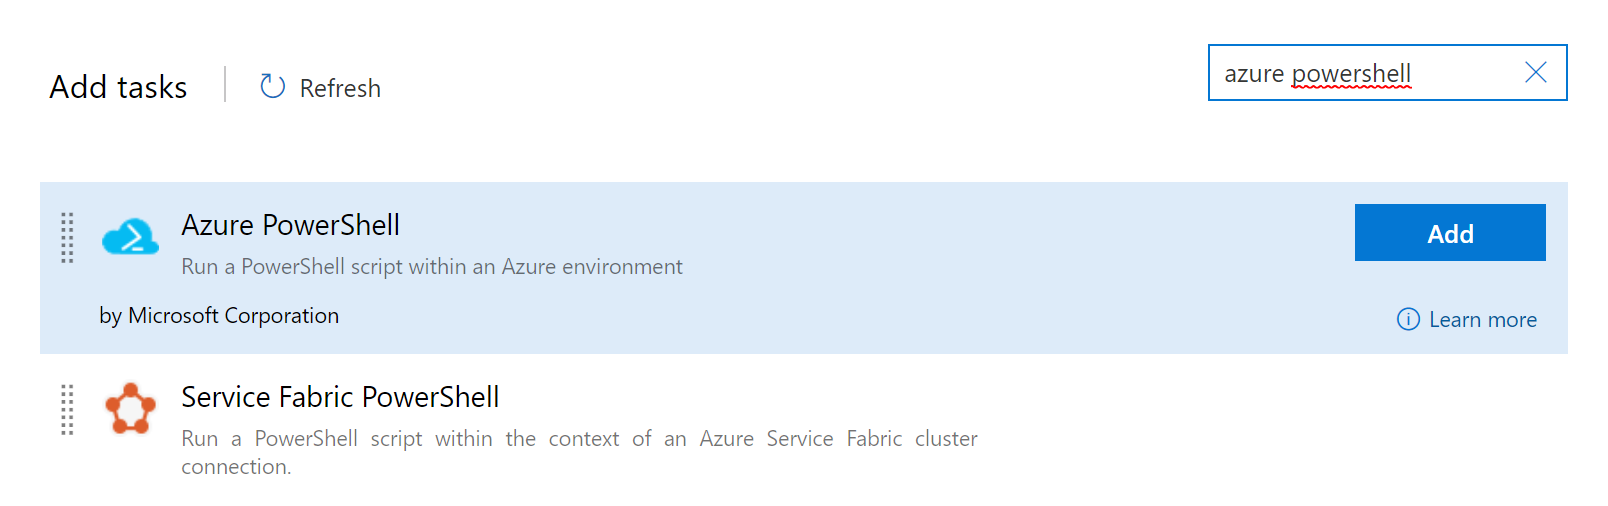
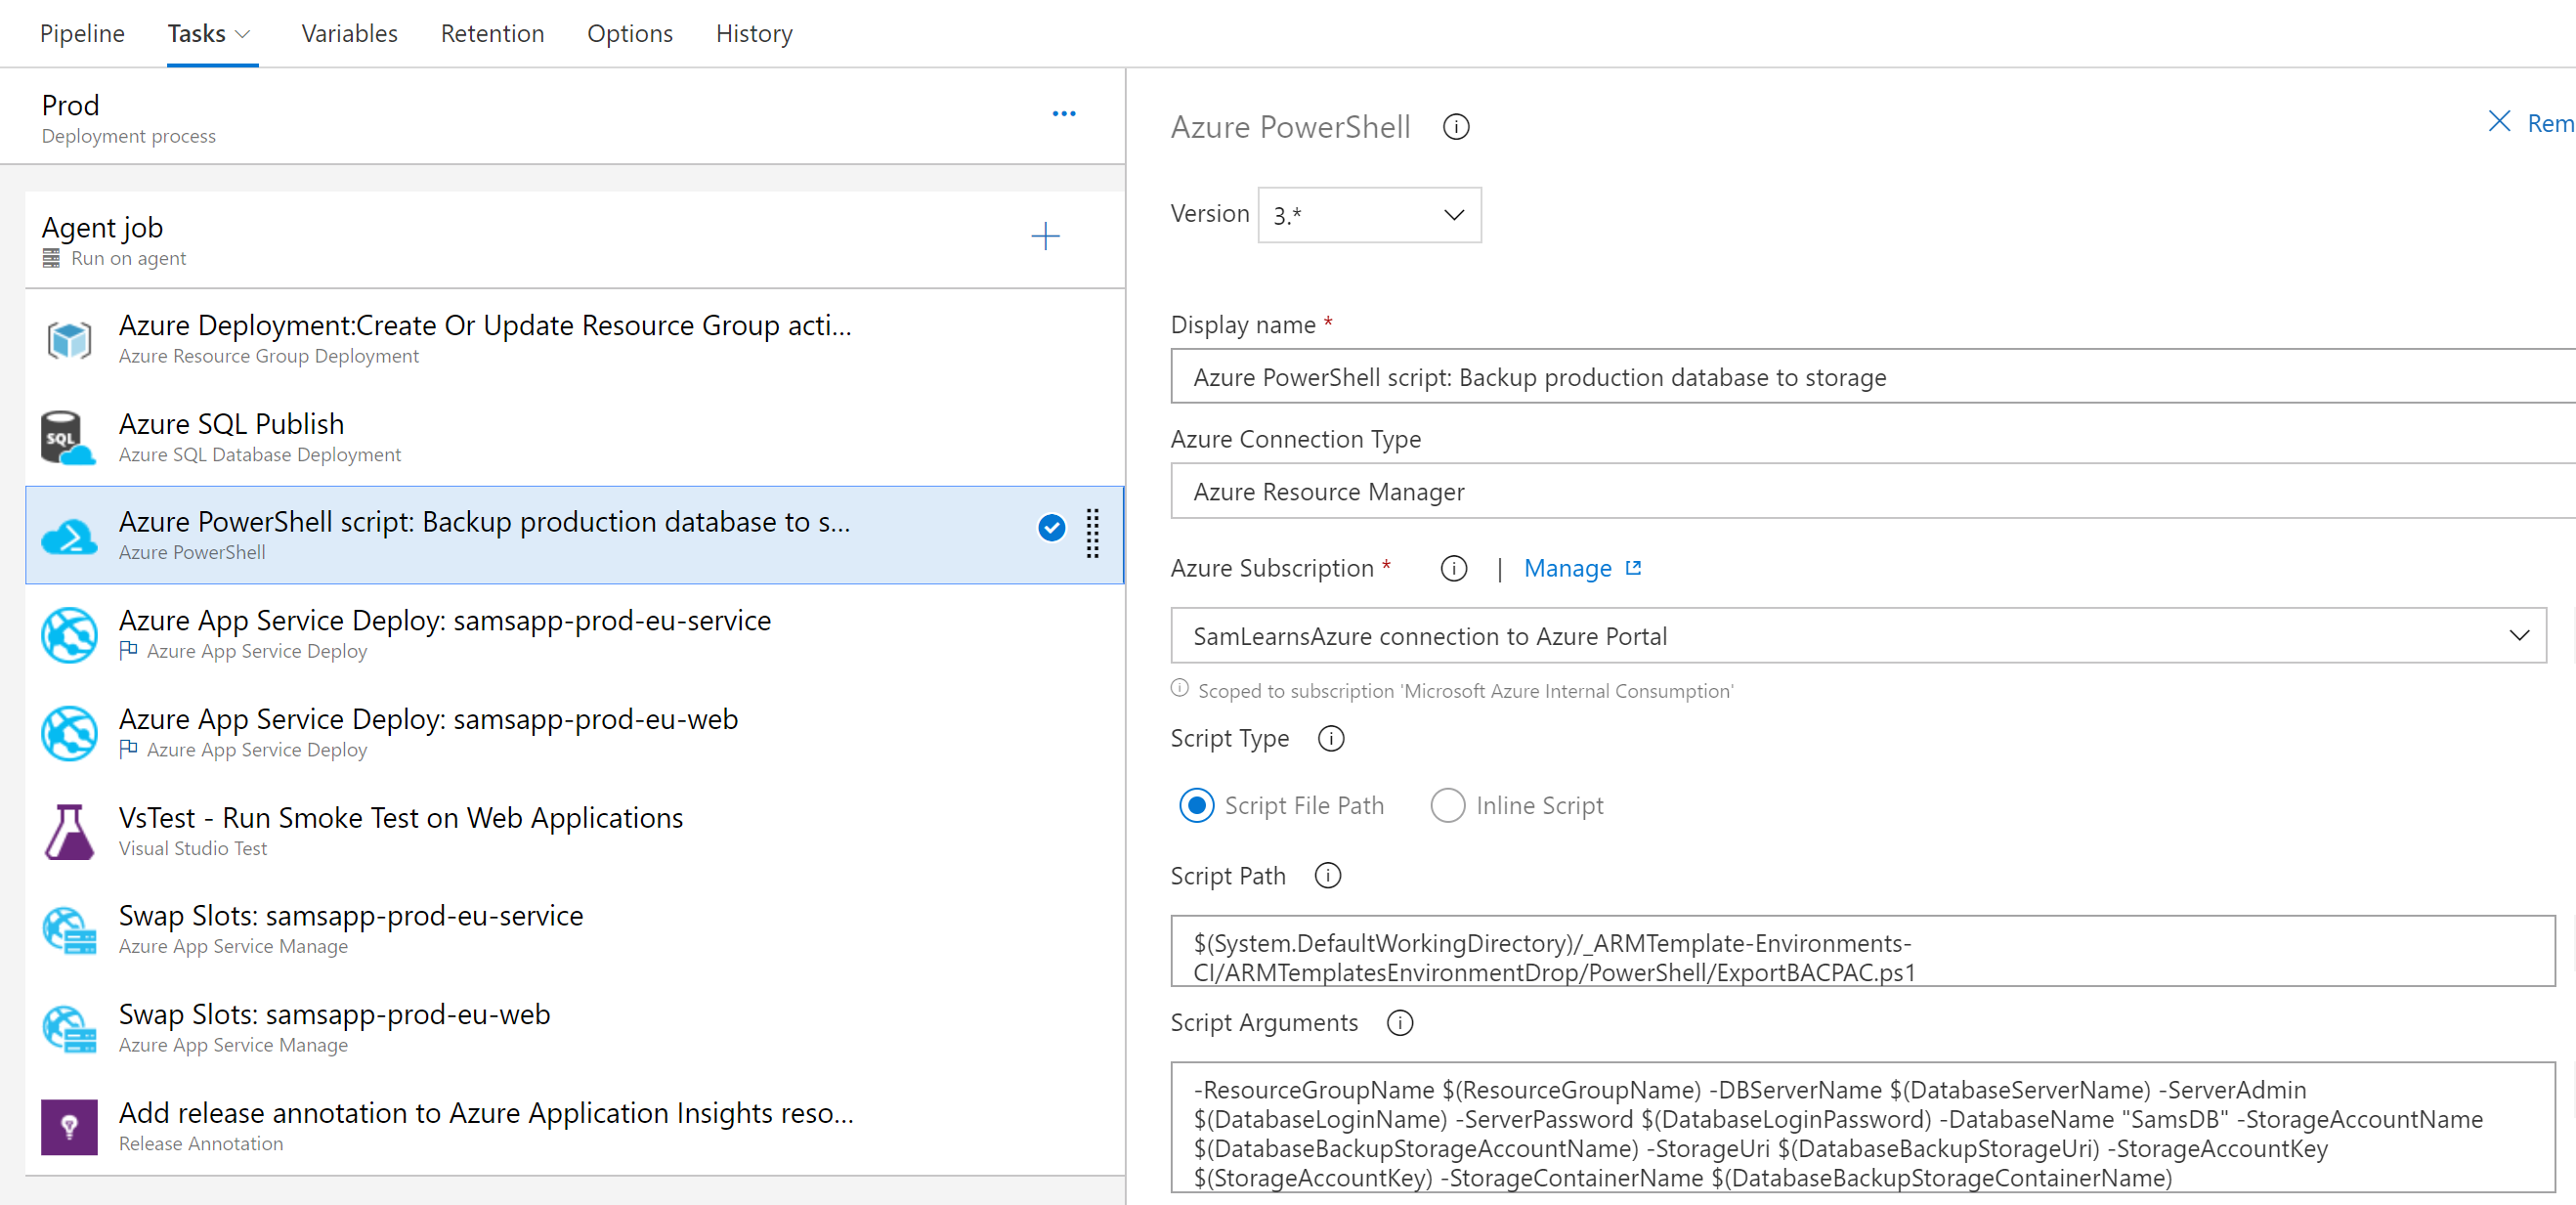
Instead, we will use a custom PowerShell script we wrote, and load the database with a couple tasks. In each of our environments we need to add the “Azure PowerShell” task.
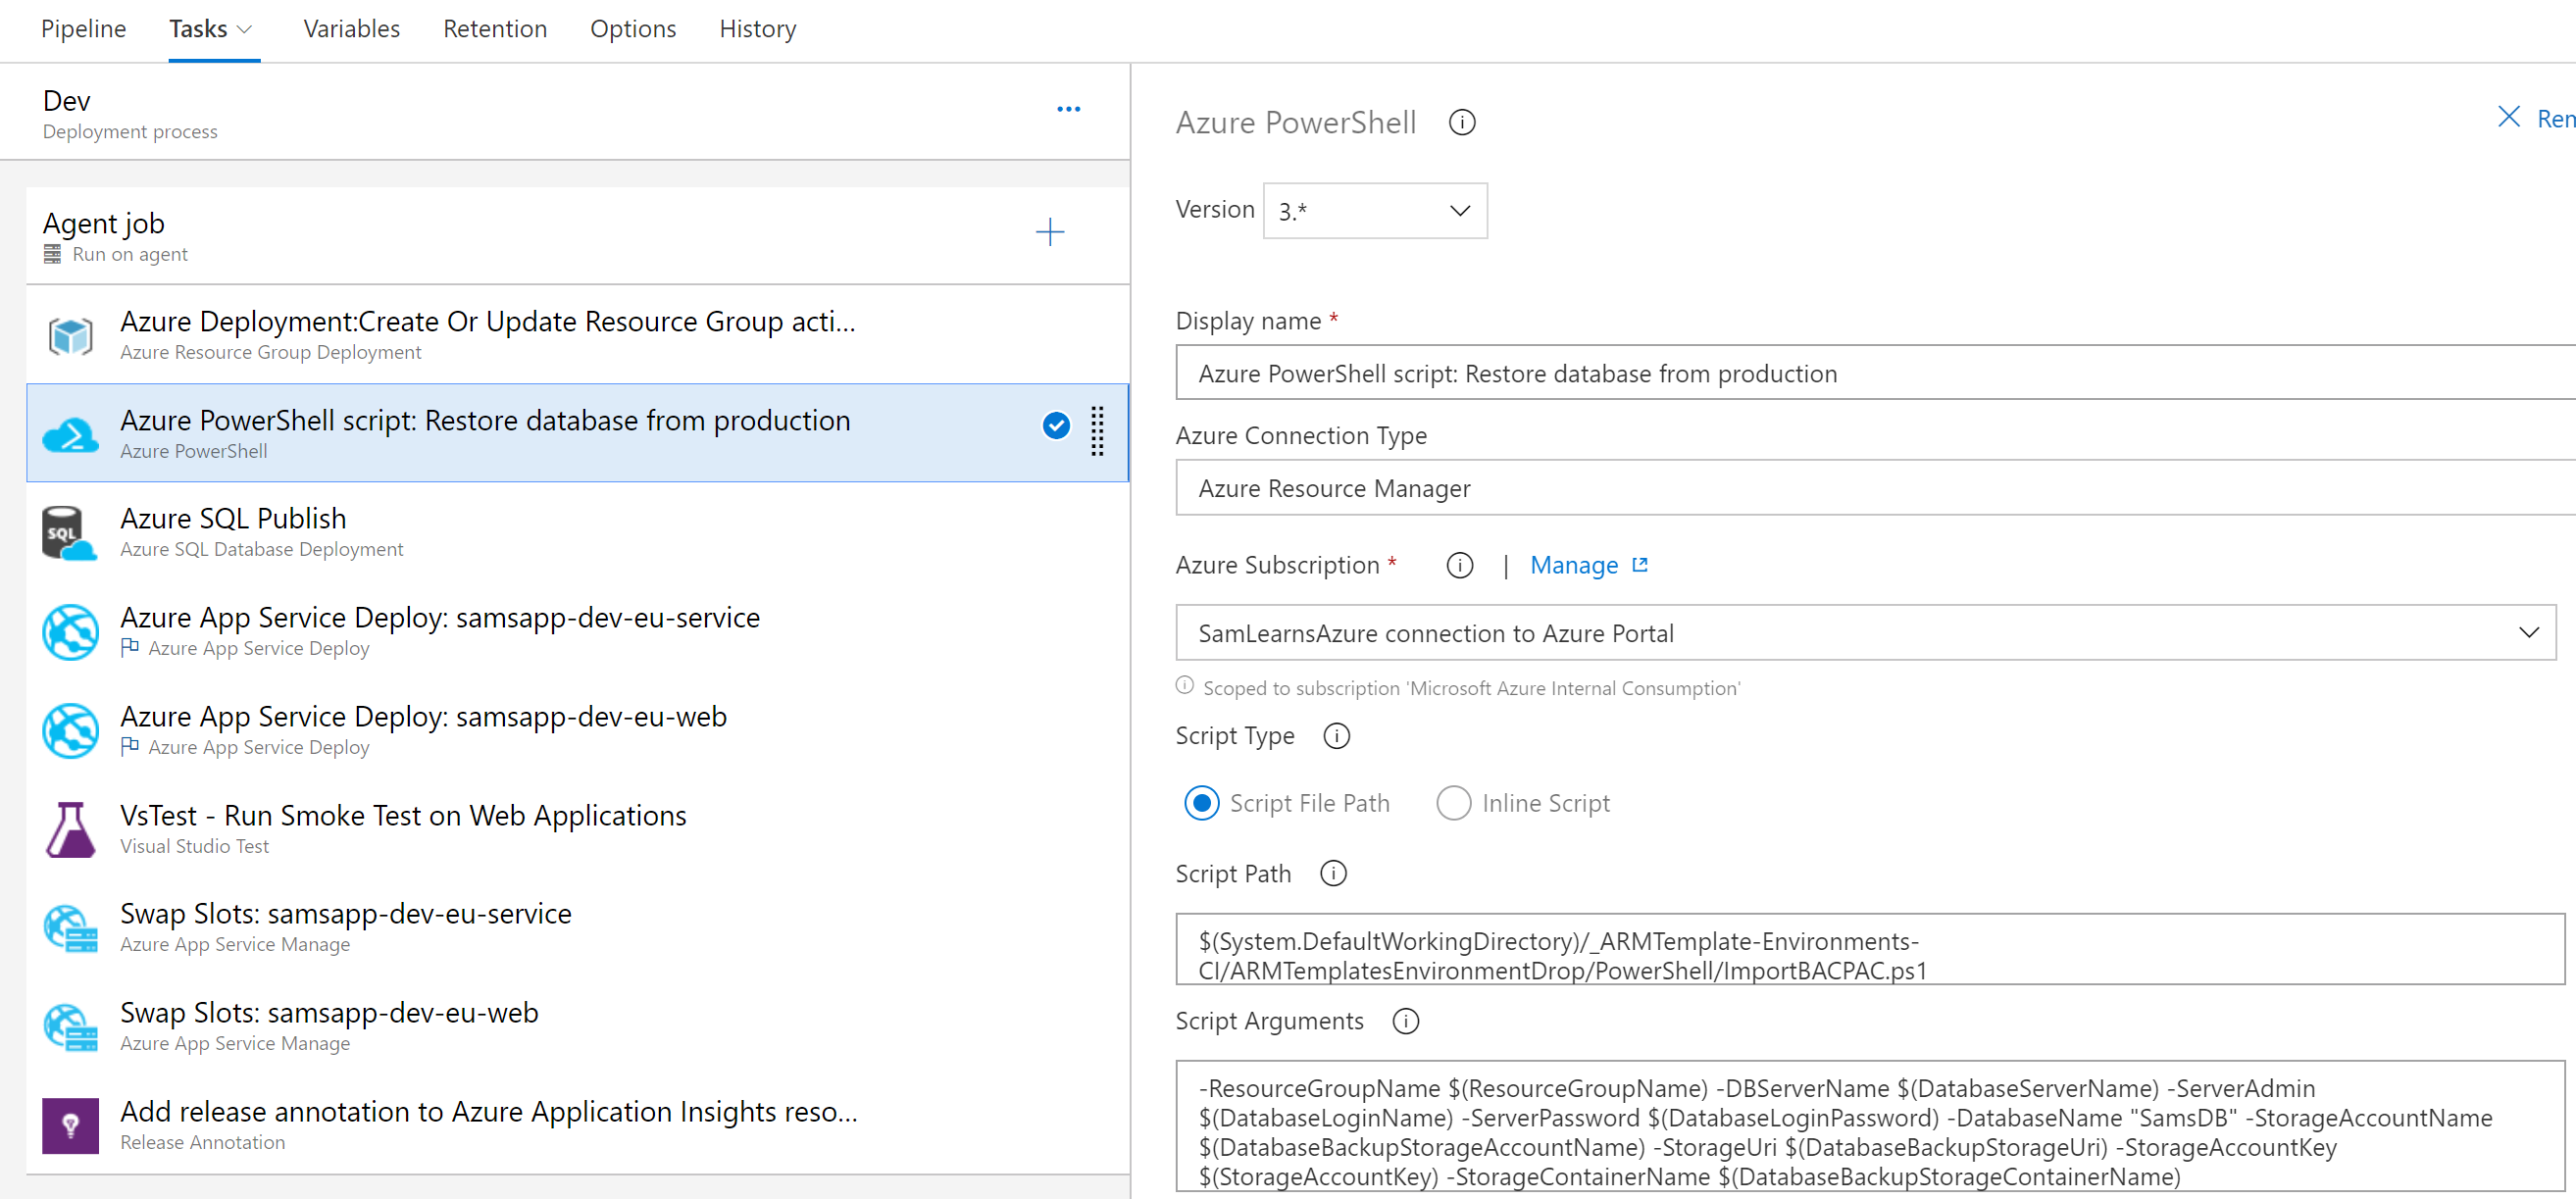
In the Dev and QA environment, we are only going to load the database BACPAC file, exported from production. The BACPAC file contains all schema and data information. In the import PowerShell task, we only need to specify the subscription, and then pass in the information we need to connect to the storage (we are using the production storage, but any will work – note that the storage key will be in Key Vault, but the other variables will be regular Pipeline Variables), and then the Dev/QA database details. Note that our PowerShell task is after we deploy the ARM Templates to the resource group, but before we publish our database changes. Reading from the blob, it creates the new database, so if the database already exists, it will be deleted first. This is designed for restoring Dev/QA environments, not production environments
Then in the production environment, we are going to export our production database to a BACPAC, in the production Azure Storage. This requires a storage blob. If the storage blob doesn’t exist, it will attempt to create it for you, before exporting the database to the blob
Similar to the import task, we implement the export PowerShell in Azure DevOps, specifying the subscription, and then pass in the information we need to connect to the storage (we are using the production storage, but any will work – note that the storage key will be in Key Vault, but the other variables will be regular Pipeline Variables), and then the Production database details we are exporting from. Note the position of the PowerShell task, right after the database publish, so that we backup the latest version of the database.
On our first release we need to disable the PowerShell in the dev and qa environments – as there is nothing to restore. After the release finishes, we start a second release, and with the database backed up from the previous release, the dev and qa restores work great. With one more branch, we add the final smoke tests to get owners from the API, and can confirm when we release that each environment can connect to the database and that the service is functioning correctly.
Wrapup
Today we setup our database, created our data access classes, added automated testing to ensure our future changes don’t bread what we have, and added an automated process to restore the Production database to Dev and QA as part of the DevOps process. All of this helps to increase our confidence in our release process when editing database objects. Every time we start a release, we are testing our database changes on the latest production database backup.
References
- SSDT: https://docs.microsoft.com/en-us/sql/ssdt/download-sql-server-data-tools-ssdt?view=sql-server-2017
- Using EF Core on an existing database: https://docs.microsoft.com/en-us/ef/core/get-started/aspnetcore/existing-db
- EF Core with ASP .Net Core: https://docs.microsoft.com/en-us/aspnet/core/tutorials/first-web-api?view=aspnetcore-2.2&tabs=visual-studio
- The Repository Pattern: https://dev.to/kylegalbraith/getting-familiar-with-the-awesome-repository-pattern–1ao3
- Key Vault Secrets when debugging: https://docs.microsoft.com/en-us/aspnet/core/security/app-secrets?view=aspnetcore-2.2&tabs=windows
- Exporting Azure SQL databases: https://docs.microsoft.com/en-us/azure/sql-database/sql-database-export
- Importing Azure SQL databases: https://docs.microsoft.com/en-us/azure/sql-database/scripts/sql-database-import-from-bacpac-powershell
- PowerShell tips for Azure DevOps: https://blogs.msdn.microsoft.com/premier_developer/2016/04/13/tips-for-writing-powershell-scripts-to-use-in-build-and-release-tasks/
- Featured Image: https://issart.com/blog/wp-content/uploads/2017/03/boxbarimage5.jpg

Hi Sam. Thanks for the sharing. 🙂
i have a question related to arm template. I found that some settings are initialized if arm template is applied to existing azure resources. For instance, i found that key vault’s access policies were initialized after deployments. So i wonder if you have any experiences to share on this issue.
Thanks a lot.
LikeLike
Can you expand a little more about what your question is here? I’m unsure about what you mean…
LikeLike