

Security, especially in 2019, is critical to ensure that we keep our users data safe. One of the top vulnerabilities in software today is credential theft. It’s not uncommon to scan through projects and see unencrypted secrets in configuration files. To address this, we are going to focus on a few key pieces today:
- Keeping your secrets secure with Azure Key Vault
- Using CredScan to identify secrets in our code
Setting up Azure Key Vault
Azure Key Vault is a secrets manager in the Azure Portal. As we have already deployed Key Vault with our ARM templates, and it is already configured with the correct access permissions. We will spend some time looking at the permissions a little closer first, as this stuff is not well documented, is confusing, and it can be so frustrating to receive a 502 error
in the ASP.NET Core startup when working with Key vault that is tricky to debug. In the screenshot below, we can see our dev instance of the key vault, with 4 users assigned to the “Access Policies”. The first one is the subscription administrator. The second and third ones are the web service and web application – these users were created with “MSI” – (“Managed Service Identity”), which we will explain about shortly. The last item in this list was created by Azure DevOps when we created an SPN.

If we click on one of these access policies we can see what they have access to. We are not currently using keys or certificates, so for all users, (Except “Sam Smith” who is an administrator and has access to everything), they only have access to secret permissions, specifically only “list” and “get” are enabled. If we had more developers, we’d likely want to give them “set” permission too, so they can add more secrets as they work.

Quick side note. To enable MSI/ Managed Service Identity for an application, just check the “On” button in the identity tab of your web application. This automatically creates a user for you in AAD – this is so much, much easier than the old method of registering an application (which we do review below). The user created matches the name of the application. For example, if my application is “samsapp-dev-eu-web”, then the user will be created as
“samsapp-dev-eu-web”.

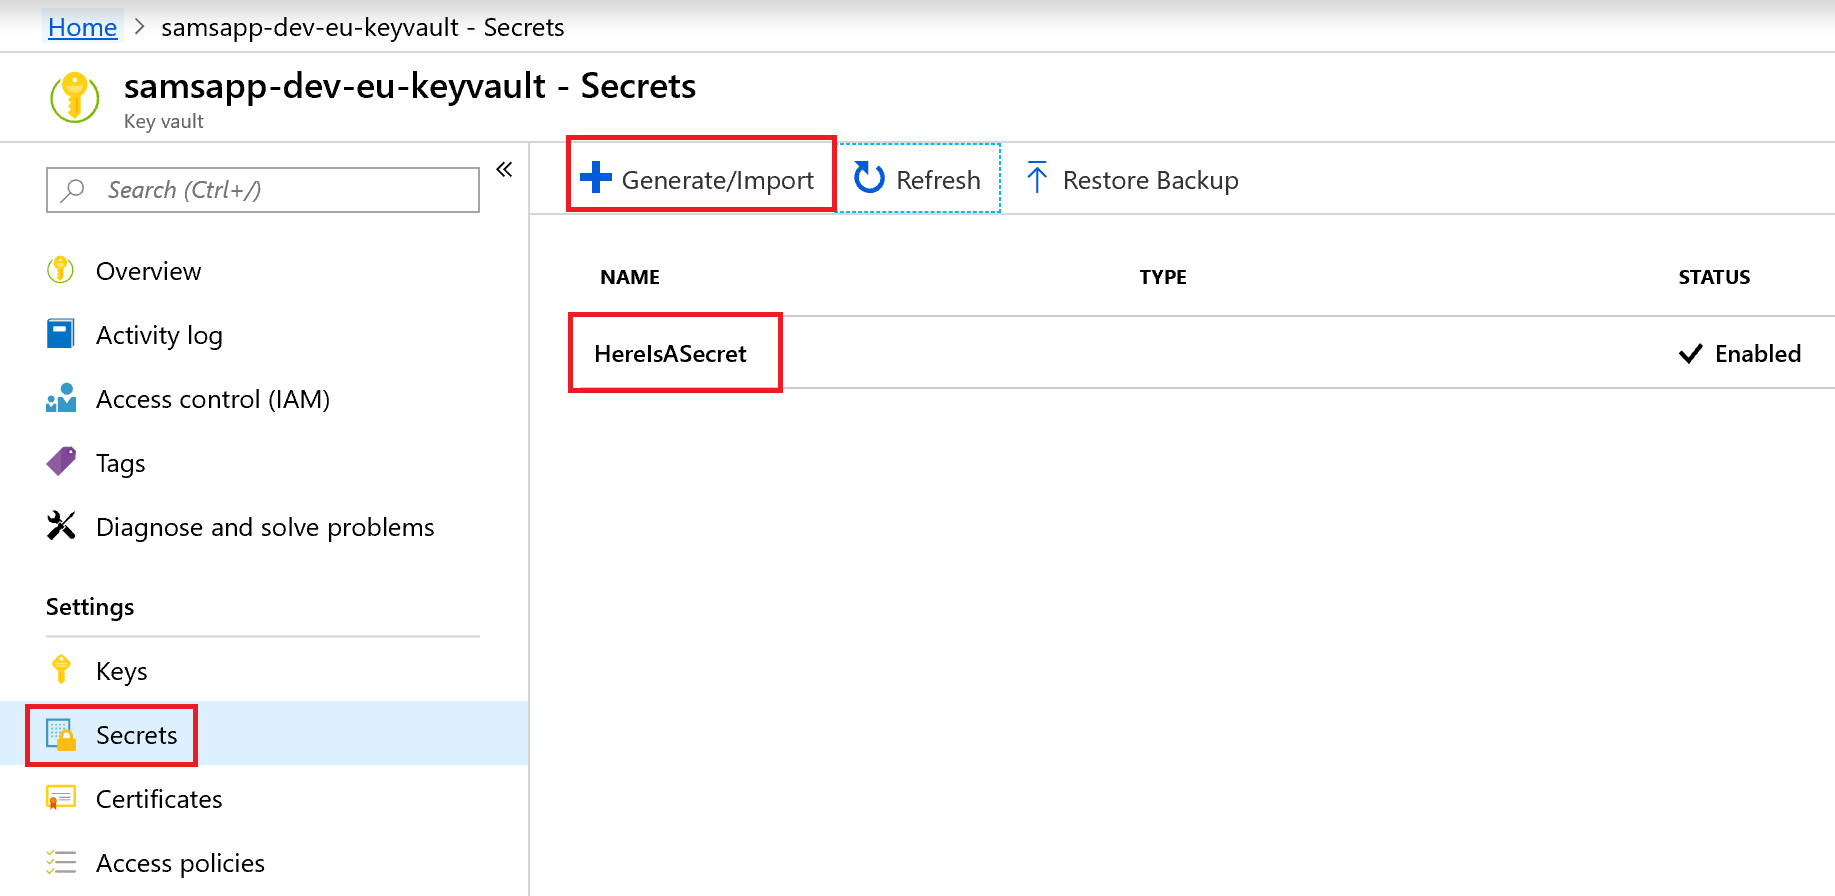
Now we need to add secrets to the Key Vault. The slow way is through the portal, using the secrets menu item. We can click the “Generate/Import” button to add new secrets, and manage our existing secrets by clicking on them one by one.
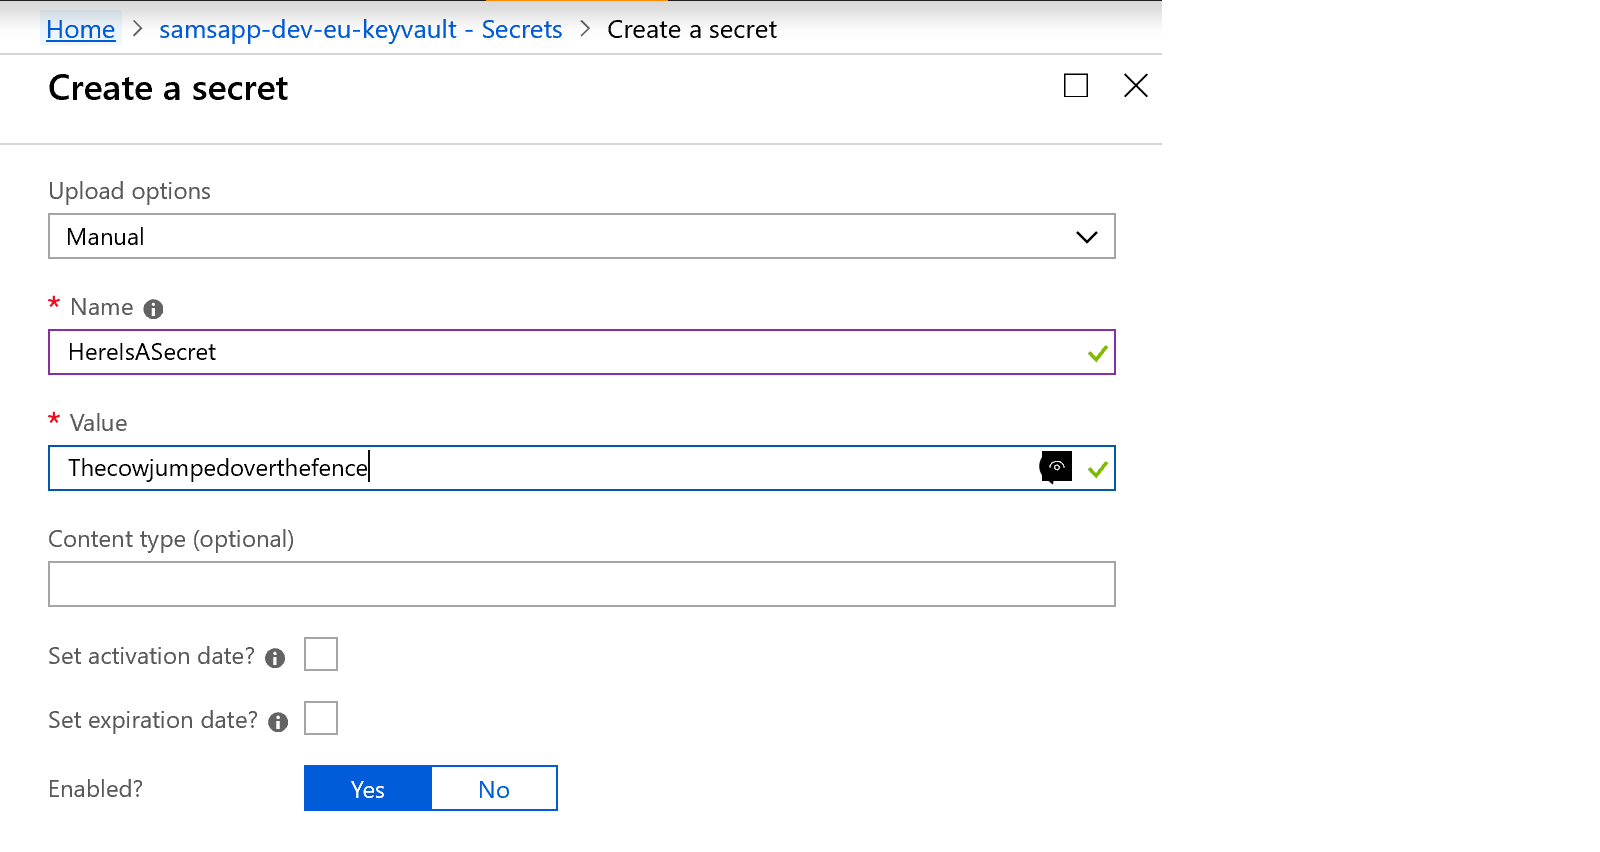
Here we have added a test secret. We can set a name, value, content type, activation date, expiration date, and enable or disable the secret. All of these things are useful if we need a temporary secret that will expire, or we are creating rotating secrets that change regularly.
However, there is an easier way to load secrets, especially when we have a large number like this situation. We aren’t typically power users in the Azure CLI, but this is a good case for it. We recommend you keep your secrets secure, and create a script to generate and load these secrets into the Key Vault. DO NOT store this file in your Repo, as this would defeat the purpose of secrets management. We used an Excel document, which generated the CLI command needed to set each of the secrets. the CLI syntax is:
az keyvault secret set --vault-name '[key vault name]' --name '[secret name]' --value '[secret value]'
For example, to load the test secret I loaded in the portal earlier:
az keyvault secret set --vault-name 'samsapp-dev-eu-keyvault' --name 'HereIsASecret' --value 'Thecowjumpedoverthemoon'
To run the CLI, we open our Azure Portal, and click the “>_” icon in the top to the right of our search box. If you haven’t used this before, it will ask you for a storage location – it’s ok to just create a new storage blob, the console commands need it. A little blue command window will popup from the bottom and you can write/paste in your “az” console commands there.

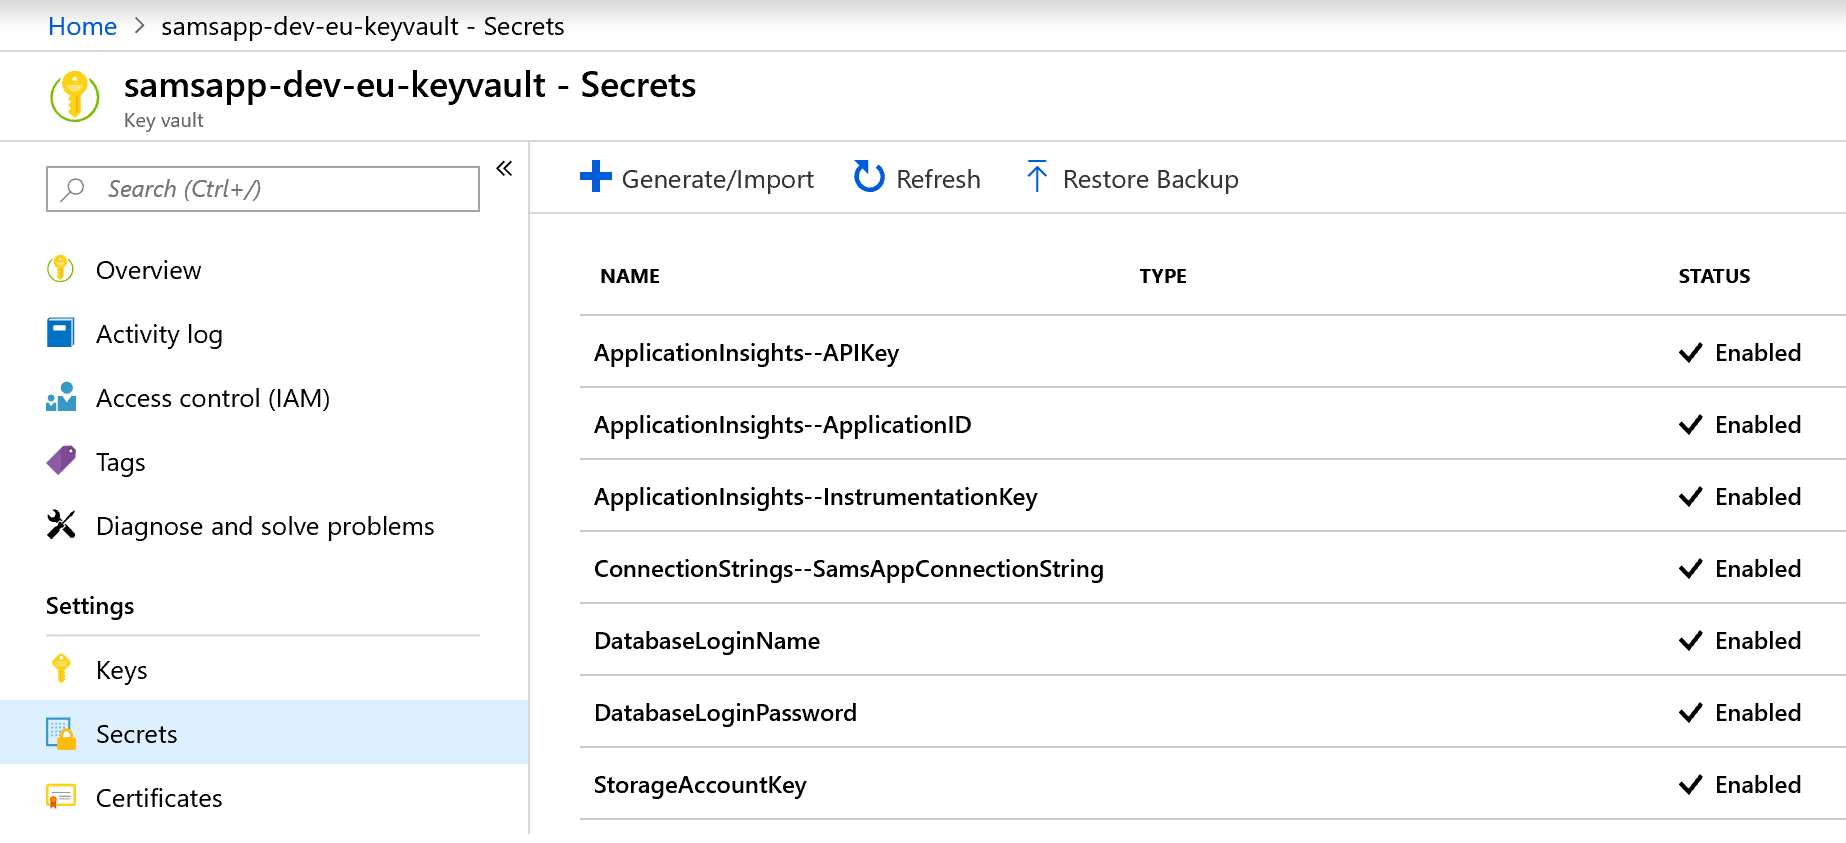
After running our secrets, we can check they loaded into the Key Vault – they look all ok! Note that JSON variables with parent/child relationships, such as “ApplicationInsights.InstrumentationKey”, are defined differently in Key Vault, as the “.” character is not permitted. Instead we use “–“, for example “ApplicationInsights–InstrumentationKey”.
Linking secrets from Key Vault to Azure DevOps
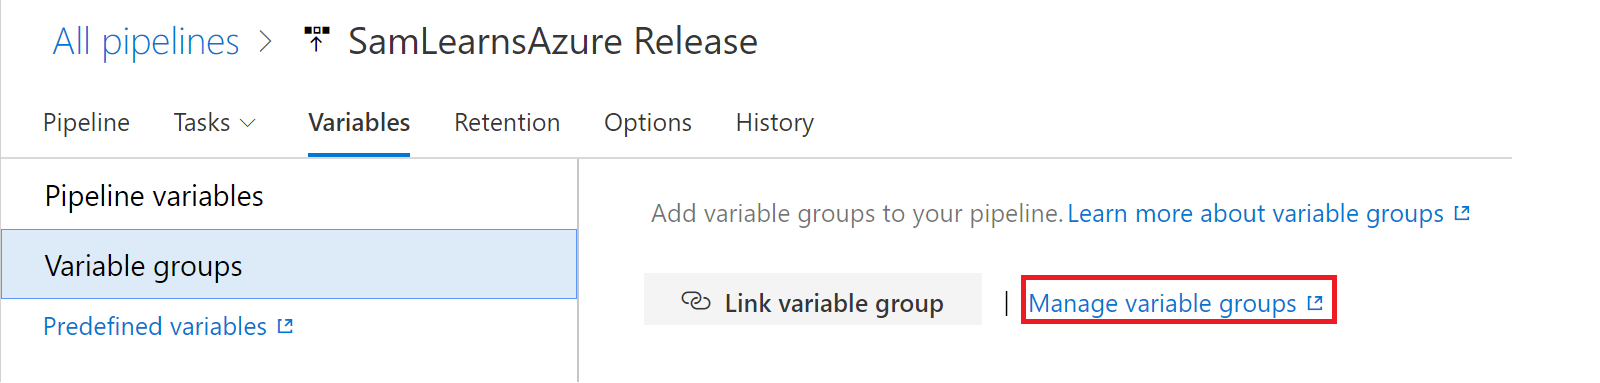
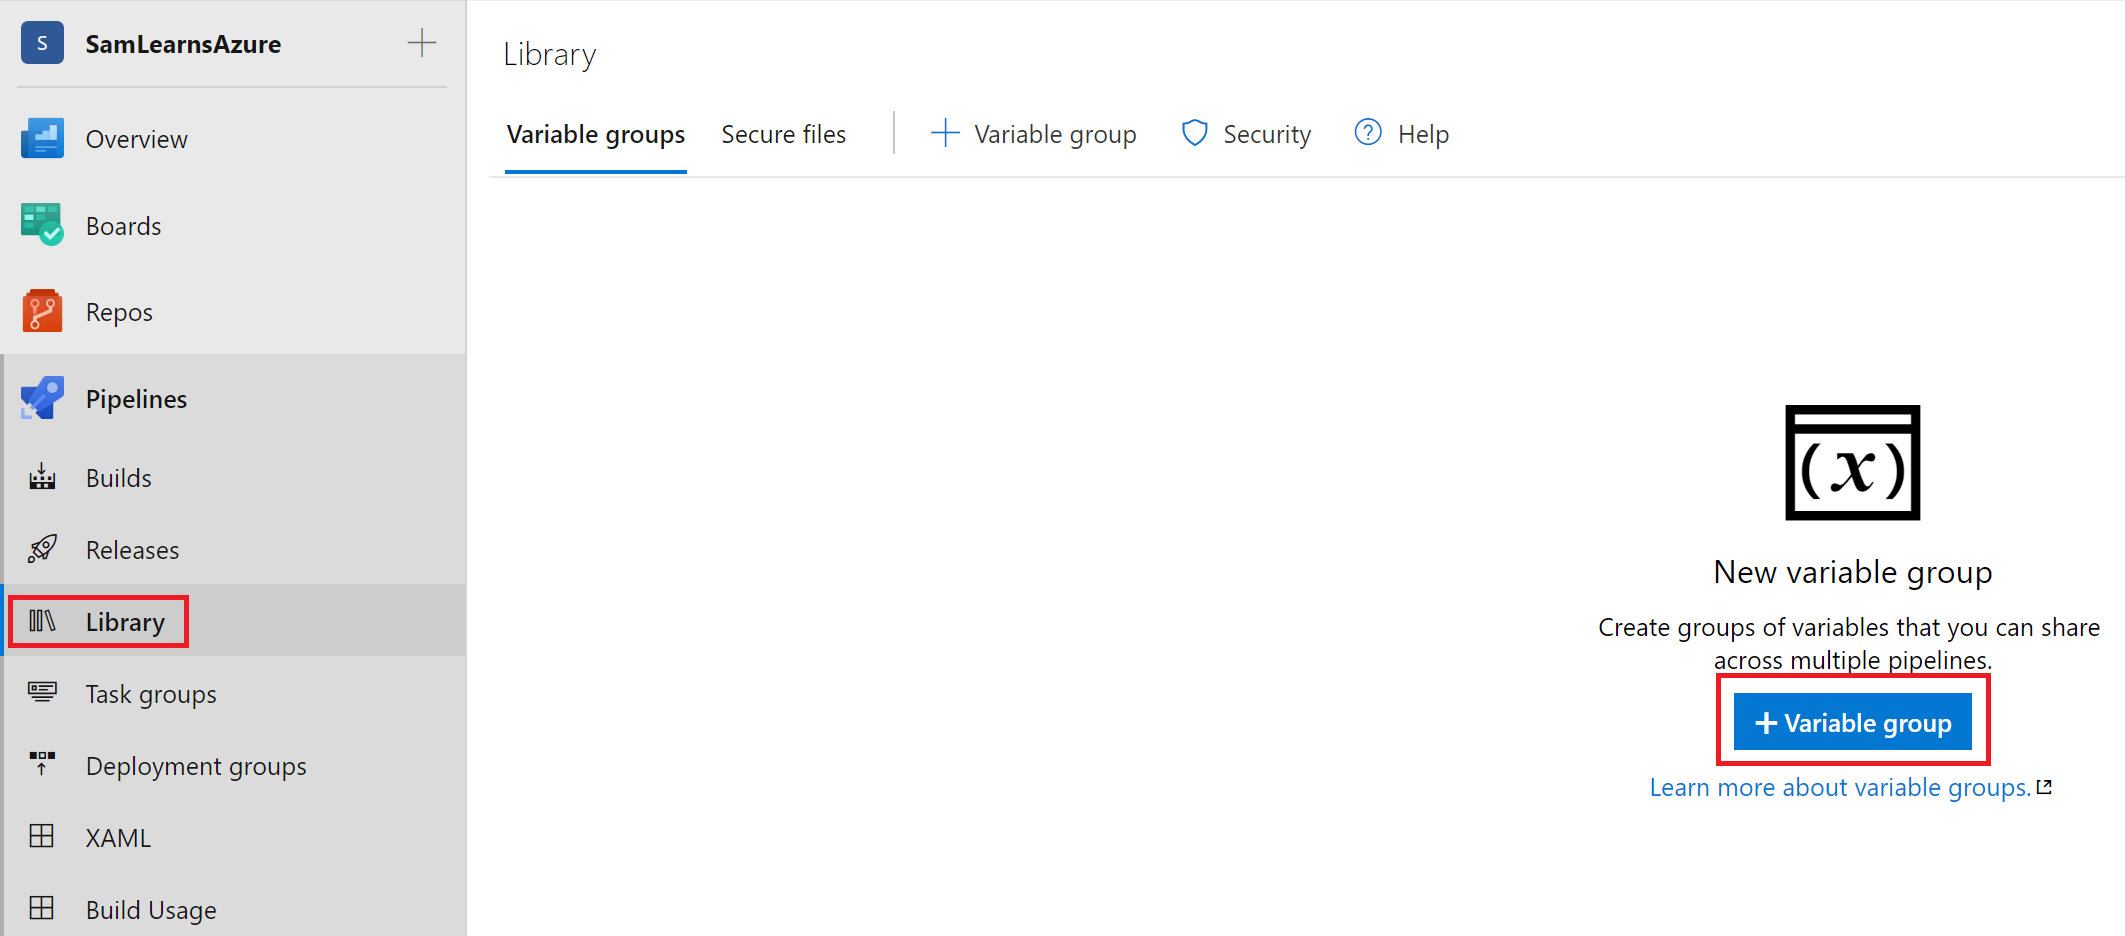
Now we have our secrets stored in each of our Key Vaults. To link them to variables in our Azure DevOps instance, we need to use Variable Groups in our release to load in the secrets from the Key Vault. We don’t have any variable groups yet, so we need to click on the “manage variable groups” to create a new one.
We are redirected to the “Library” section, where we can create a new variable group.
In the popup that appears, we name it, and enable “Link secrets from an Azure key vault as variables” button. This requires a subscription and key vault name. We then click the “Add” button to add the specific variables.
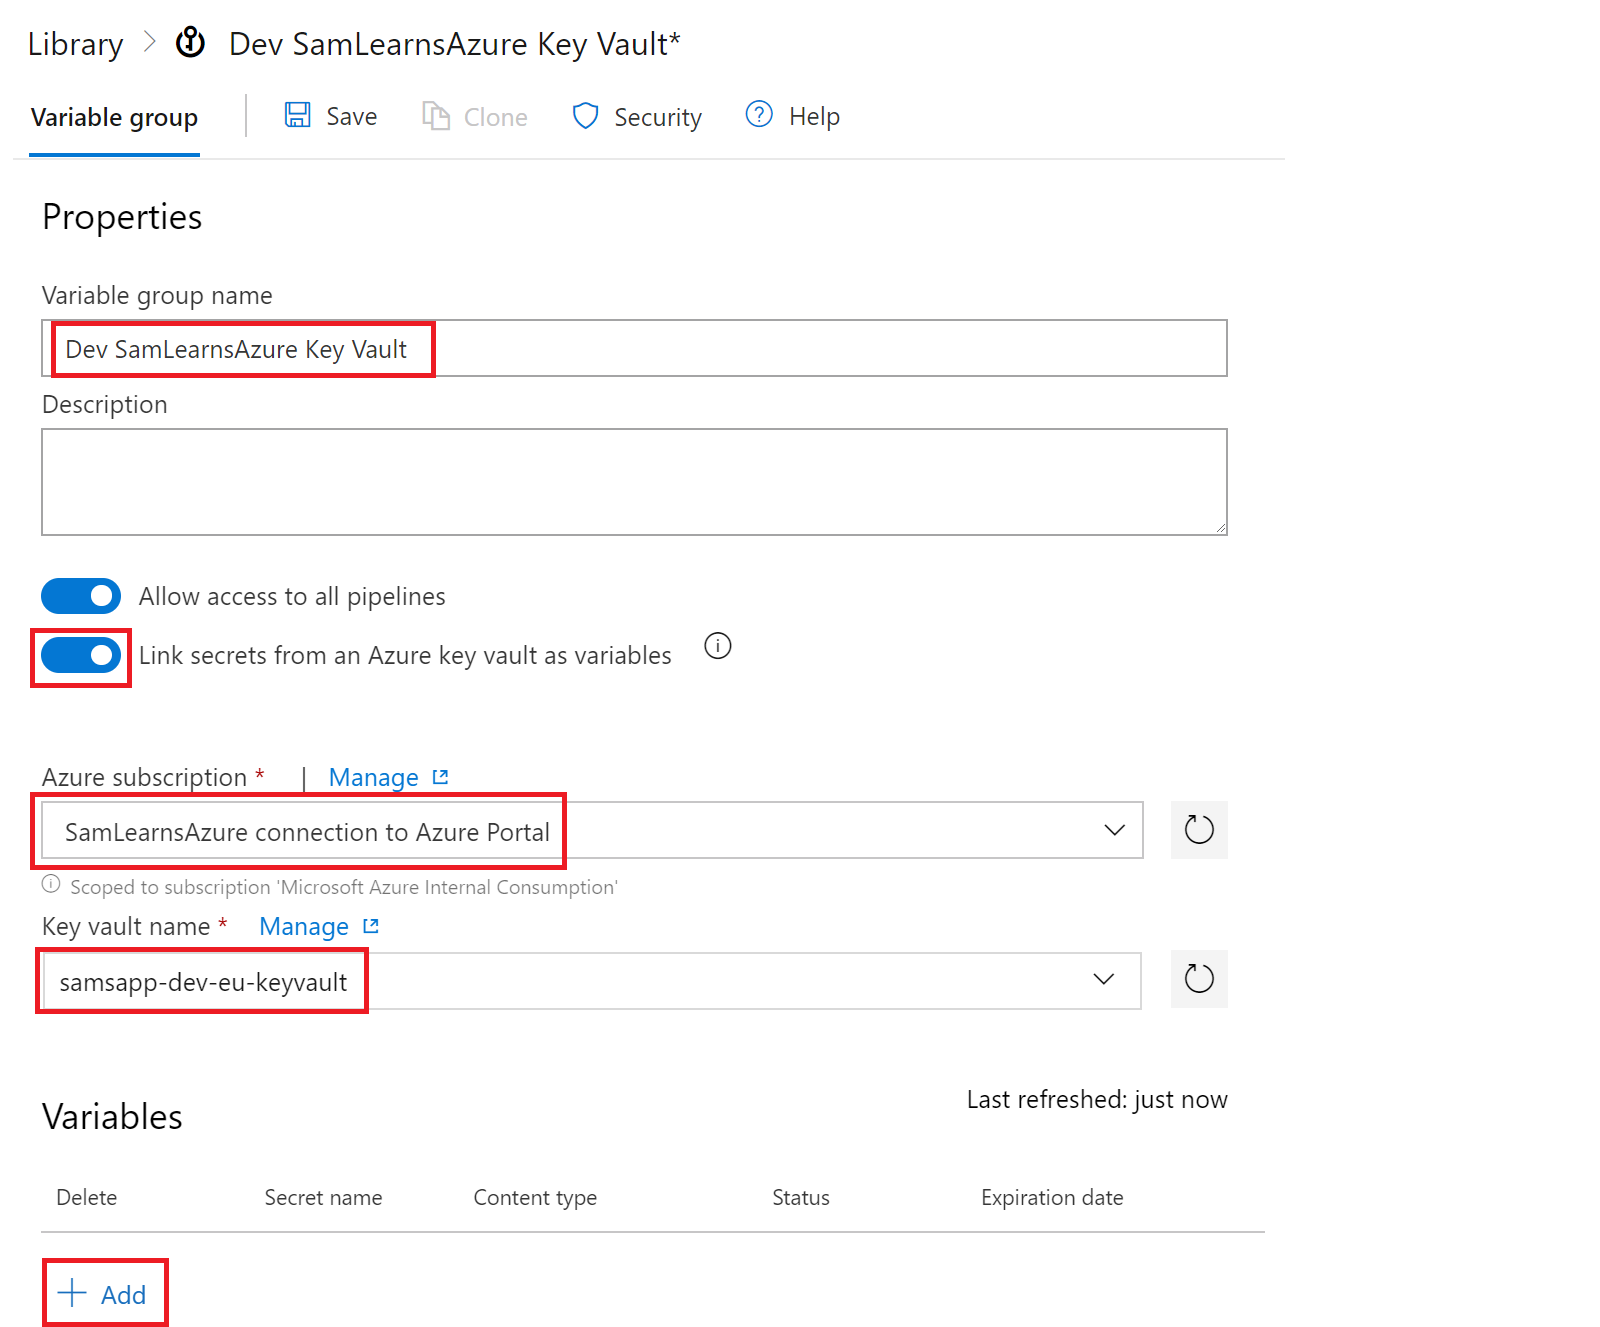
In the popup that appears, we are check on the checkbox for all of the variables and then click “Ok”. We repeat this for our QA and Production key vaults too.

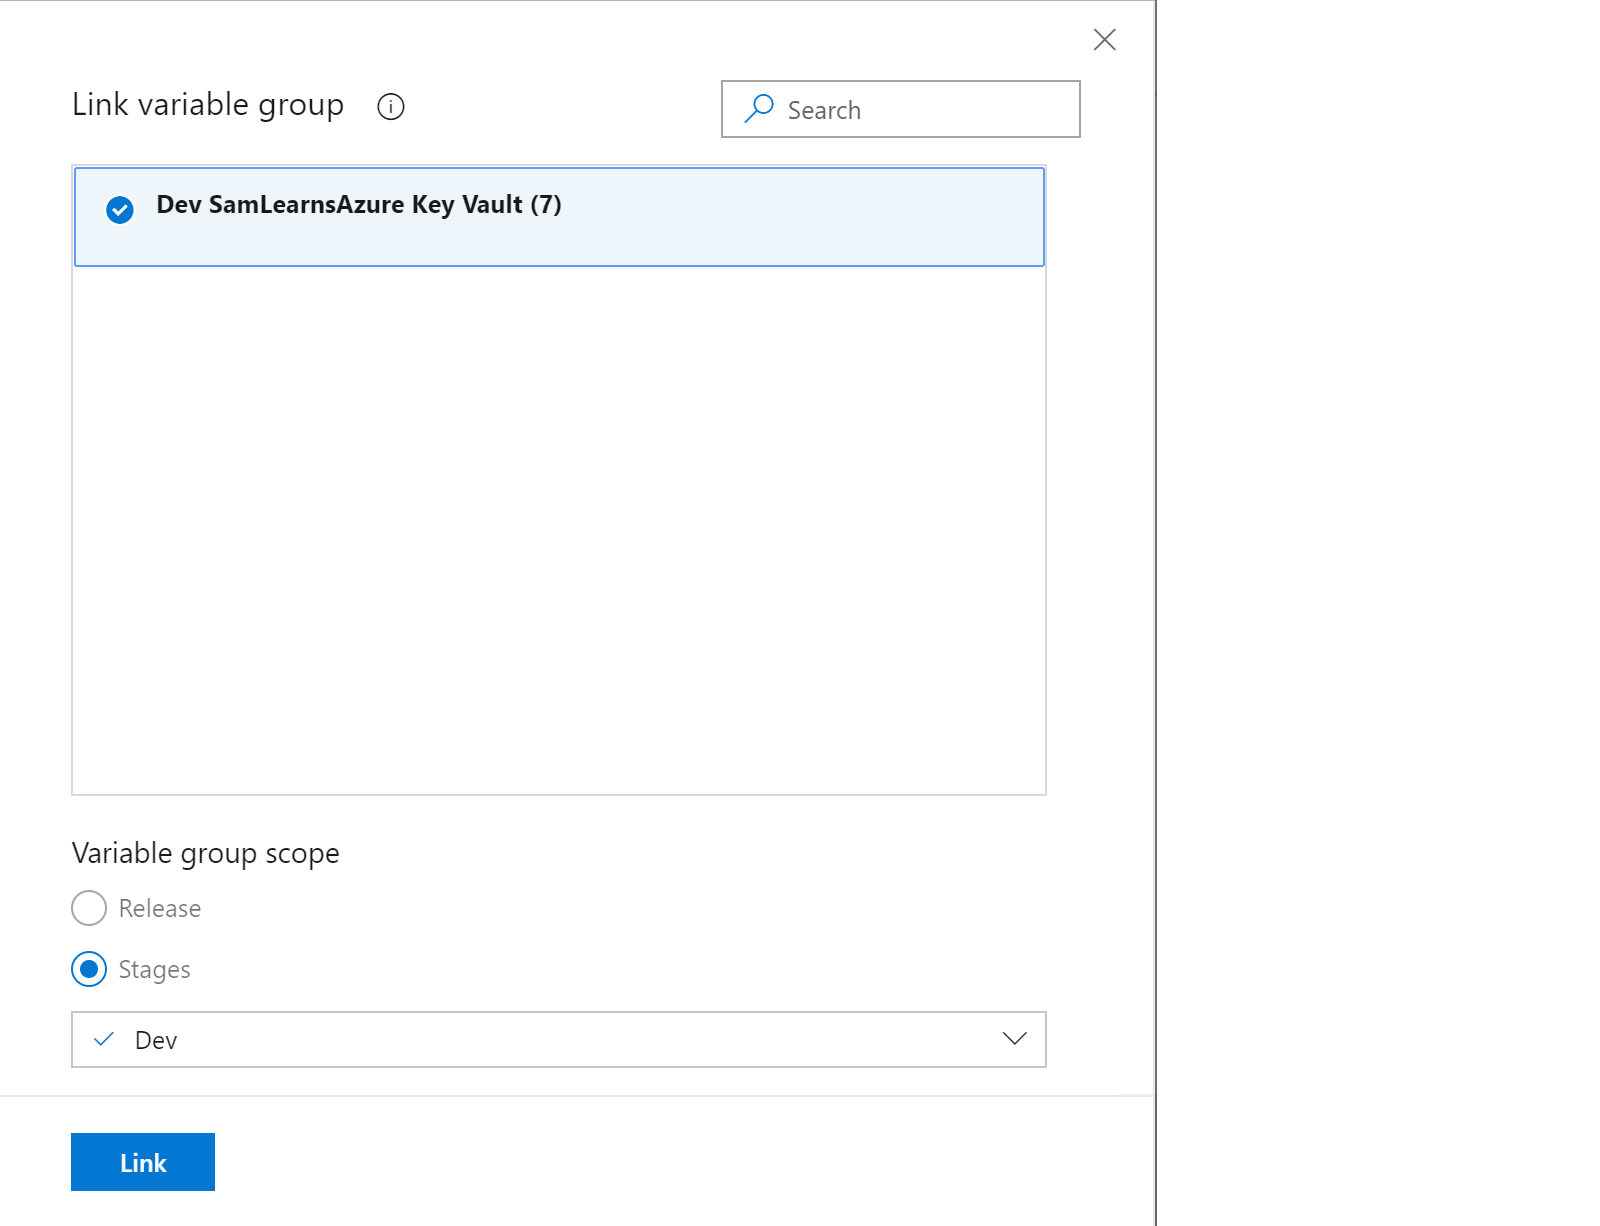
Back in the Variable Groups tab in Azure Pipelines, we click the “Link variable group”. We need to connect our variable groups we created in our library to our specific release pipeline.

In the popup appears, we select the variable group we want to link, and then set the “Variable group scope”, setting the stages that this variable group will map too. For each of our Dev, QA, and Prod variable groups, we will map them 1:1 with their relevant stages.
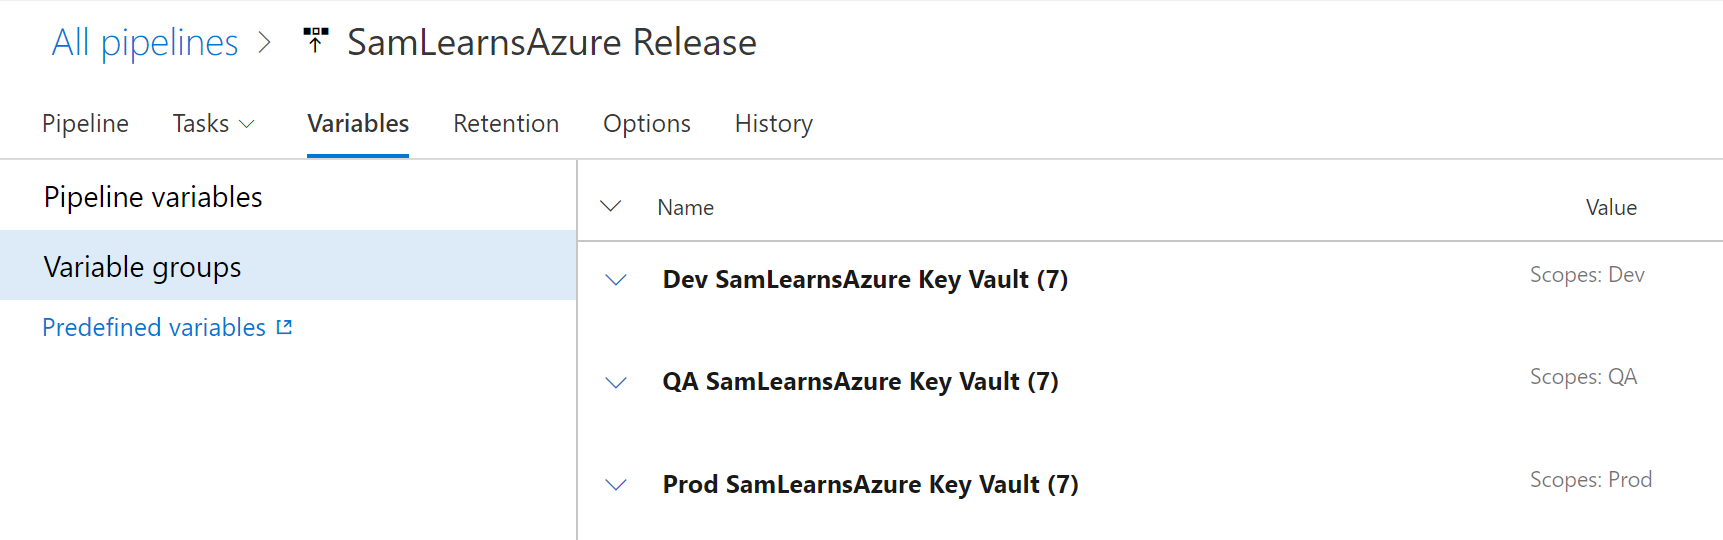
Once we are done, our release “variable groups” page looks like this. Note that each of our variable groups lines up with the correct scope (e.g. the Prod variable group maps to the Prod scope).
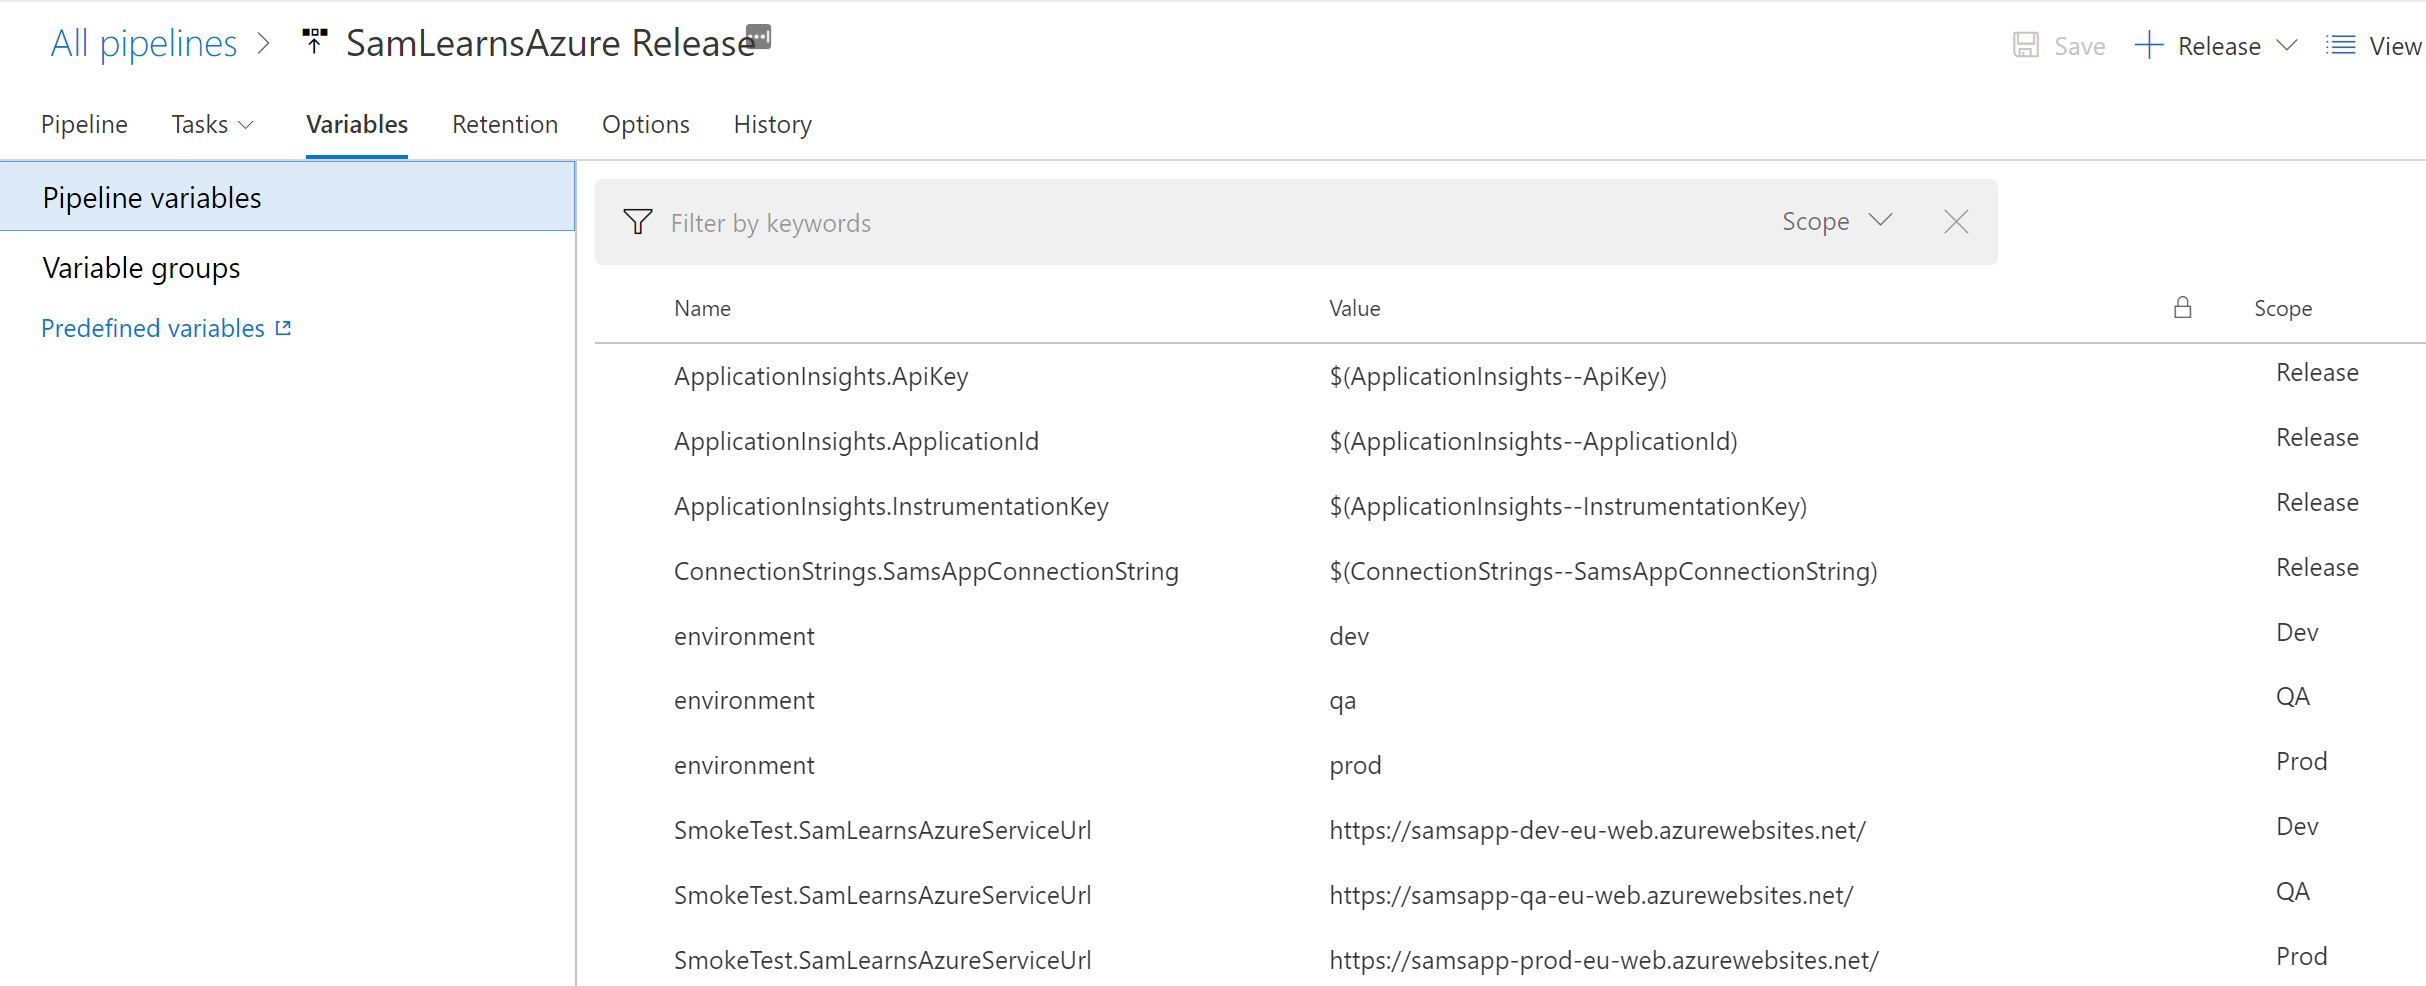
Finally, in the Pipeline variables, we need to map the JSON configuration elements that contain the double pipe (“–“), to regular JSON variables. For example, for the “ApplicationInsights.ApiKey” pipeline variable, we change the value to use a variable “$(ApplicationInsights–ApiKey)” to read the value from Azure Key Vault, and the change scope to “Release”. When an environment deployment starts, it will use the correct variable group and populate the variable from Key Vault which will then be mapped in here. Note that variables from Key Vault that aren’t using the JSON parent/child relationship, for example “DatabaseLoginName”, can be accessed anywhere in the release as a variable, e.g. “$(DatabaseLoginName)”, and don’t need this extra mapping step.
There is one potential problem here – as our ARM Template uses the database login and password to deploy our resources to an environment, if we need to deploy to a new environment, we won’t be able to deploy, as the release will be trying to use the key vault – which doesn’t yet exist – to setup the user and password. This circular problem is one we don’t have a solution to and we are open to ideas. We could move the database secrets back to the pipeline variables, but then some important secrets aren’t being used or stored in key vault and are being stored twice. There might be a way to use a backup key vault, but we will have to investigate this a little bit more. For now, this works…
Setting up our web service to use Key Vault
With Azure Key Vault configured and populated, and our release in Azure DevOps setup, we are ready to create a new branch and start editing our ASP.NET Core web service. First we need to add two NuGet packages
- AspNetCore.KeyVault
- Microsoft.Azure.Services.AppAuthentication
Next in Program.cs, we need to add these lines of code in the CreateDefaultBuilder function, this is the magic that sets up the key vault for our controllers with MSI. First we need these using statements:
using Microsoft.Azure.KeyVault;
using Microsoft.Azure.Services.AppAuthentication;
using Microsoft.Extensions.Configuration.AzureKeyVault;
Then we need this code over the “WebHost.CreateDefaultBuilder(args)” line. This code:
- Connects to the appsettings.json file loads all of the settings from it.
- Initialize the Azure Service Token Provider.
- Create a new key vault client, using the MSI method of authentication callback, using the Azure service token provider.
- Finally, we add the Azure Key Vault, using the Key Vault URL to load secrets into the ASP.NET Core applications’ configuration.
.ConfigureAppConfiguration((context, config) =>
{
    //Load the appsettings.json configuration file
    IConfigurationRoot builtConfig = config.Build();

    //Load a connection to our Azure key vault instance
    AzureServiceTokenProvider azureServiceTokenProvider = new AzureServiceTokenProvider();
    KeyVaultClient keyVaultClient = new KeyVaultClient(new KeyVaultClient.AuthenticationCallback(azureServiceTokenProvider.KeyVaultTokenCallback));
    config.AddAzureKeyVault(builtConfig["AppSettings:KeyVaultURL"], keyVaultClient, new DefaultKeyVaultSecretManager());

})
Below is our completed program.cs class for context.
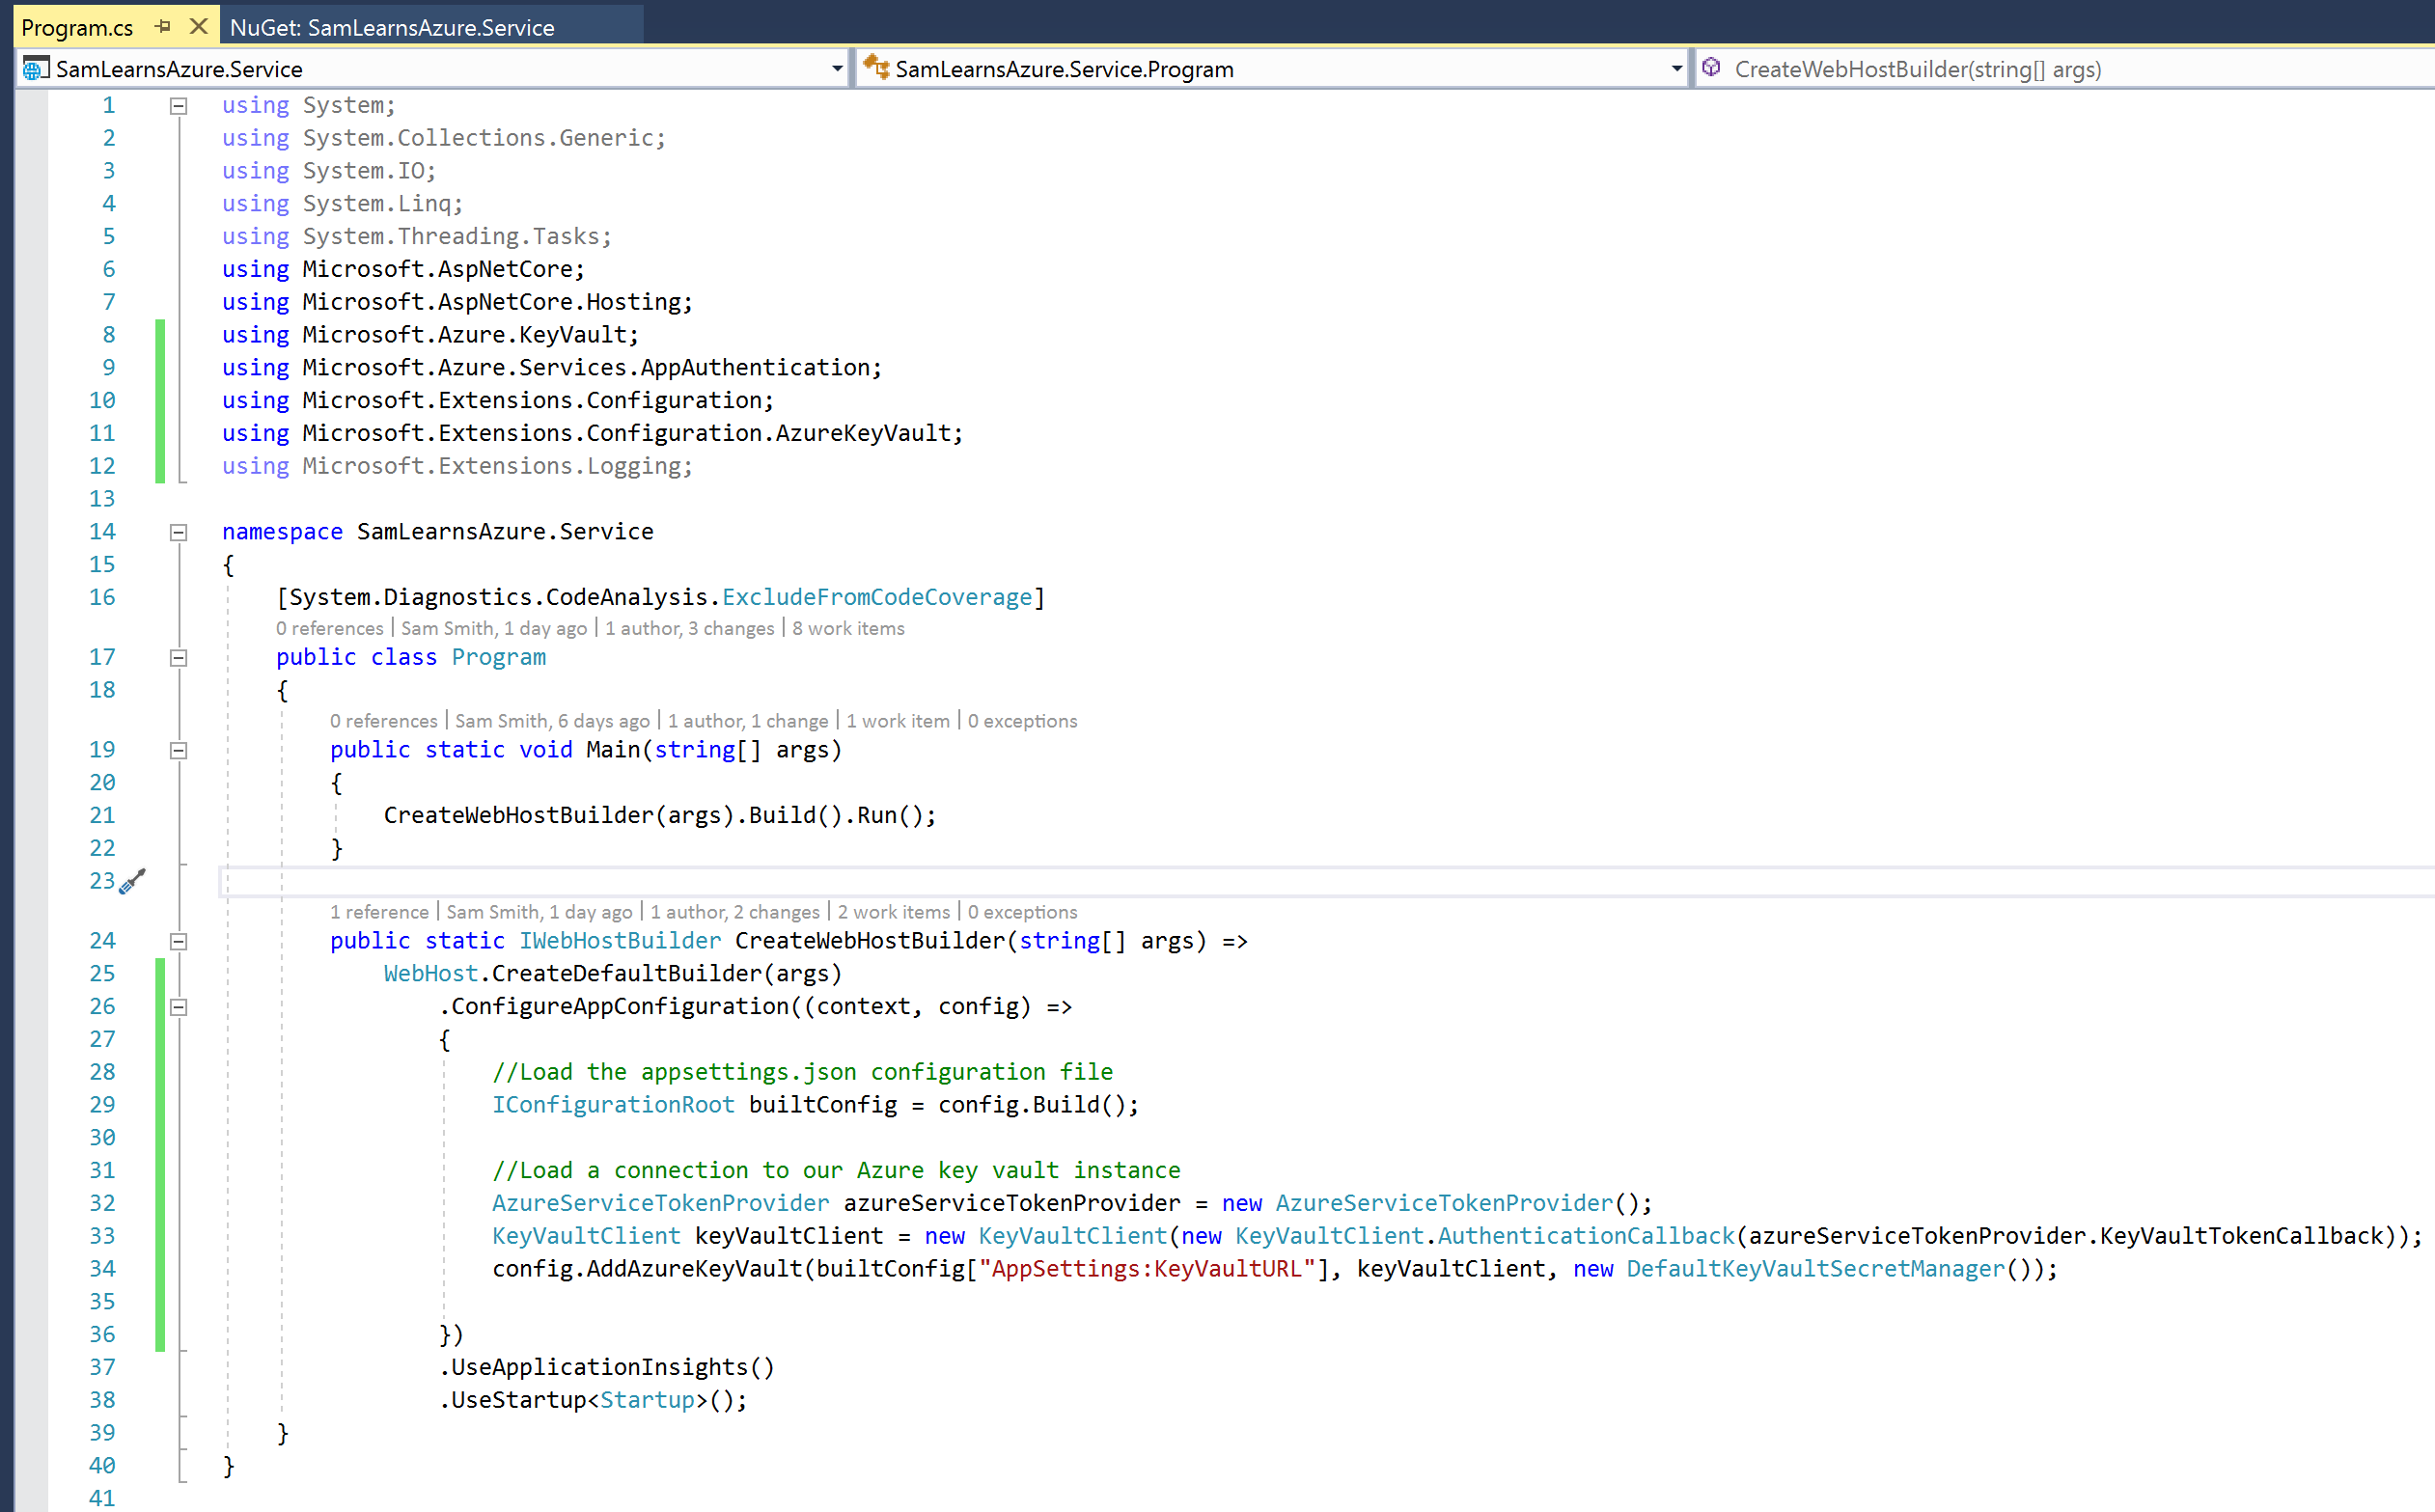
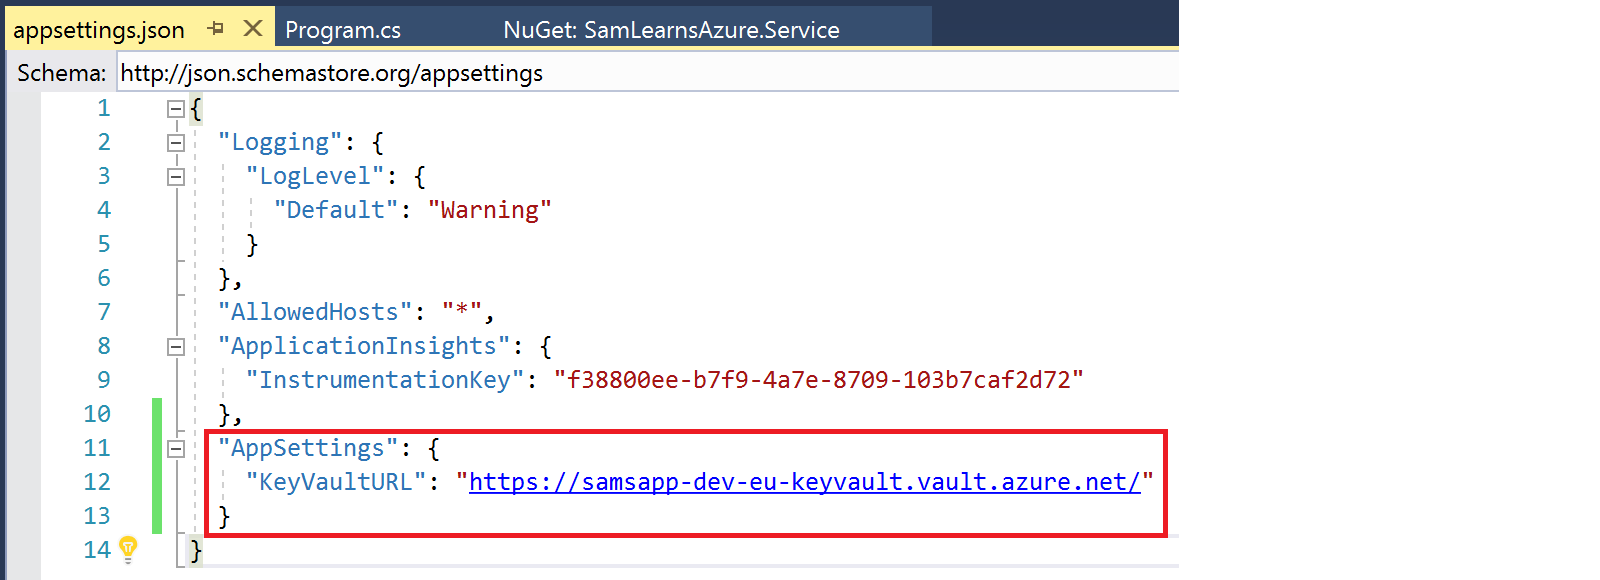
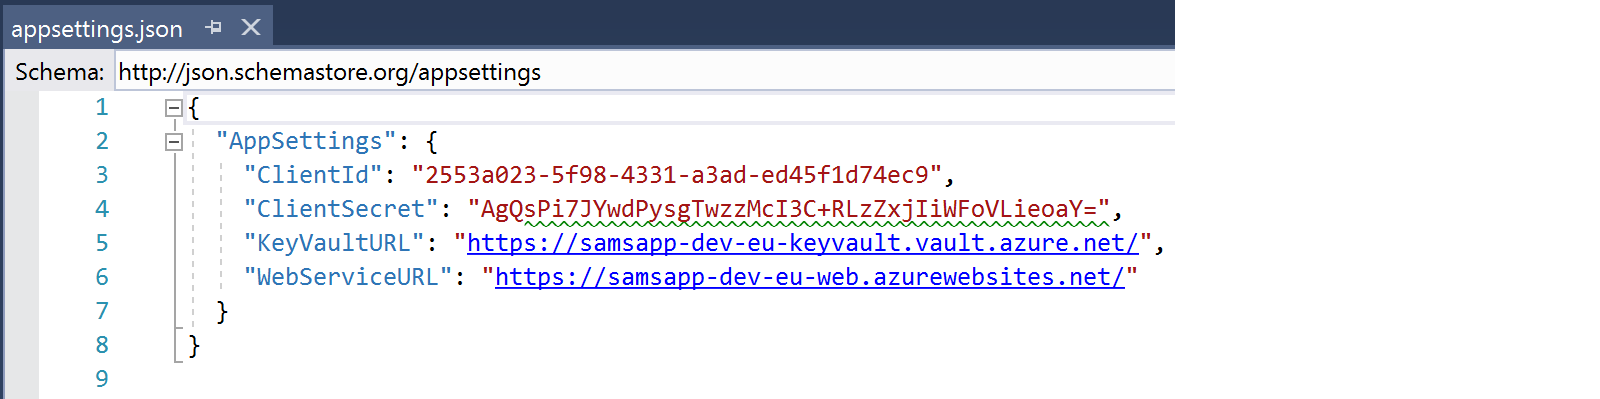
You will note that we are accessing a KeyVaultURL from our appsettings.json file, which we have populated.
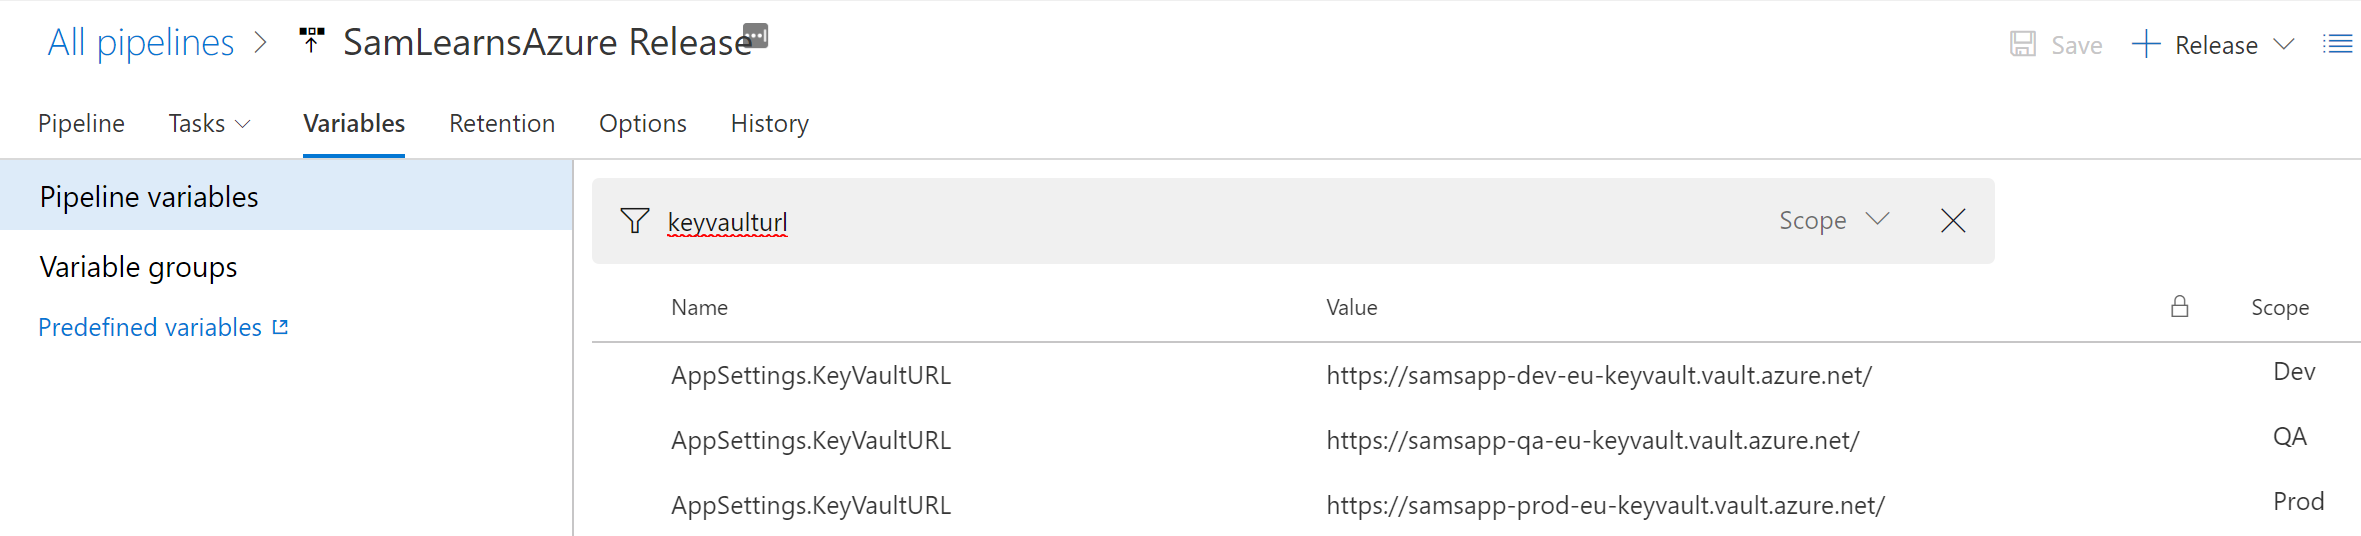
We need to add these URL’s to the Pipeline variables, so we create new “AppSettings.KeyVaultURL” variables for each environment.
Finally, we are going to create a new controller to demonstrate all of this together. There are three parts we are going to look at closely.
- The Key Vault is auto-magically added to the page with dependency injection to bring in the configuration we built in the program.cs file. This is indicated in red below.
- We can extract JSON secrets, (see the appsettings screenshot above), with the “:” (colon) character. Note that the in the Key Vault, this is stored as “ApplicationInsights–InstrumentationKey”, but in C#, it’s extracted with “ApplicationInsights:InstrumentationKey” (our third variation). This is indicated in green below.
- We can also extract simple string secrets with the secret name. We are extracting a storage key from the key vault. This is indicated in blue below.

We debug our web service and confirm that the results are able to be extracted from the key vault successfully.
Writing tests for key vault
While this controller is clearly a temporary solution to demonstrate the key vault, we are still practicing Scrum here, and to deliver the feature, we need to write unit tests to verify that the key vault is working correctly and firfull our definition of done – that “all work is developed and tested before merging into the master branch”. Writing tests is a massive subject that we could spend hundreds of pages explaining how to write them. As we don’t have that time, we will write the tests we need and try to explain them as we go.
As we discussed in our testing blog post, we always try to write a unit test first. These tests will not require a connection string, especially if we make use of the Moq framework. The Moq framework allows us to simulation a connection to any external resource – whether it’s an API or a database. It’s both easy to use and challenging to use – depending on the nature of your tests and experience with the framework. As a unit test is just C# code, it runs in fractions of a second, and we can run hundreds, if not thousands, in just a few seconds. This example is just a tiny sliver of Moq unit tests, we will create more later. The arrange section of the Moq test has the biggest changes.
- On line 17, we create a Mock configuration of the IConfigurationRoot.
- On line 18, we setup the method result, allowing any string to be passed in and returning a predefined string – in this case “AppInsightsInsKeySecret”. This is the most confusing and complicated part of our Moq code.
- On line 19, we initialize our controller, injecting in the configuration with the .Object method. When we call the controller, this helps to redirect the result into the Moq data we have setup to return.
- Now on line 22, when we call the function on the controller, it will return our Moq string, instead of the data defined in the controller – as we have overridden the controllers result. This is the key behind what makes the Moq framework so important and useful. Now instead of calling the Key Vault, we can simulate the result in the test project and still confirm that what we expect to be returned will pass our tests.

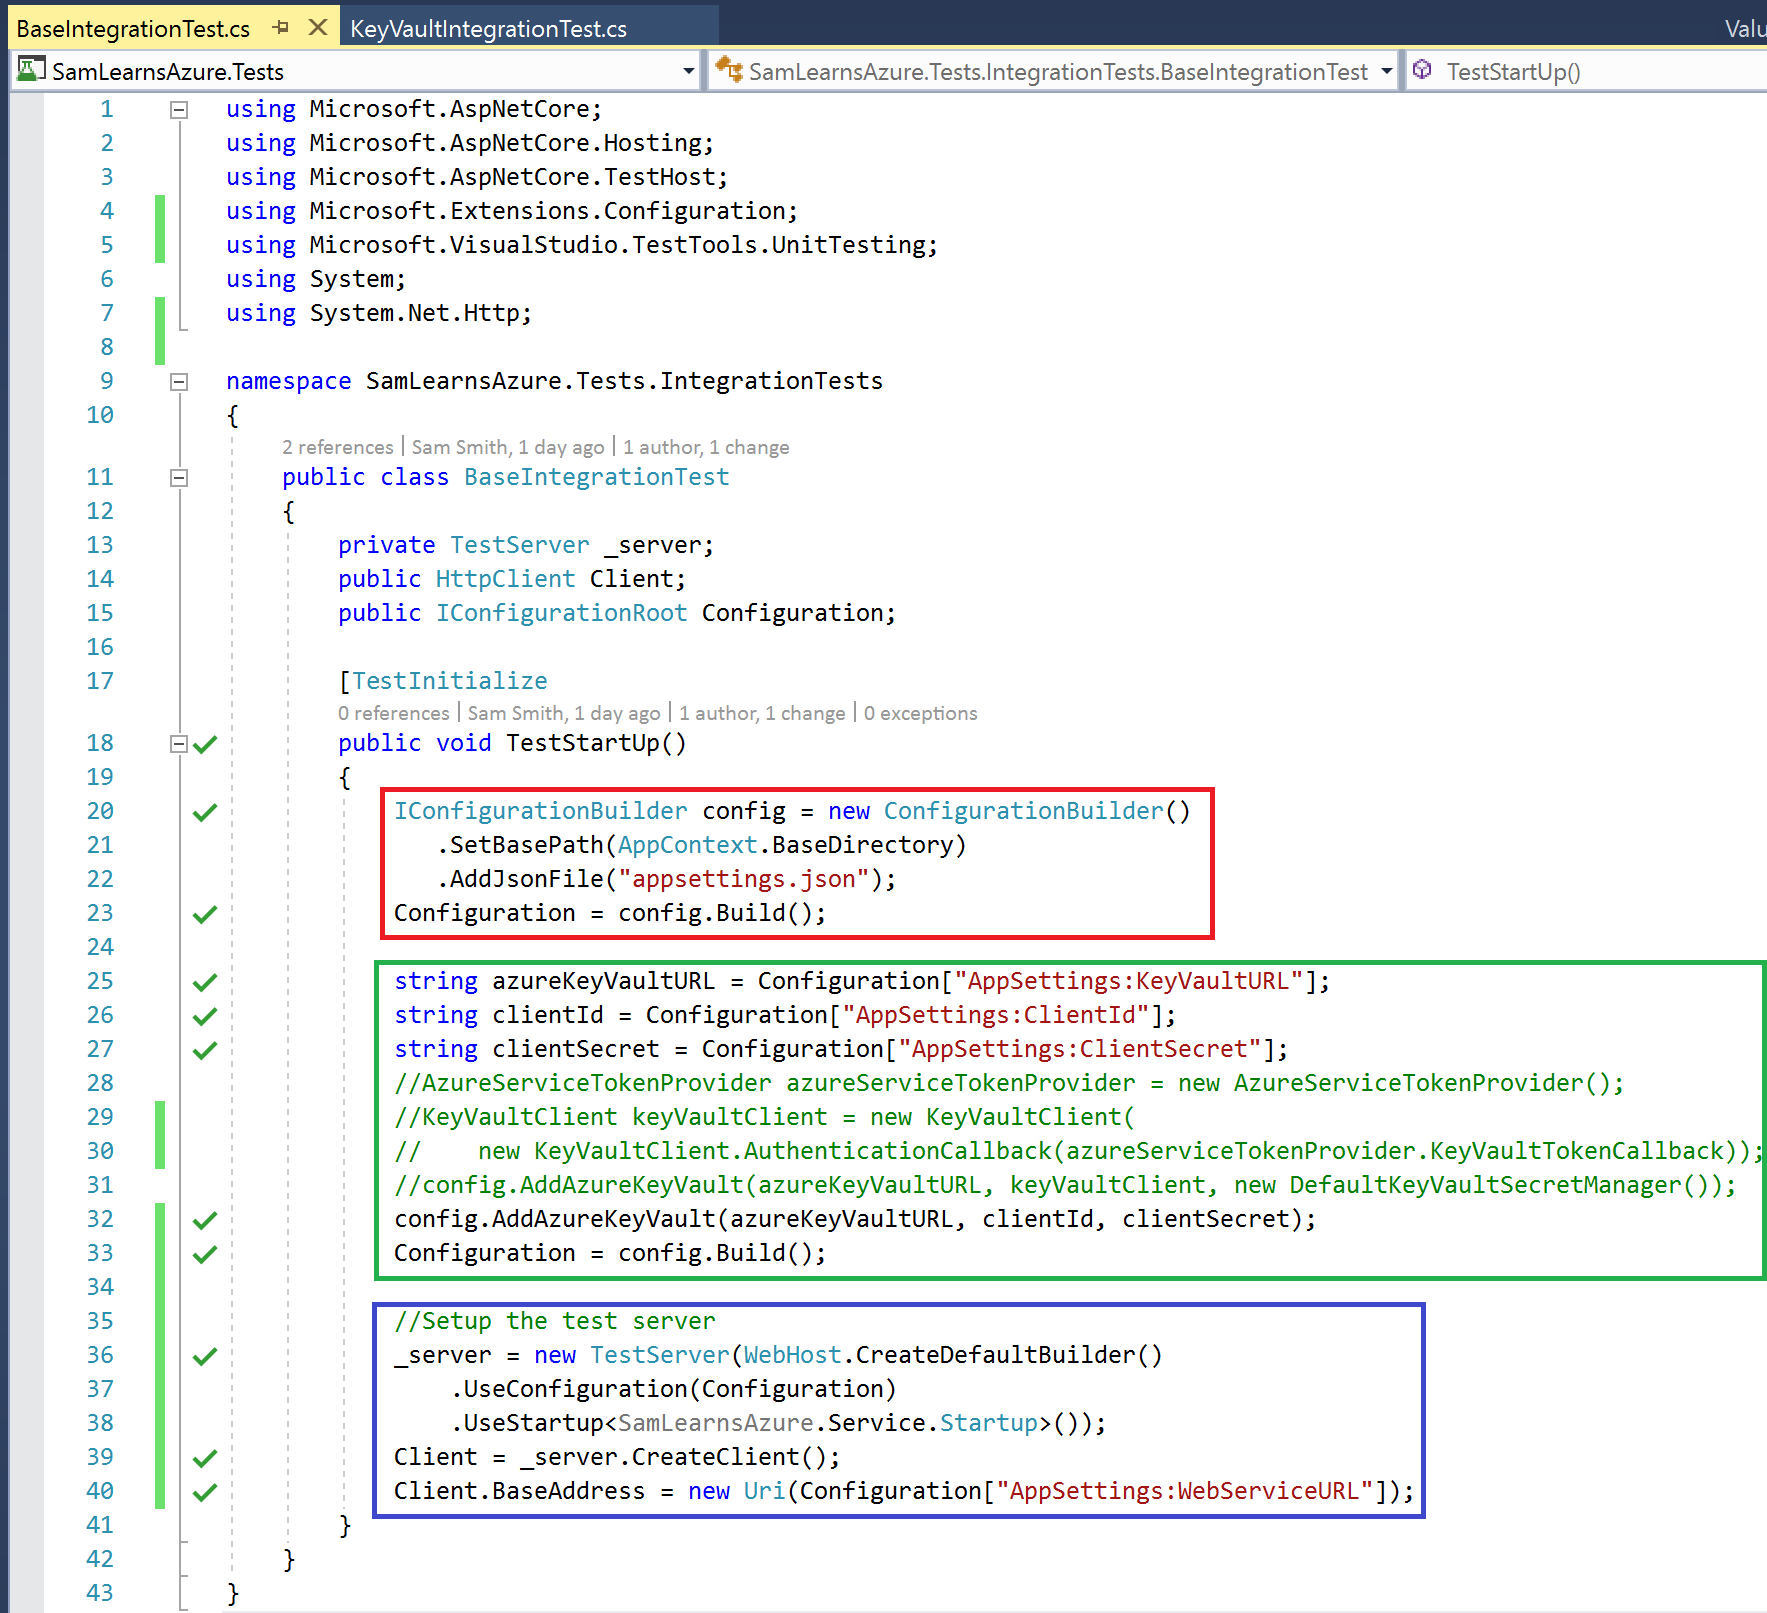
Next we are going to create an integration test. These tests will use a connection string defined in the test project to test loading data from service. As integration tests are using our database, they often take a few seconds to return data. First we are going to create a base integration class to read from our appsettings.json file and Azure Key Vault:
- In the red section, we are initializing our configuration builder and loading the appsettings.json file. This is very similar to what we do in out program.cs file in a ASP.NET Core web service.
- In the green section, we use the client id and client secret to open the key vault. We would have preferred to use the MSI security method in our test, but there is an open issue using MSI with Key Vault, Azure DevOps, and a integration test that we have been unable to solve, (link 1, link 2). If anyone has an answer to this, we would love to chat… For now, we are going to use the older client id and client secret method to run our integration tests. Once this issue is resolved, we will revisit this Azure Key Vault code and use Azure Key Vault to make our test project more secure.
- In the blue section we are creating a “TestServer”. This simulates the rest of the program.cs file.
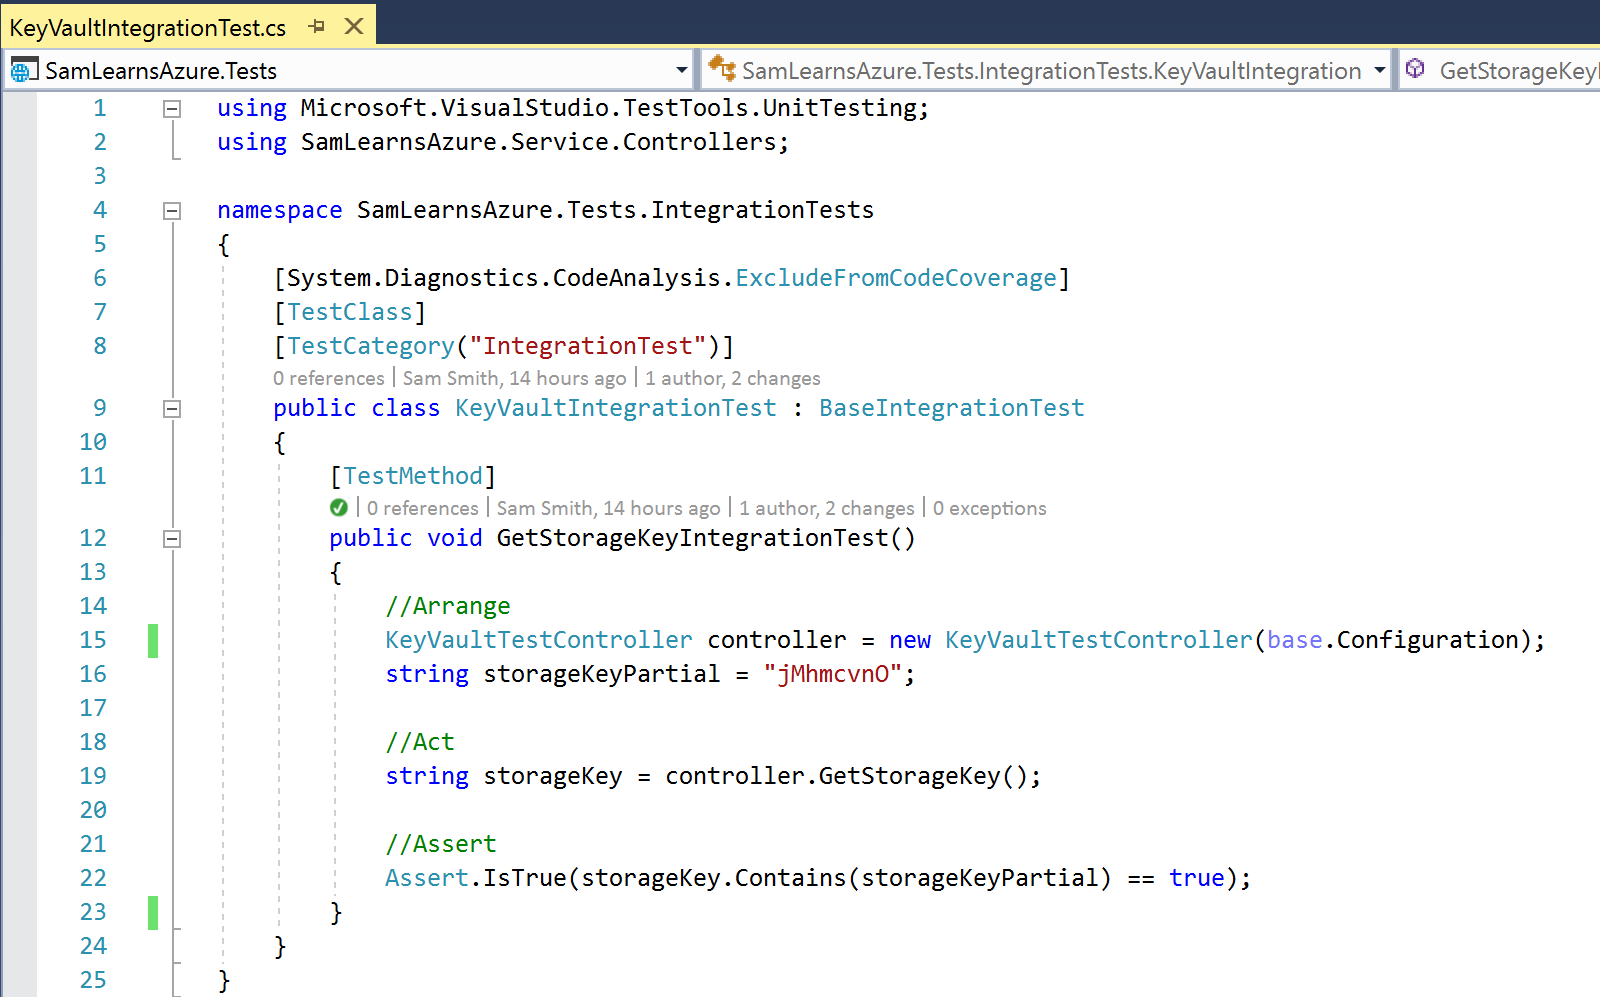
Next we write our actual integration test. This is fairly simple, with out test broken into our three favorite sections, “Arrange”, “Act”, “Assert”. We can arrange our test, act on performing the test, and then assert/check the results to confirm our test was successful. In this test for sets, we are arranging the controller with the base integration configuration, acting on the controller to retrieve our storage key, and finally asserting that the storage key is what we expect. As we don’t want to put secrets in our code, but we want to verify that our storage key was loaded correctly, we are using a piece of the storage key – yes – this is the same as using 7 characters from your login password – so not ideal, but this is a test required for this iteration, and will be removed in a future iteration.
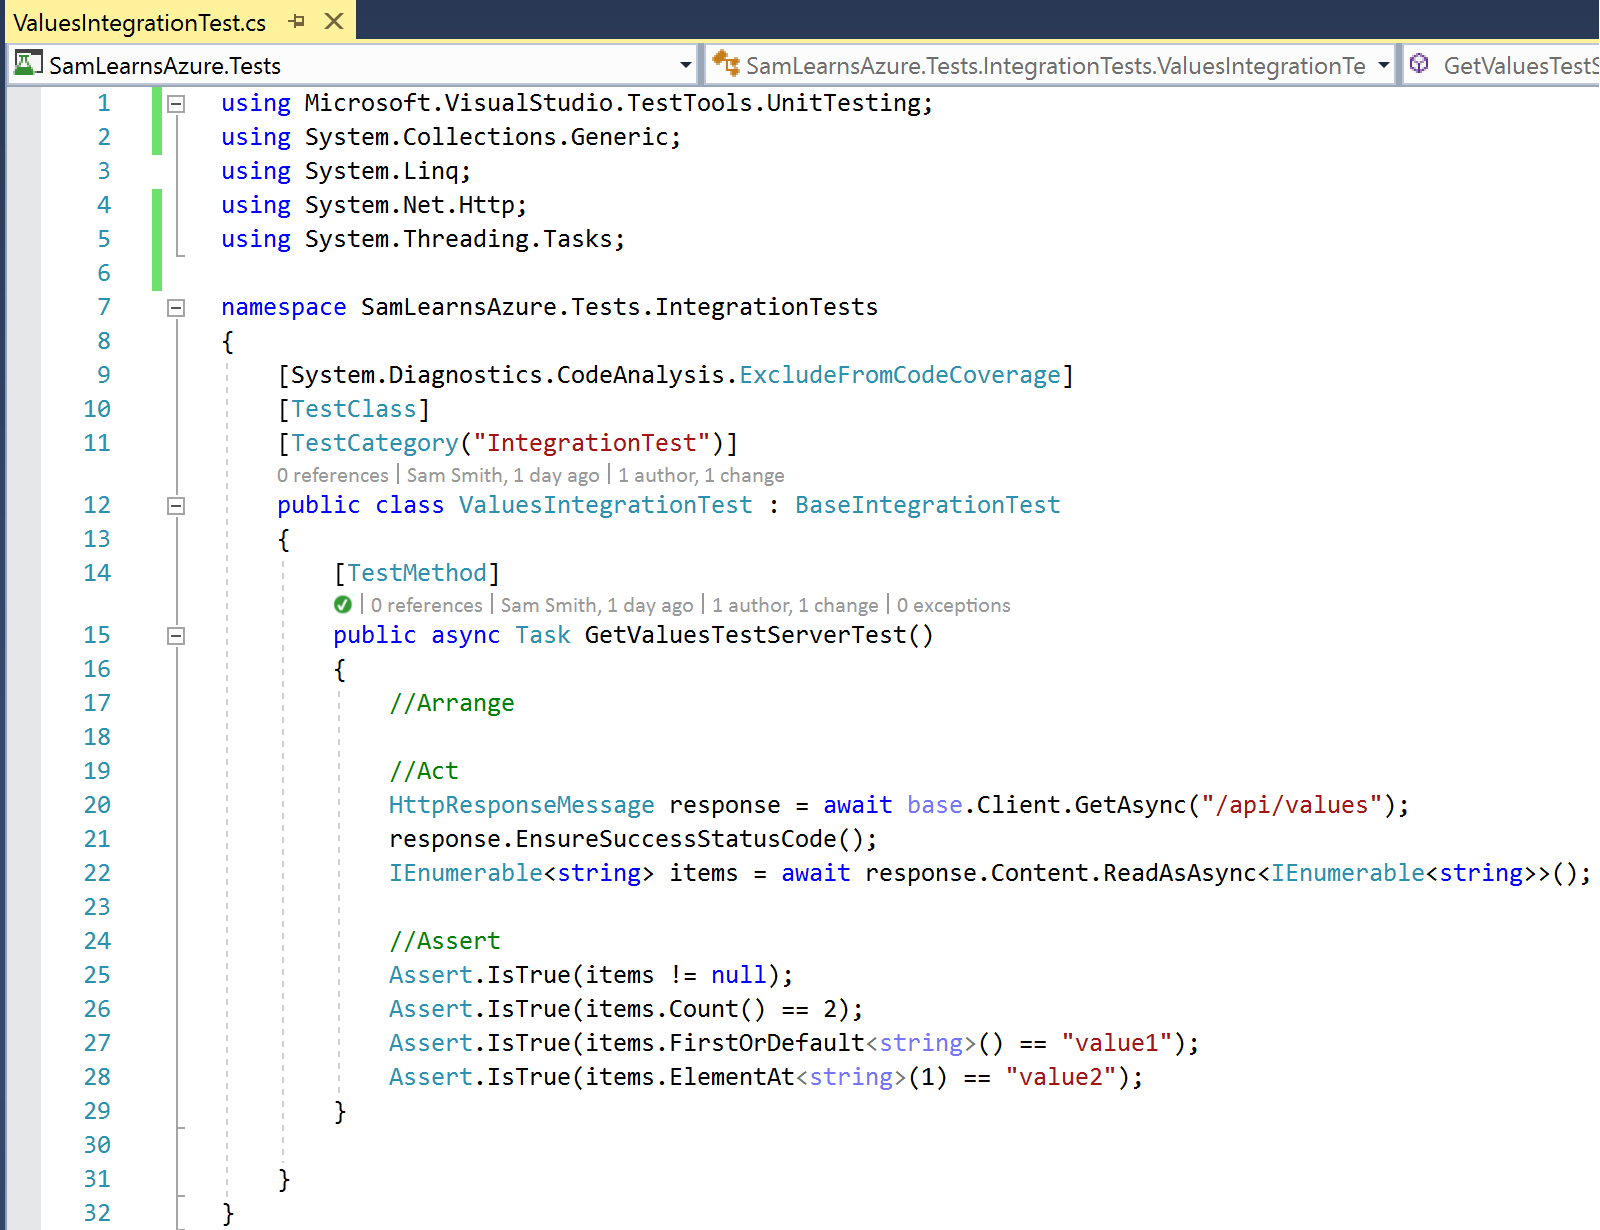
In our other integration test, we are using the test server to call the base Client variable to pass the API Url string to receive an HTTP response. We then read that response and convert it into the data type we are expecting, and assert the result to ensure this is what we were expecting.
How to create the client id and client secret for Azure Key Vault
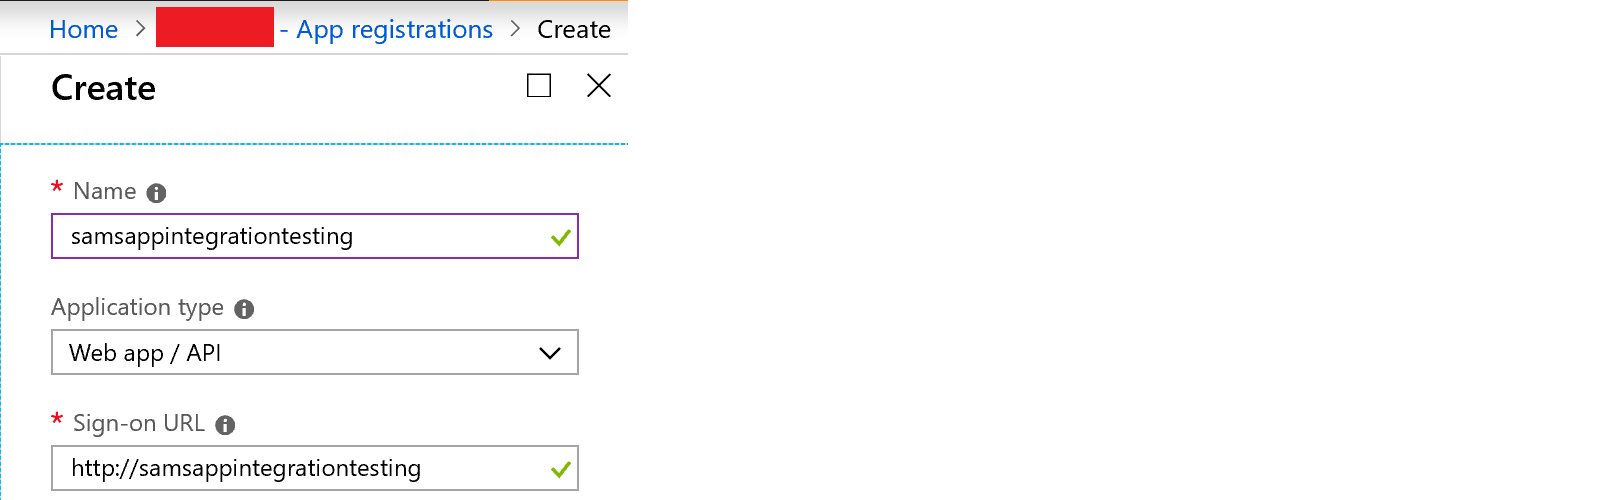
To use the key vault with a client id and client secret, we need to register a new app in our Azure Active Directory. To complete this, we browse to “Azure Active Directory” in our Azure Portal and select “App registrations” from the menu. We then create a new registration. We use the name “samsappintegrationtesting”, and an application type of “Web app/ API”, but the sign-on URL can be anything.
In the following screen, we make a note of the “Application ID”, and then press the settings button.

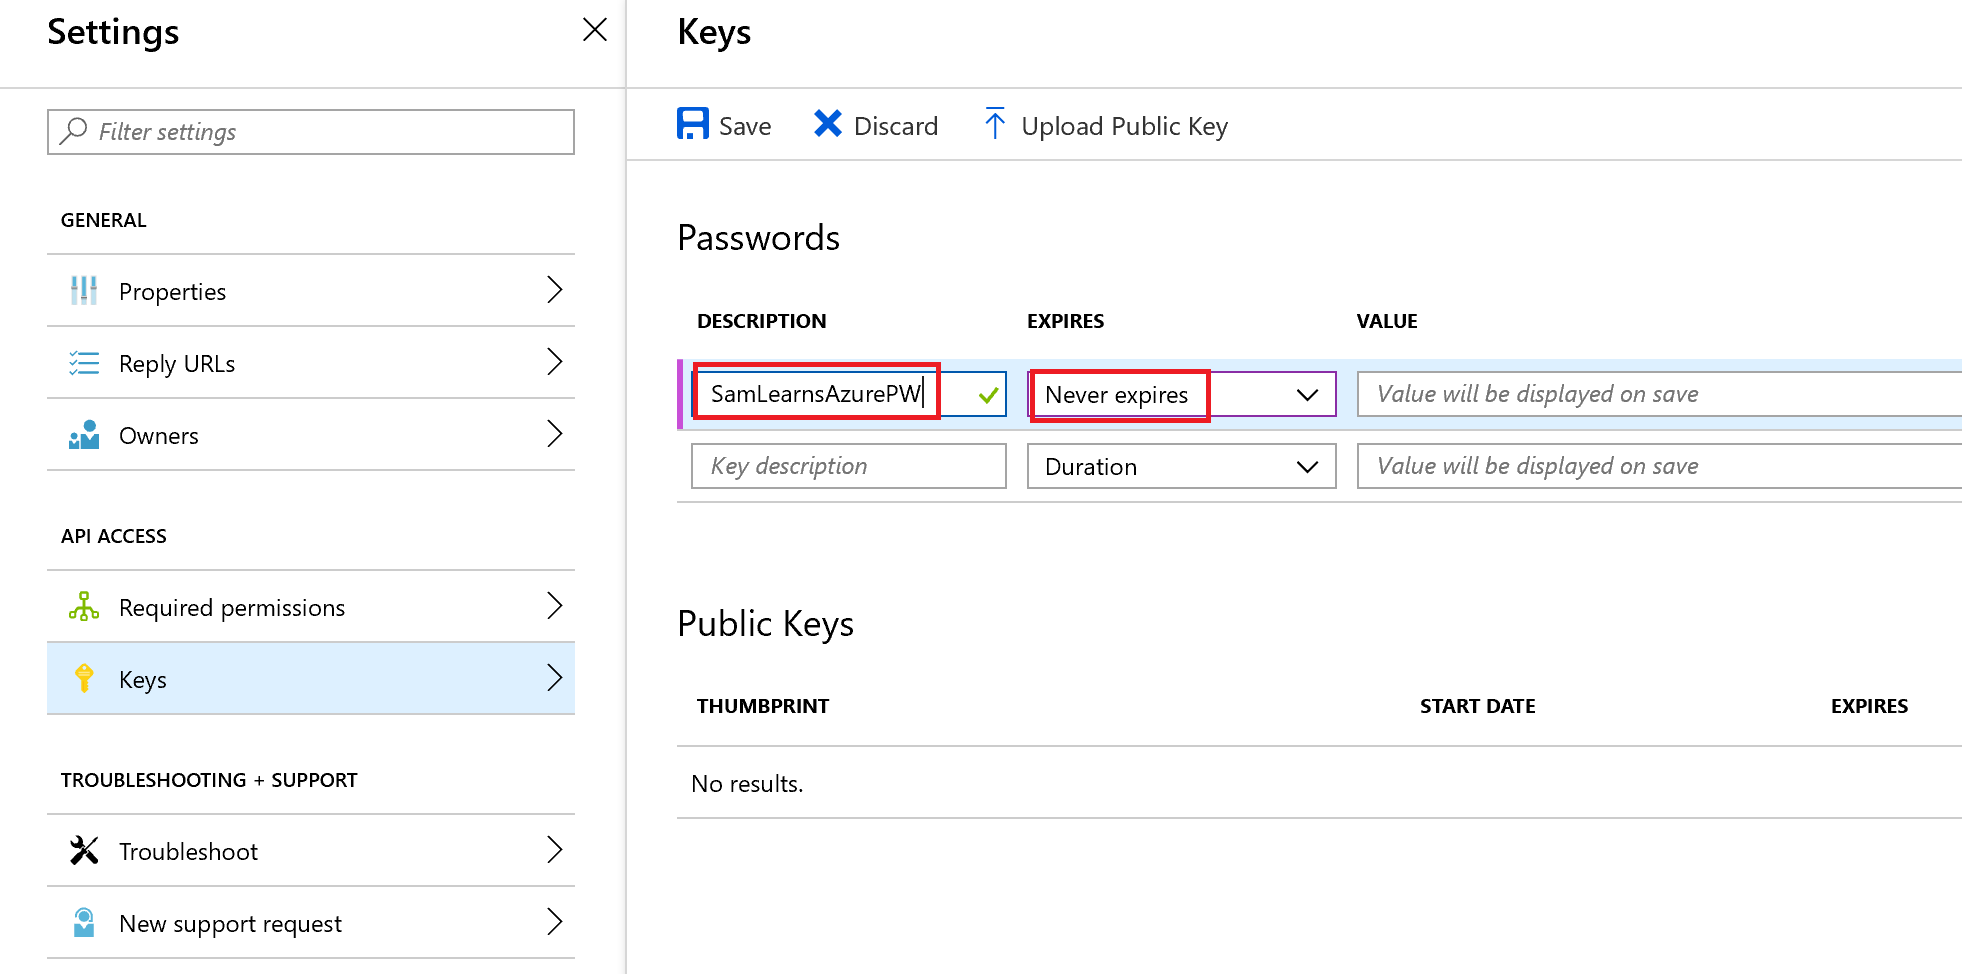
In the settings section, we select “Keys” from the menu items and then enter in a password description – this has to be 15 or less characters. We also set the “Expires” field to “Never expires”. Saving this generates a value, a secret key that we need to copy – we cannot access this again.
With this information, we populate the appsettings values with our client id and client secret. This is read into the base integration class we created above
Using CredScan to detect secrets
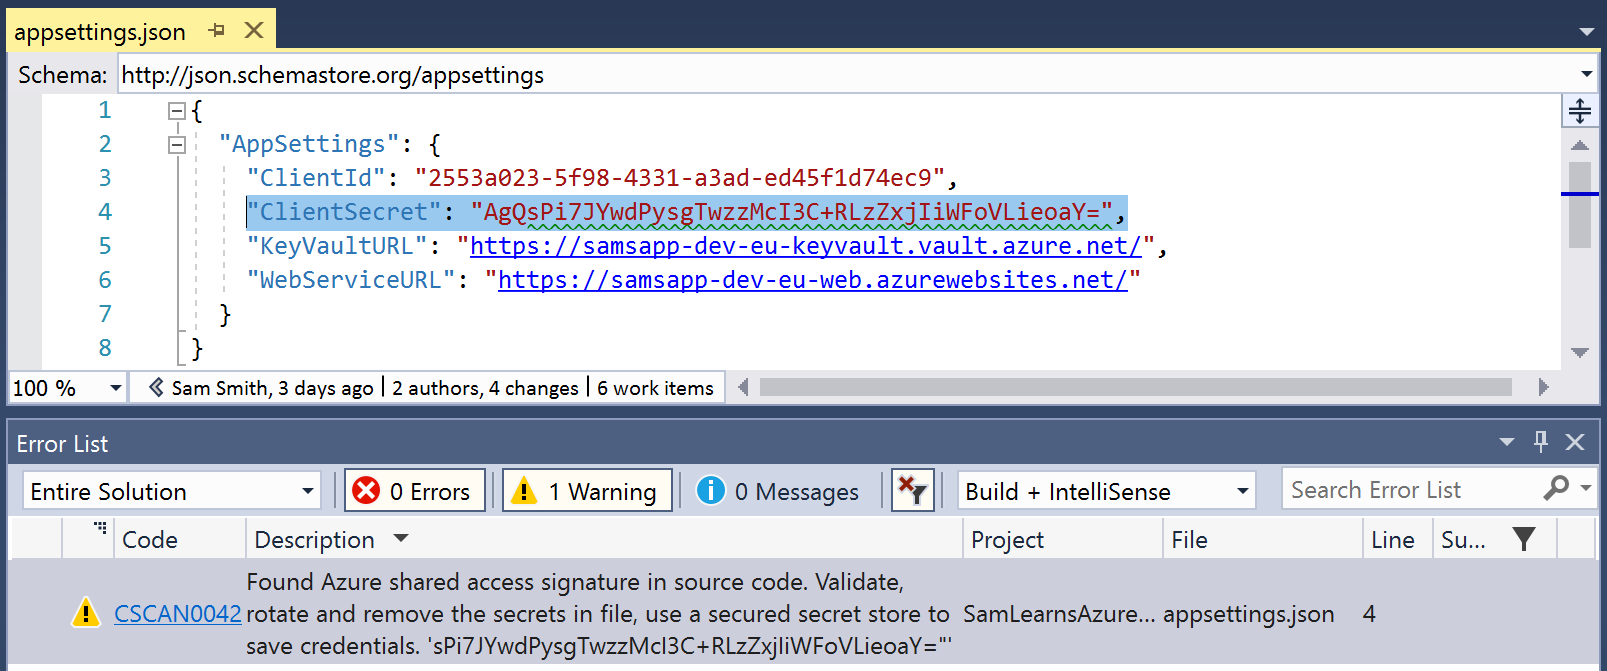
CredScan is a tool to identify secrets in code. CredScan is available in Visual Studio as part of the Microsoft DevLabs extension, and in Azure DevOps, as a private preview you can sign up for. As we’ve created all of this infrastructure to use Azure Key Vault, going forward, we will use CredScan as a policy check to prevent future developers adding secrets in our code going forward. With the “Microsoft DevLabs” extension enabled in Visual Studio, CredScan runs against our code looking for secrets. Here it found a secret in our appsettings.json file in our test profile.
With the preview enabled in Azure DevOps, we can also use the security tasks to detect secrets. This is useful, as we can create a gate to ensure that secrets are not accepted into our branches. If a secret is accidentally added, the Pull Request build will fail, preventing the secret from going to production.
To use CredScan in Azure DevOps, we add the following YAML for the CredScan task – by adding it to an empty build with the designer view, and then clicking the “View YAML” button to extract the YAML. In our build, we add this YAML to the end of the build, after the “Publish Artifacts” task. This is the recommended position in the build for these tasks per the Microsoft Security Code Analysis documentation. To configure the build to break when CredScan identifies an issues in the code, we use the ‘Post-Analysis’ build task.

We commit and push this code, and watch our pull request run and validate that we have no secrets. We can complete our pull request and complete this feature!
Wrapup
Today we focused on methods to help keep our secrets safe, secure and out of our source code with Azure Key Vault. We also looked at how we can use CredScan to identify secrets in Visual Studio, and ensure that any code we check in is free of secrets.
August Update
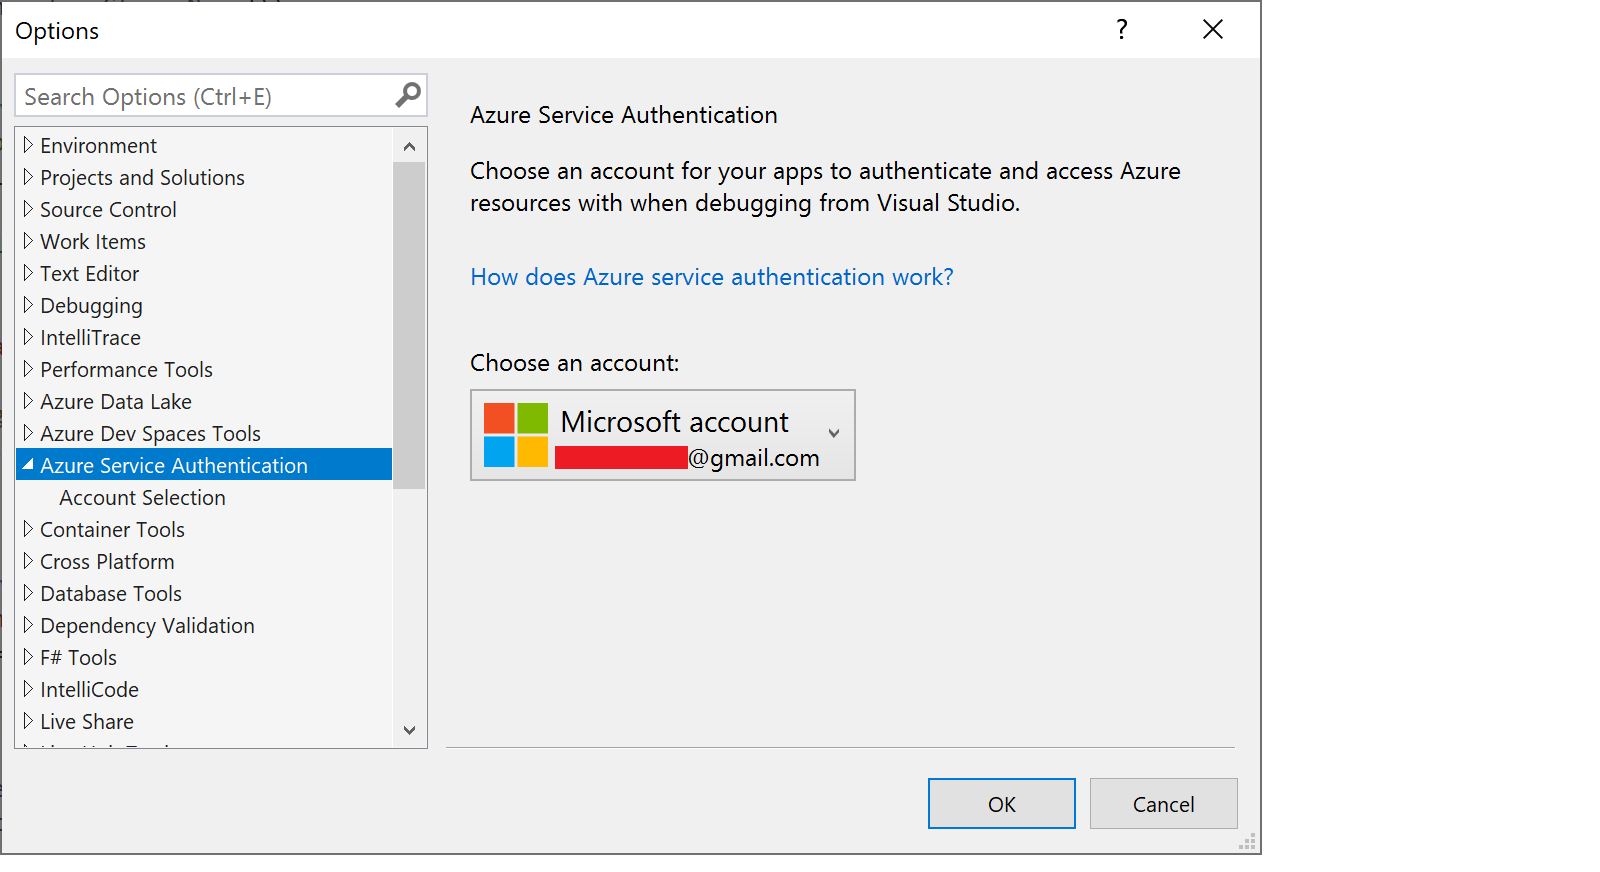
After rebuilding our dev machine, we were suddenly unable to debug, receiving error messages that we did not have permission to connect to our key vault. It turned out that in Visual Studio, in the Tools>Options menu, has a place where you can specify which account to have Visual Studio connect to Azure. Here you need to make sure your account is authenticated, (and is not asking you to re-enter credentials), and the correct account is selected.
References
- Azure Key Vault MS Docs: https://docs.microsoft.com/en-us/aspnet/core/security/key-vault-configuration?view=aspnetcore-2.1
- Azure Key Vault: https://www.codeisahighway.com/create-an-azure-key-vault-using-an-arm-template-api-version-2015-06-01-and-azure-powershell-v1-0-4/
- Azure Key Vault with Managed Service Identify (MSI): https://azure.microsoft.com/en-us/resources/samples/app-service-msi-keyvault-dotnet/
- Using MSI in Key Vault Arm Templates: https://briantjackett.com/2018/03/27/how-to-reference-azure-managed-service-identity-msi-during-arm-template-deployment/
- Creating an application client id and client secret: https://www.netiq.com/communities/cool-solutions/creating-application-client-id-client-secret-microsoft-azure-new-portal/
- CredScan: https://blogs.msdn.microsoft.com/visualstudio/2017/11/17/managing-secrets-securely-in-the-cloud/
- CredScan documentation : https://secdevtools.azurewebsites.net/helpcredscan.html
- Managing secrets in the cloud: https://blogs.msdn.microsoft.com/visualstudio/2017/11/17/managing-secrets-securely-in-the-cloud/
- Featured image credit: https://www.zensar.com/sites/default/files/services/section/Cybersecurity.jpg

2 comments