

In the second part of our data migration, we are going to move on to a large number of images we have in our zip files. We need to unzip and move these into our Azure Storage Blobs. There were a number of options for us to achieve this. Today we will examine those options to understand how we ended up with Azure Functions. Today we are going to:
- Investigate different methods to unzip over a GB of zip files with Azure Logic Apps, Azure Functions and the C# namespace System.IO.Compression.
- Use DevOps to build, and deploy our infrastructure as code (including the Data Factory from part 1), and deploy our Azure function, with supporting Application Insights and a hosting plan instances.
Investigating how to unzip our images
We have 1.3GB of images across 135 zip files. We need to unzip these into an Azure Storage for our application. In our last part, we attempted to unzip them ourselves and upload the unzipped images, but this took too long – about 3 hours to process. Our requirements here include being able to unzip the files and upload them to Azure Storage easily and quickly.
Attempt #1: First up, are going to try and use an Azure Logic App. Logic Apps have a built in task to unzip files, this could be the easiest way to unzip files without writing code. Unfortunately, right away we discovered there is a restriction on the maximum size of zip files at 50MB – and we have a few that are a couple hundred MB.
Attempt #2: As it looks like we need to write some code, we start back in our “SamLearnsAzure.DataMigration.App” console application, to add some code to unzip the files inside of Azure Storage (line 145 of AzureBlobManagement.cs). Previously we unzipped the files locally and uploaded the unzipped images, but this took too long – over 3 hours. We create a new method to use System.IO.Compression namespace to unzip the files. When we run this on all of the zips, it takes 3 hours… again. We suspect it’s actually unzipping the files locally when it should be in the storage – or perhaps it’s just our serial method that processes one file at a time. We briefly consider setting up a thread pool, before deciding on another new approach.
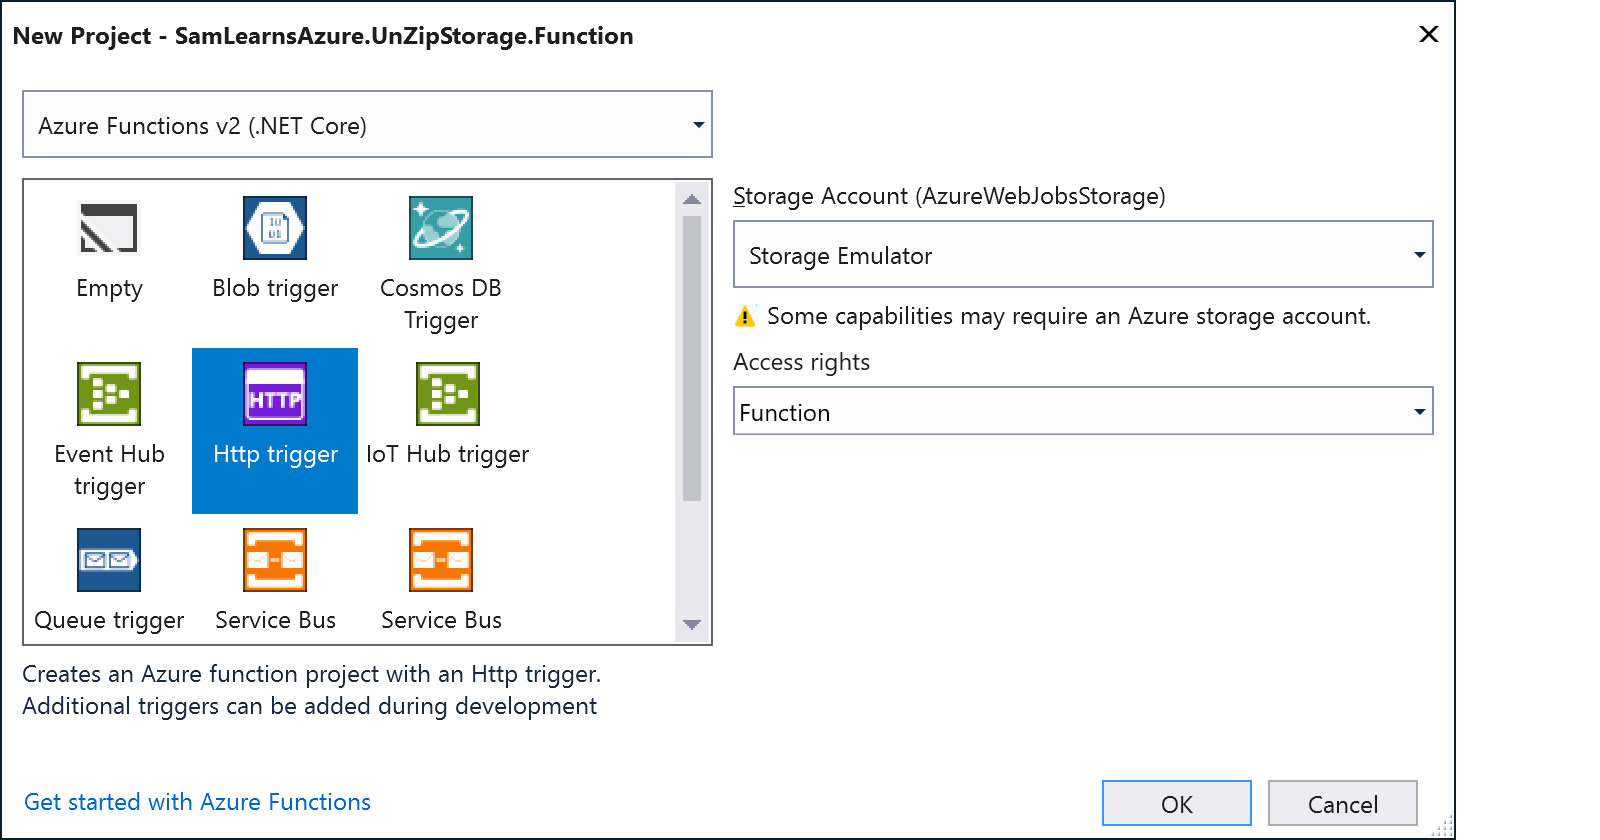
Attempt #3: The next approach will use Azure Functions, unzipping files into Azure Data Storage. There are a number of advantages in using a function here. As there are millions of images to unzip, processing the content in the cloud will allow us to scale and process the data in parallel. This parallel processing will enable us to complete the workload in seconds, rather than hours – as we could have an instance of the function run for each zip. The plan here is to have the console app still upload the zip files, and then trigger a HTTP trigger for each file. We start by right clicking on our solution to add a new project, selecting the “Azure Functions” template, and naming the project “SamLearnsAzure.DataMigration.Function”.

We then select “Azure Functions v2 (.NET Core)” to use the .NET core version, “Http Trigger”, to create an HTTP trigger, and leave the other options as they stand.
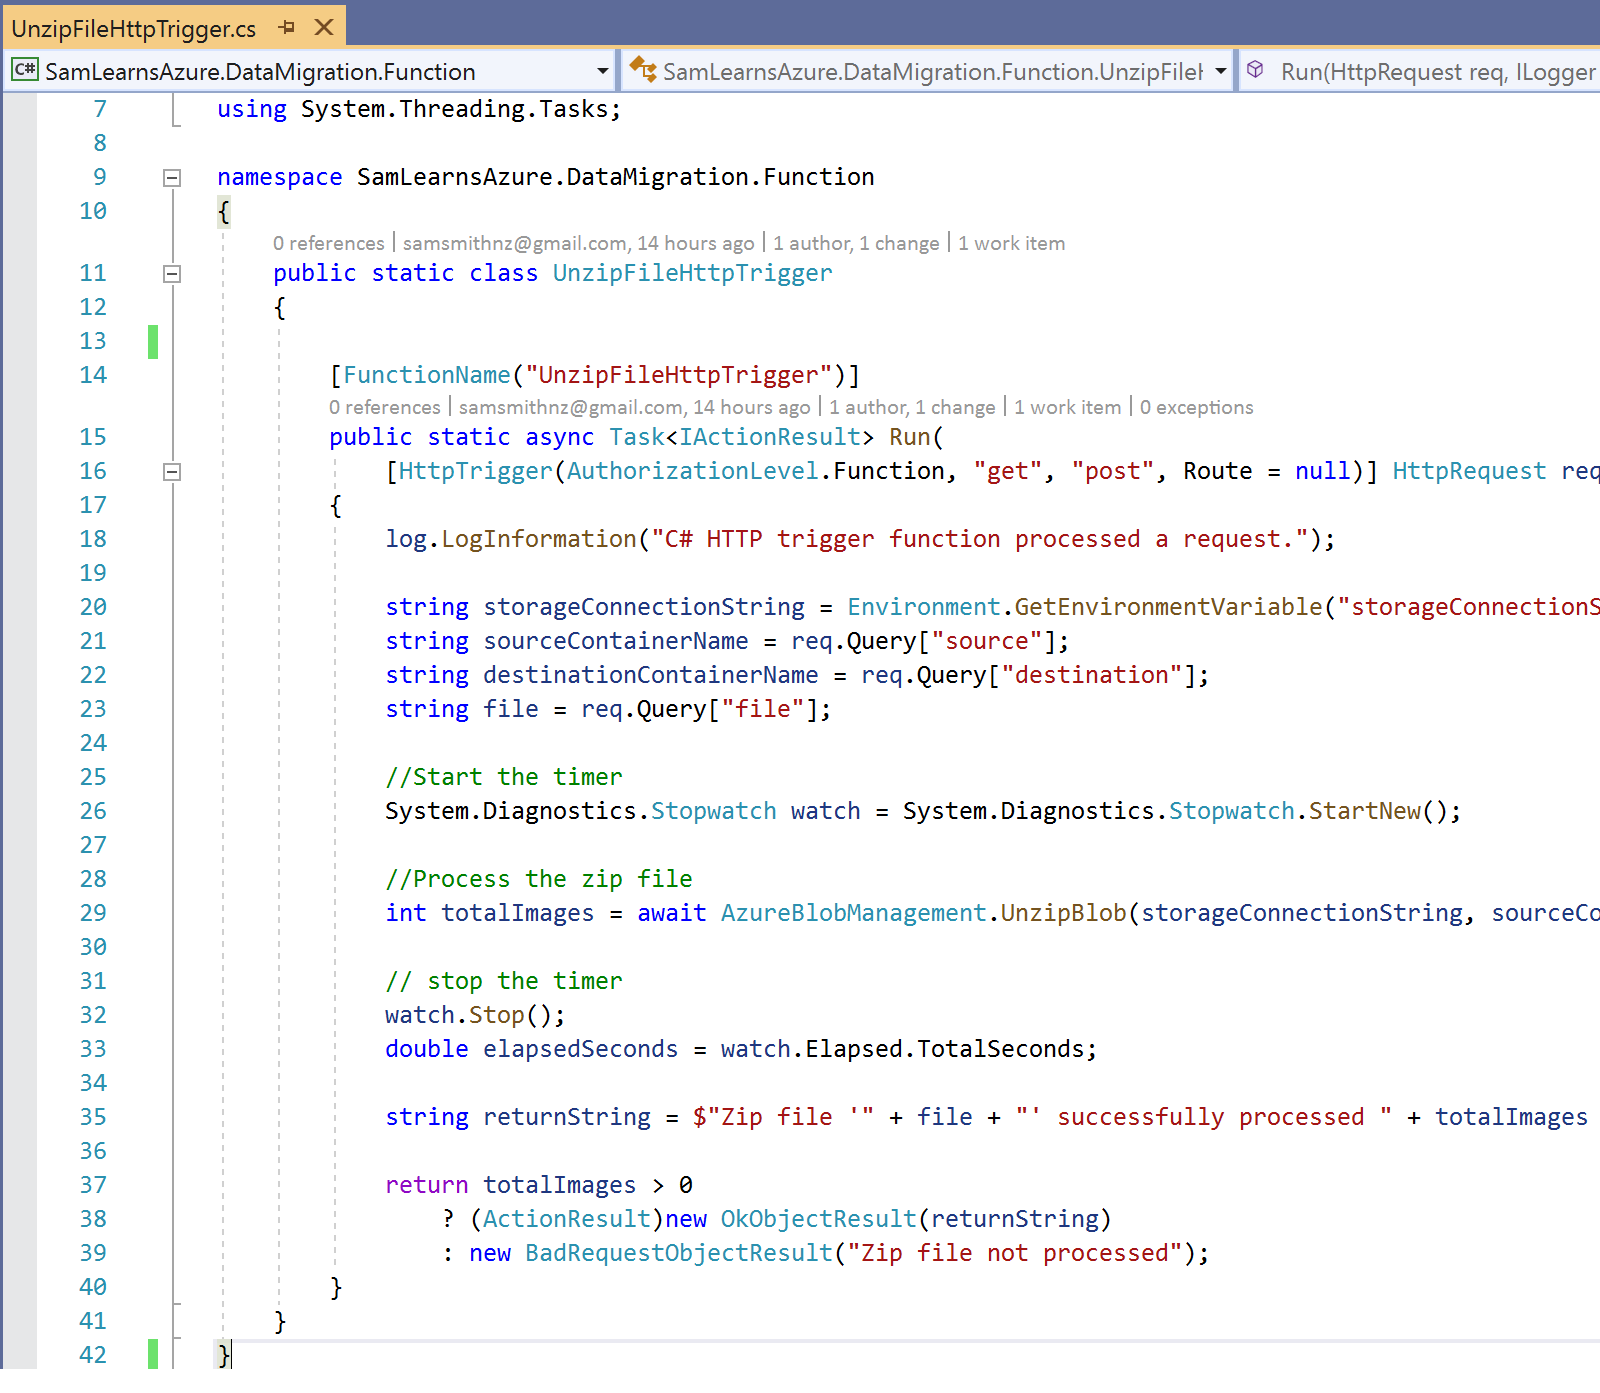
This creates a new trigger, that we rename to “UnzipFileHttpTrigger“. We use the query string to pass data in, so in this case ”
UnzipFileHttpTrigger?source=&destination=[destination container name]&file=[file to unzip]”. You can see these query string items being extracted on lines 20 to 23 below. On line 26 we start a timer to add some more information to our log. On line 29 we unzip the blob using the code we created on our previous attempt. We then stop the timer on line 32 and log and return the result.
Looking at the logs, this method works well for individual files, processing most files in seconds, with a few minutes for the larger 200MB+ files. This is a good result, however, we struggle to find a way to “fire and forget”. Ideally, we’d call the HTTP trigger for all 135 files and not worry about the response. In general “fire and forget” is not considered good coding practices, so we move to the next attempt.
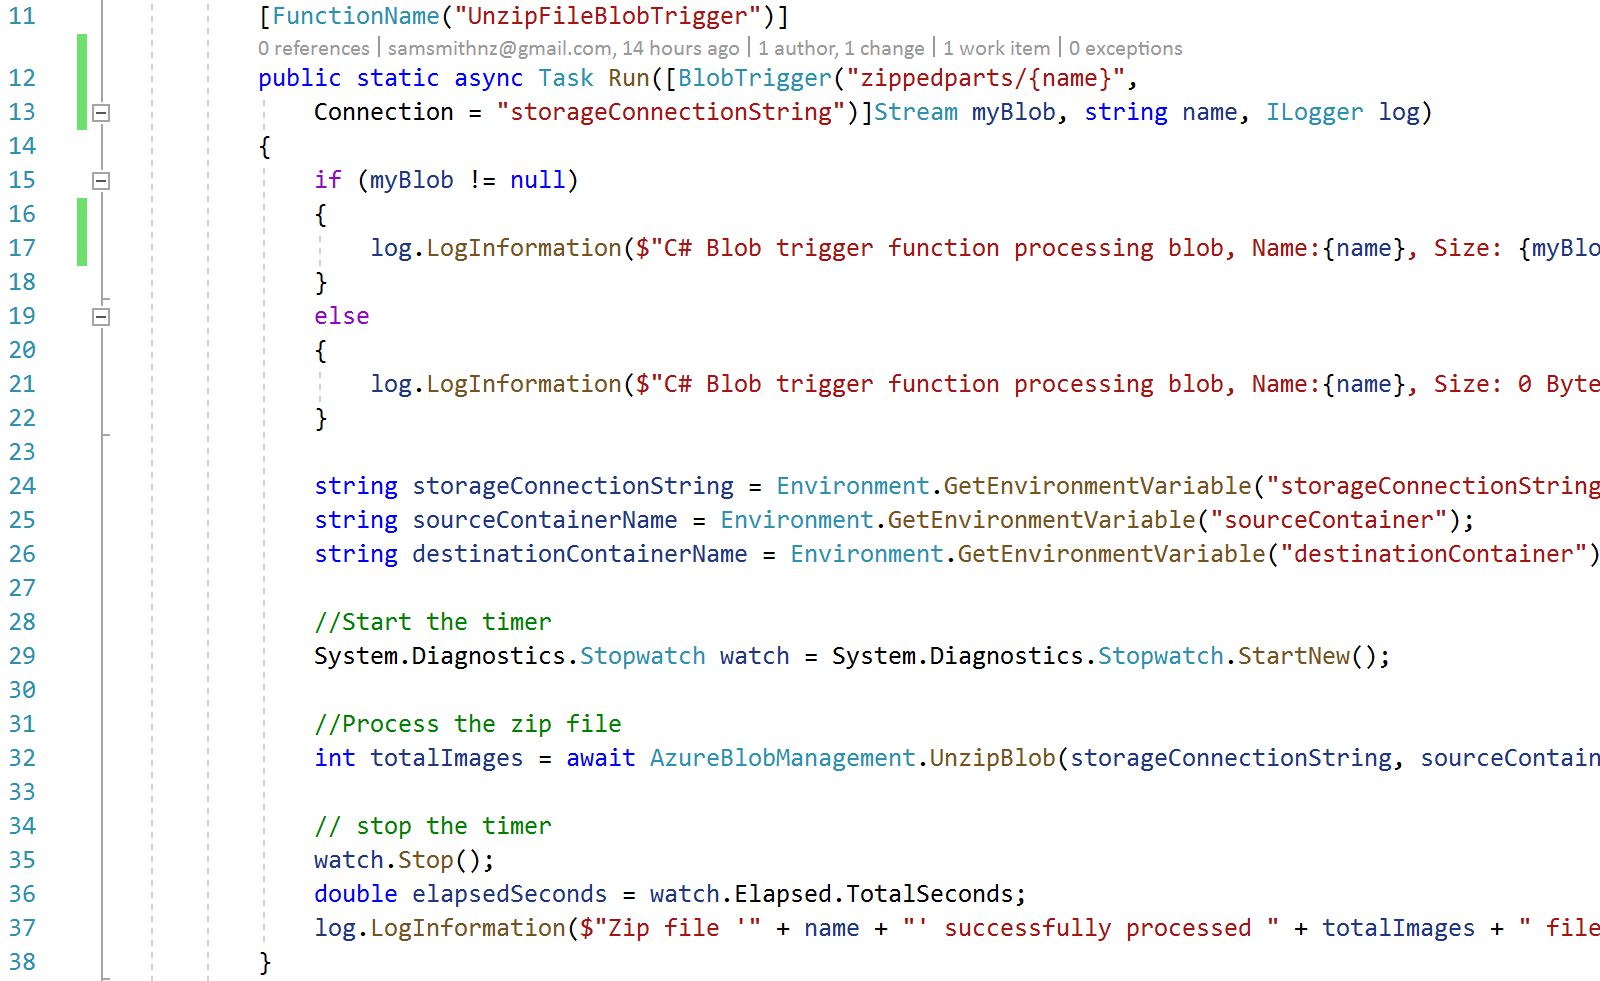
Attempt #4: We’ve done all of the work to unzip, and briefly consider a queue. As we start to investigate setting up a queue, we realize we missed an easy option – a blob storage trigger. This would start the function every time a blob changes, and not require another object (the queue) for us to manage. Reusing the code from the HTTP Trigger function, we create a new function, “UnzipFileBlobTrigger“, with the Blob Trigger.
Our blob trigger uses the default parameters created with the function, but we’ve edited line 12 a little to fire when the “zippedparts” container blobs change – this is the location our console app uplaods files into. We have a little error handling on lines 15-22, then read in the application settings with environment variables on lines 24-26. Then, exactly like the HTTPTrigger, we start a log, unzip the file, and then record the result, on lines 29 to 37. As this is a blob trigger, it doesn’t return a response like an HTTPTrigger, so we just log it.
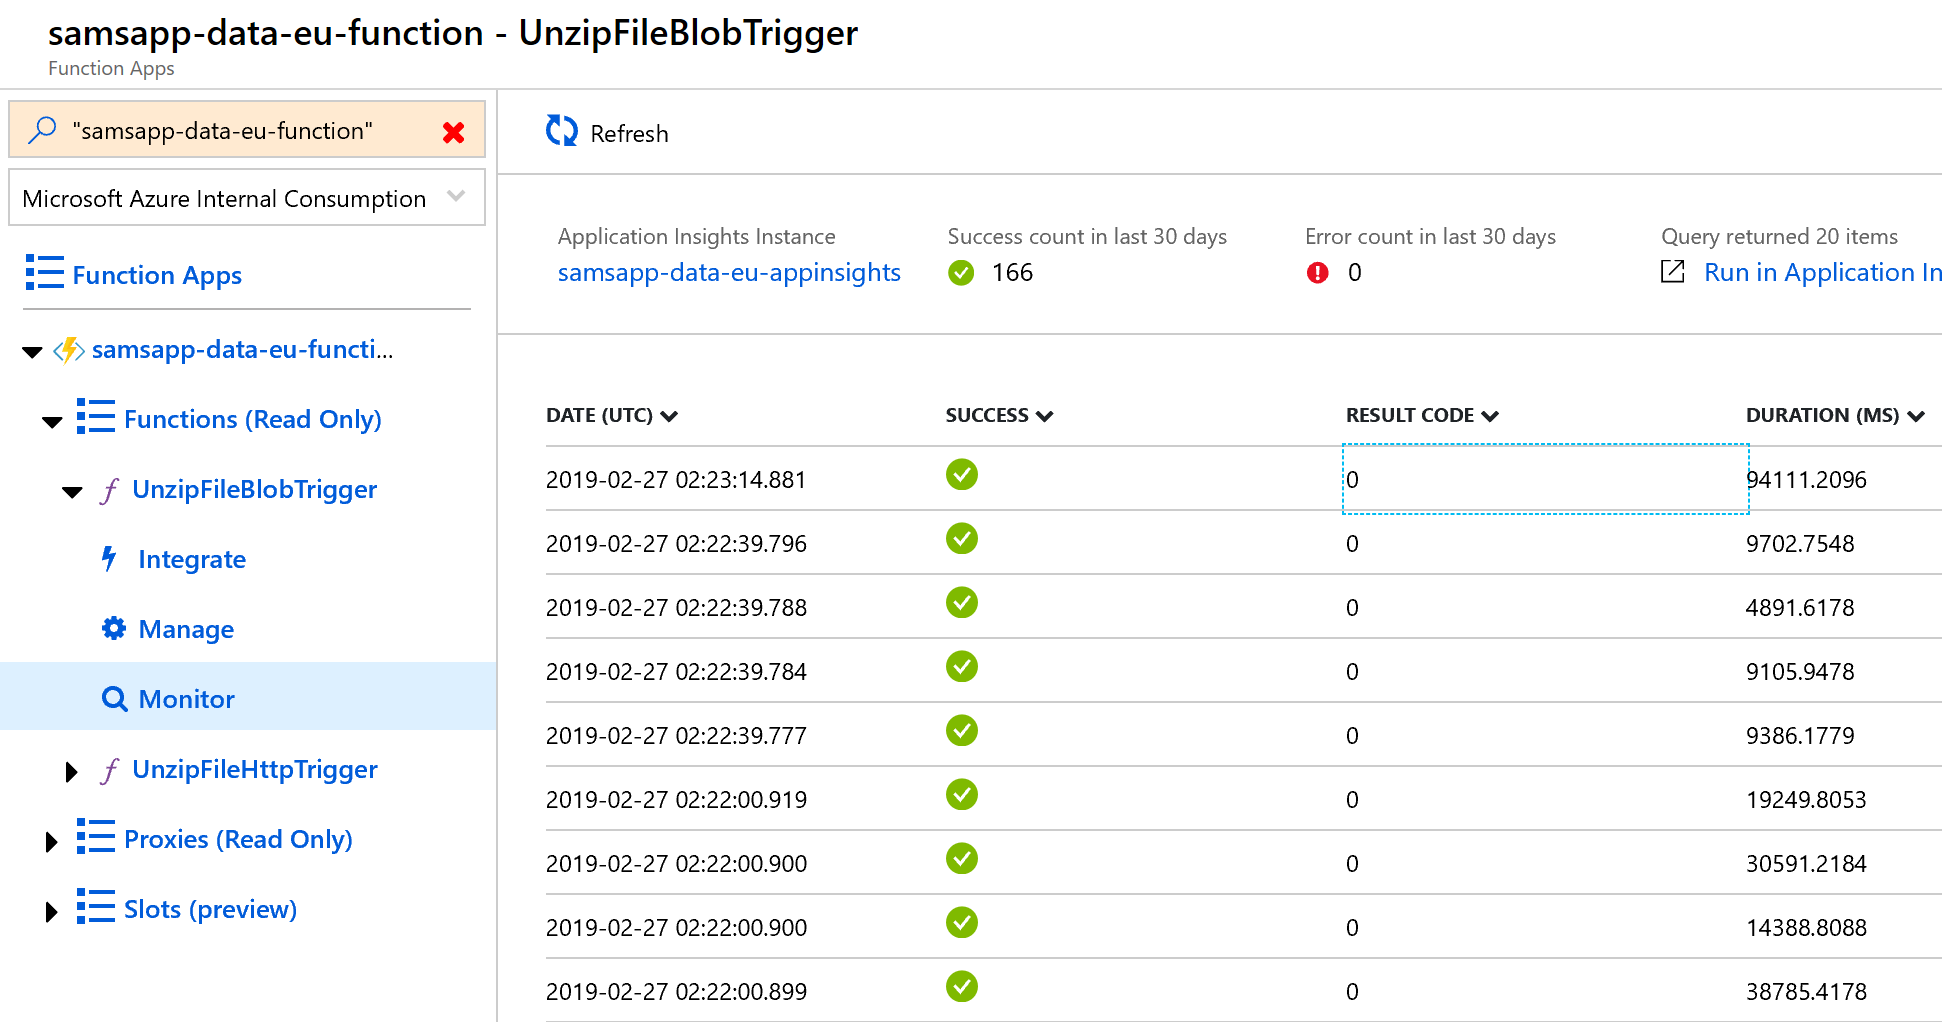
This works brilliantly, processing all of the zip files in 15 minutes – including the 8 minutes required to upload the 1.3GB from our connection. If we were running this more often, we might consider looking for more optimizations, perhaps using a queue and having the function download the file directly into the storage blob, but this is a very good result for us today.
Using infrastructure as code with our data migration projects
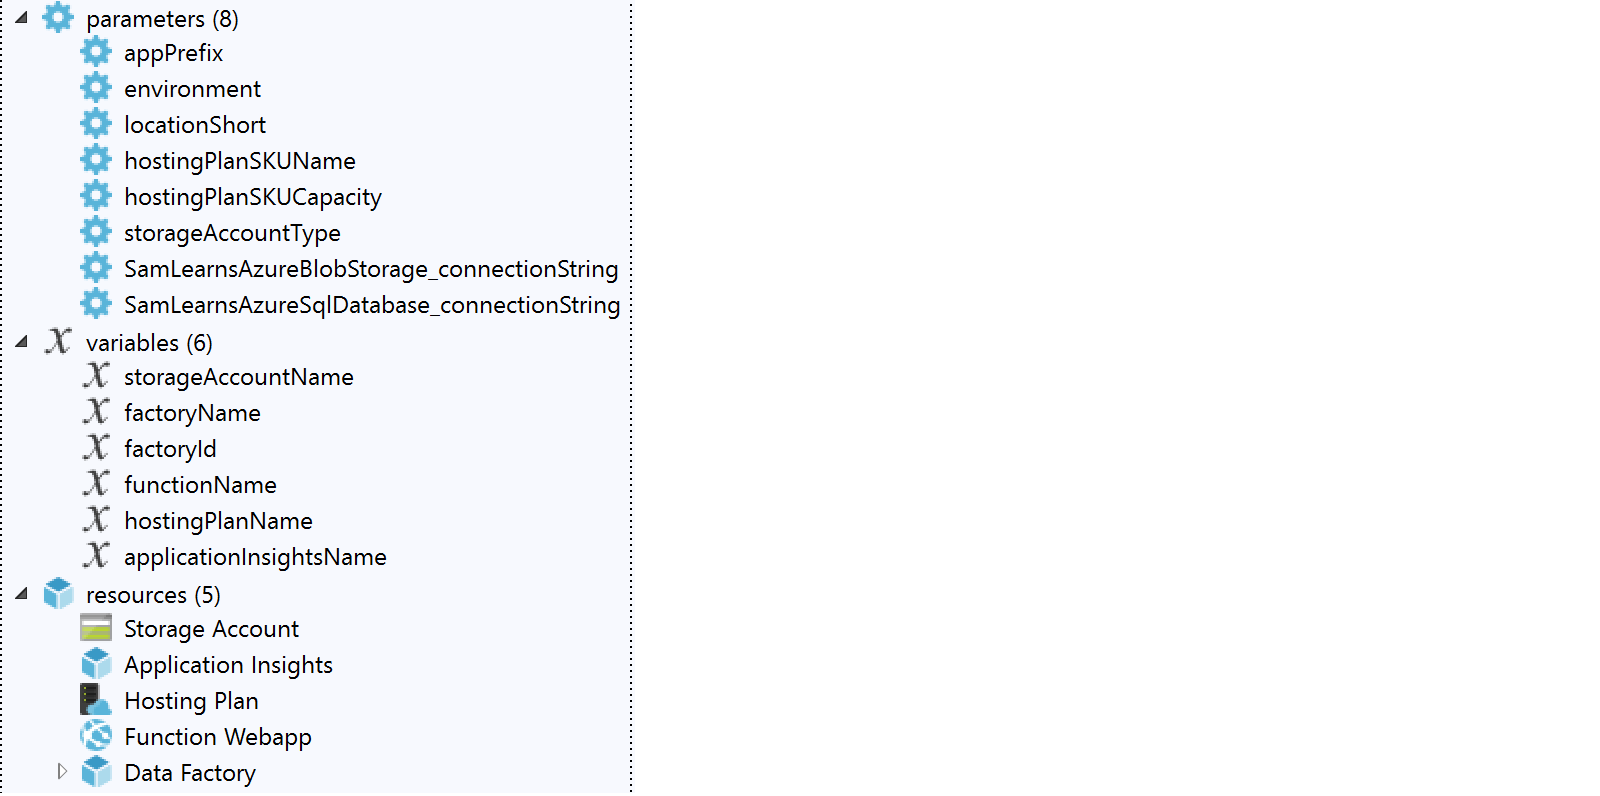
Using infrastructure as code with ARM templates, we need to deploy Azure Storage, our Azure Function with Application Insights, as well as our Azure Data Factory from our previous blog post. As we don’t need this for every environment, we are going to refactor our previous “SamLearnsAzureCore” resource group into a new “SamLearnsAzureData” resource group, to essentially put all of the data migration items in one resource group and prove that what we deploy in “data” matches what has already been created in “core”. We are creating a new ARM Template Visual Studio project for our data migration, and later we will create a separate DevOps pipeline for this, as it’s, (in theory), a one off task – although we may want to run it again if the source files update.
We export an ARM template from the “core” resource group, to generate the Azure storage, host plan and Azure function. Interestingly, this doesn’t create the data factory, so we will have to generate this another way. This is mostly straight forward, but we need to make some minor edits, using a lot of what we learned for our first arm template.
When deploying the functions, we noticed that “AlwaysOn” was not being enabled. This is recommended for functions. To correct this, we need to change the “siteConfig” setting, which is currently set to null.

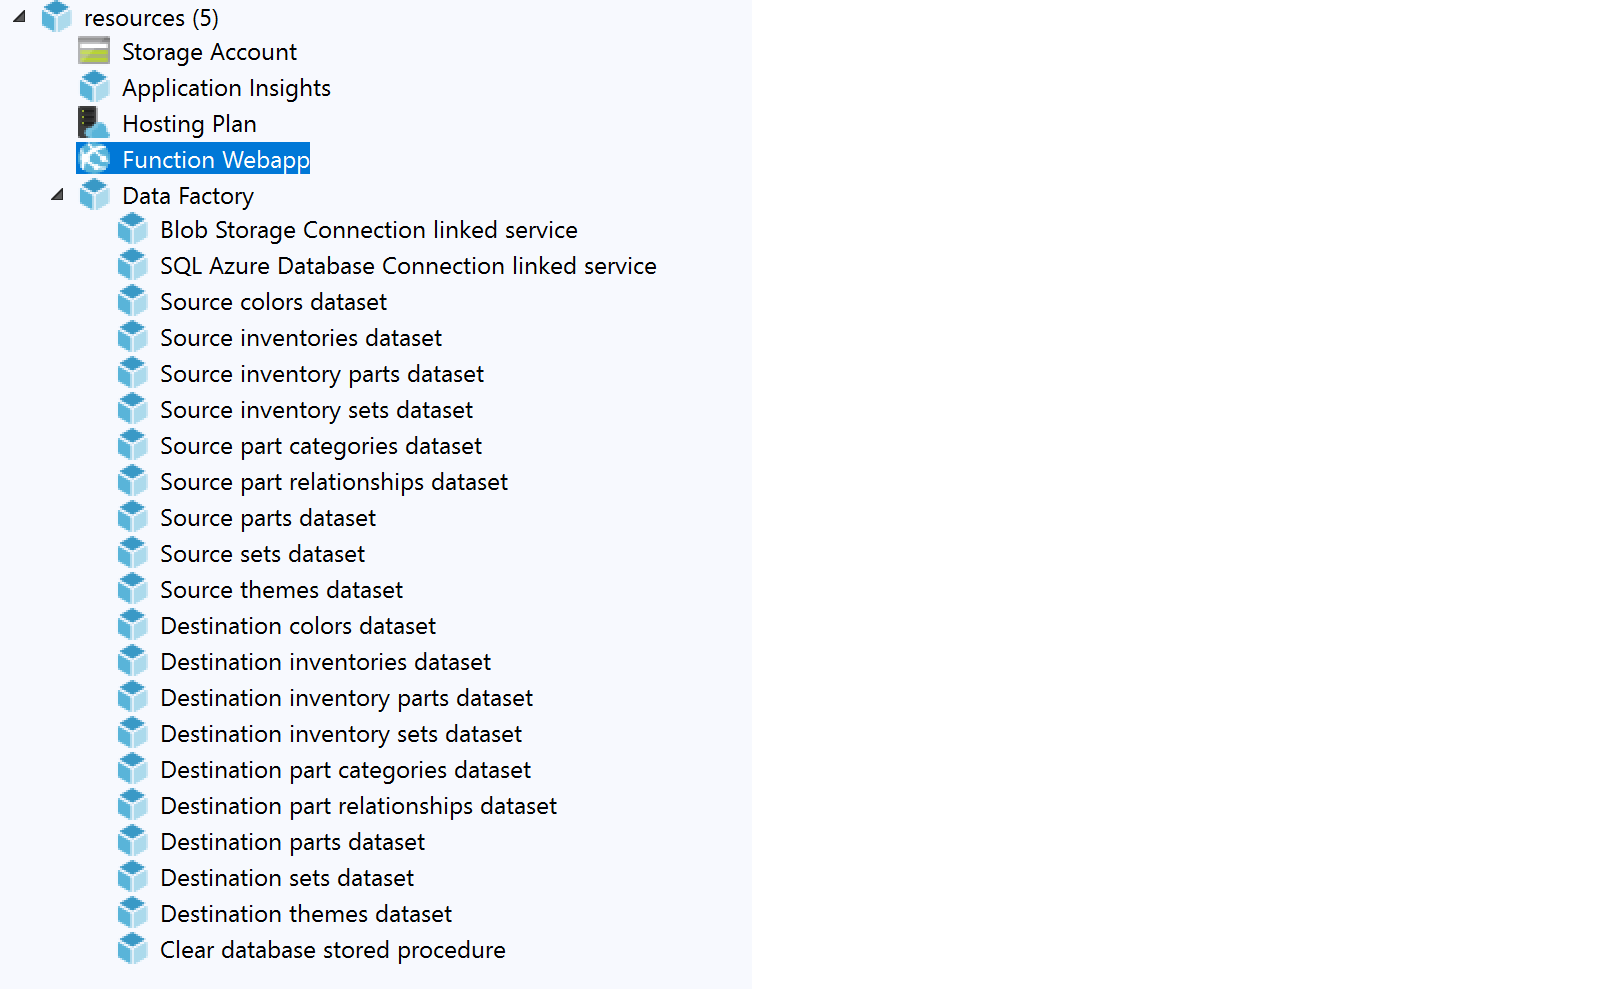
Configuring the ARM Template to deploy the data factory was more complex, to say the least. To export the data factory, you need to enter the data factory pipeline editor and click the ARM template menu to export it.

The actual exported ARM Template is a bit of a mess – it created many linked templates. The problem with a linked template is that you need to call it from a URI – either publicly or from a blob storage. While we did experiment with editing the build to deploy the ARM templates directly to the storage, it made development very difficult – as we couldn’t run and test the ARM template locally. Ultimately, we found a way to combine the Data Factory into a single ARM template allowing us to run and test locally, and also deploy without using Azure Storage.
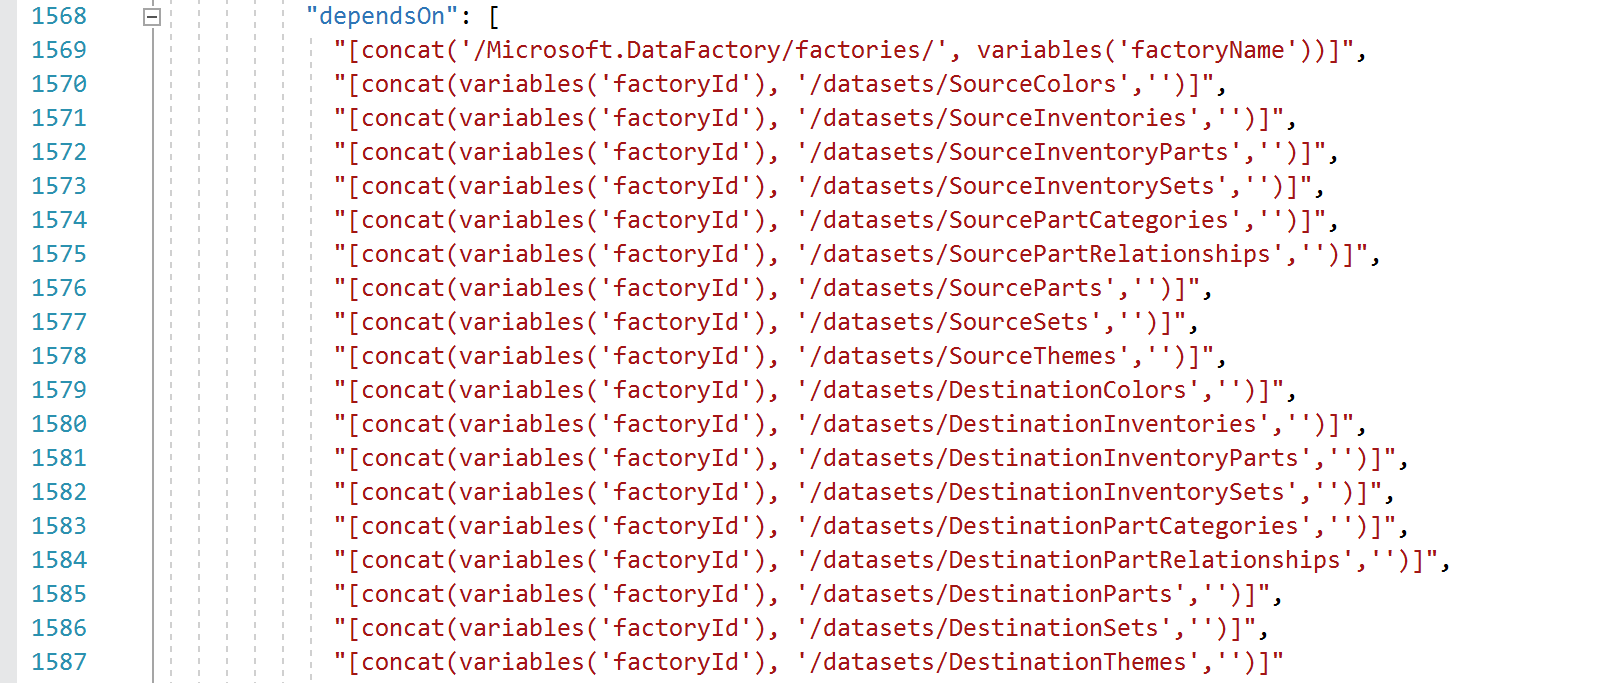
We do need to fairly aggressive with the “DependsOn” properties of our Data Factory children. Before we create our pipeline activities, we need to ensure our datasets have been created, and before we create our datasets, we need to ensure our SQL and storage connections have been created. As a result, the pipeline “dependson” ends up looking like this:
DevOps
Finally it’s time to wire up all of this so that any future changes are automatically built and deployed. First we need a new build. Previously we did this in two separate builds, one of the code and one for ARM templates, but we are combining this into one – mostly because we don’t expect to use this build a great deal, and this will be easier to maintain.
On the Azure Pipeline>build page, we click the new build button, use the visual designer, select the correct repo and branch, and then select the “ASP .NET Core” template. In the new build, we rename it to “SamLearnsAzure-DataMigration-CI”, set the Agent pool to “Hosted VS2017”, delete the “Test” task, and add the migration console app and Azure function projects we need to build. If any of this seems a bit confusing, refer to our old ARM Templates build.
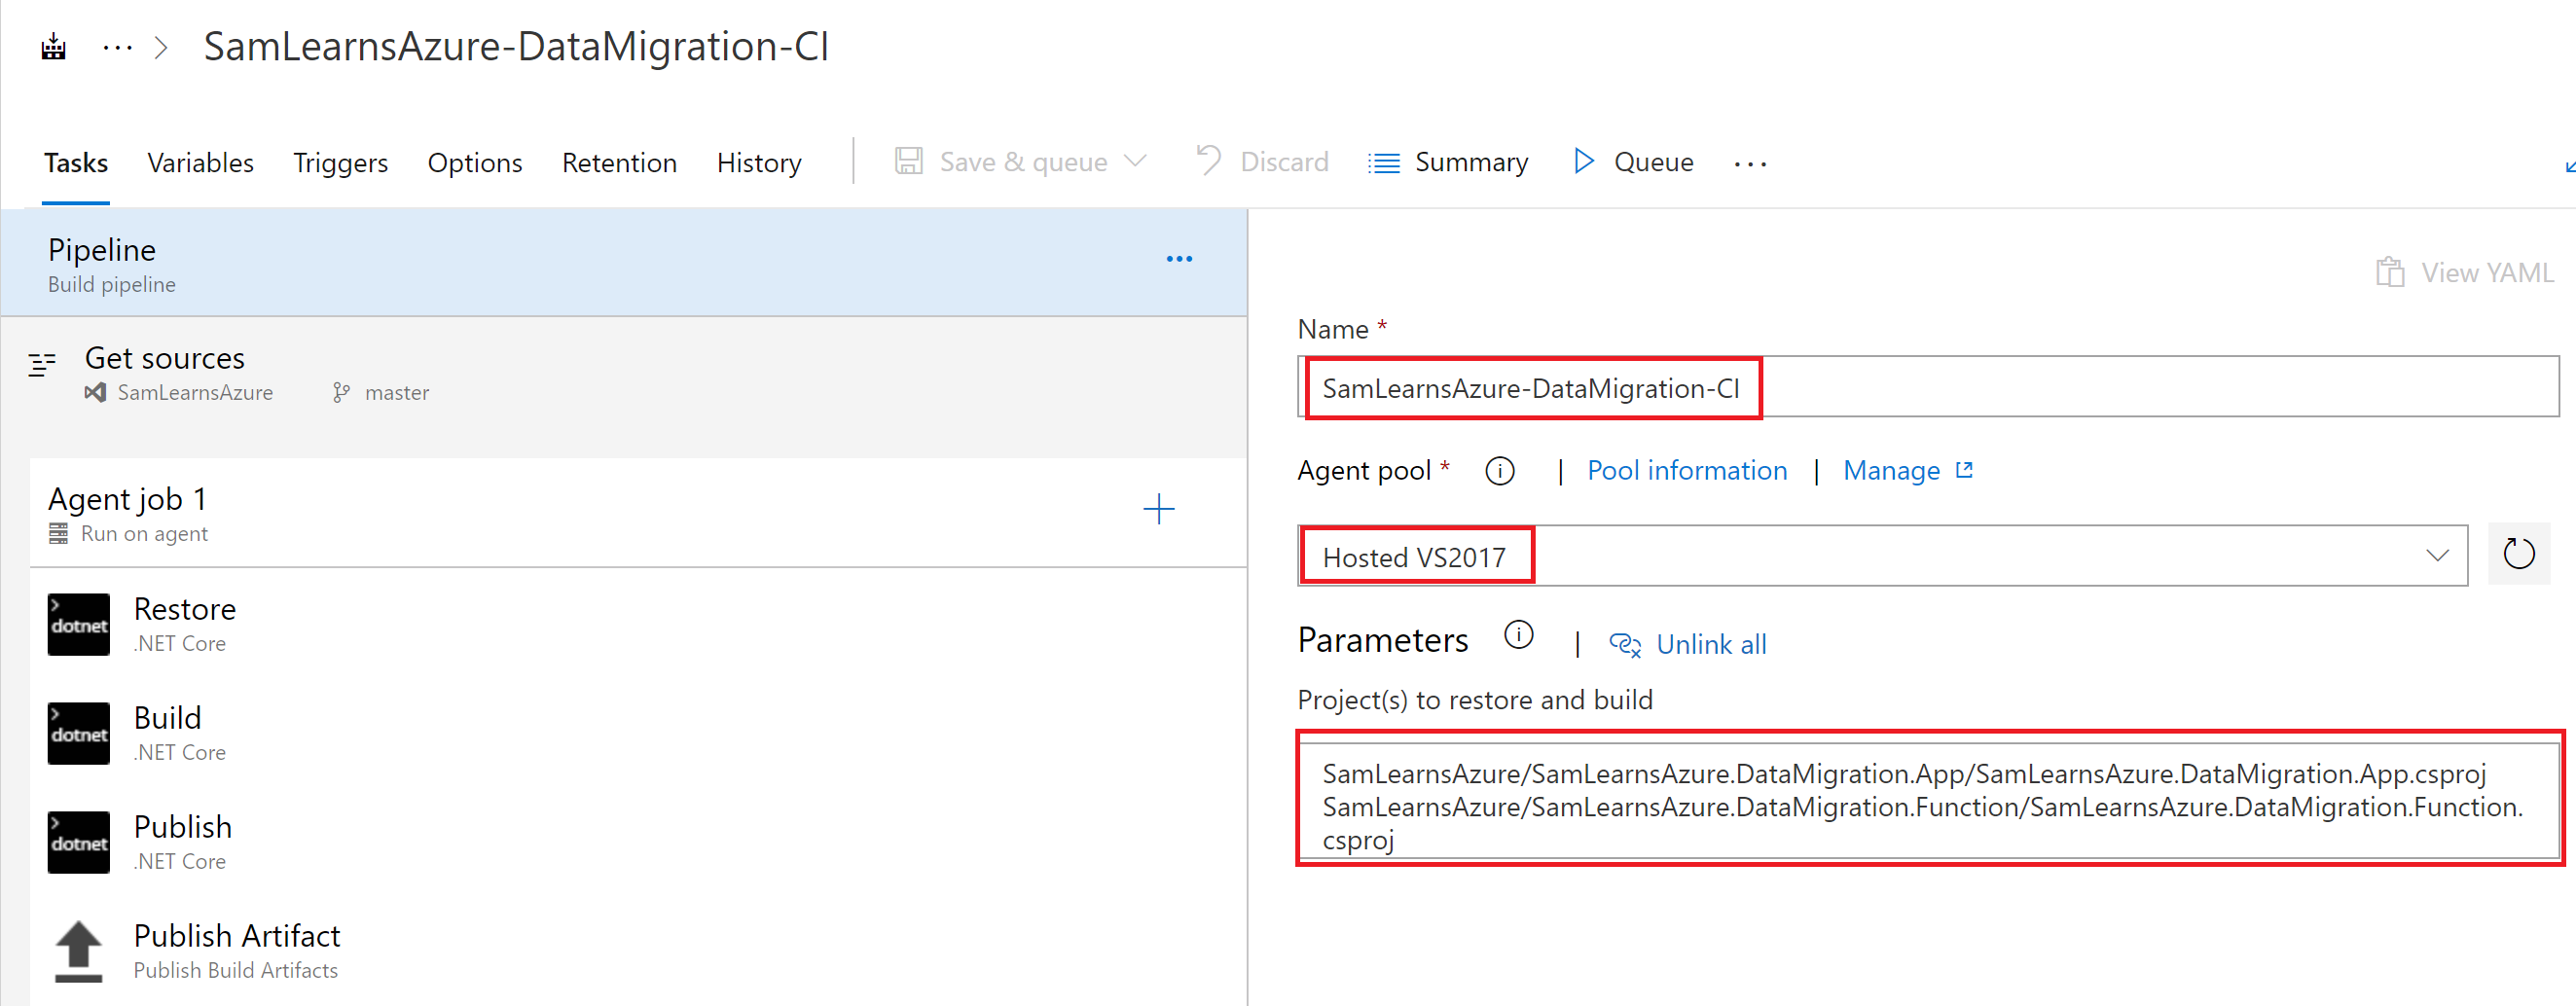
With the basic build created, we need to make a small change to the publish task, un-checking the “Publish Web Projects” checkbox, so that both the function and console app will be built and zipped. While we aren’t planning to do anything with the console app, it’s good to have it built and ready.

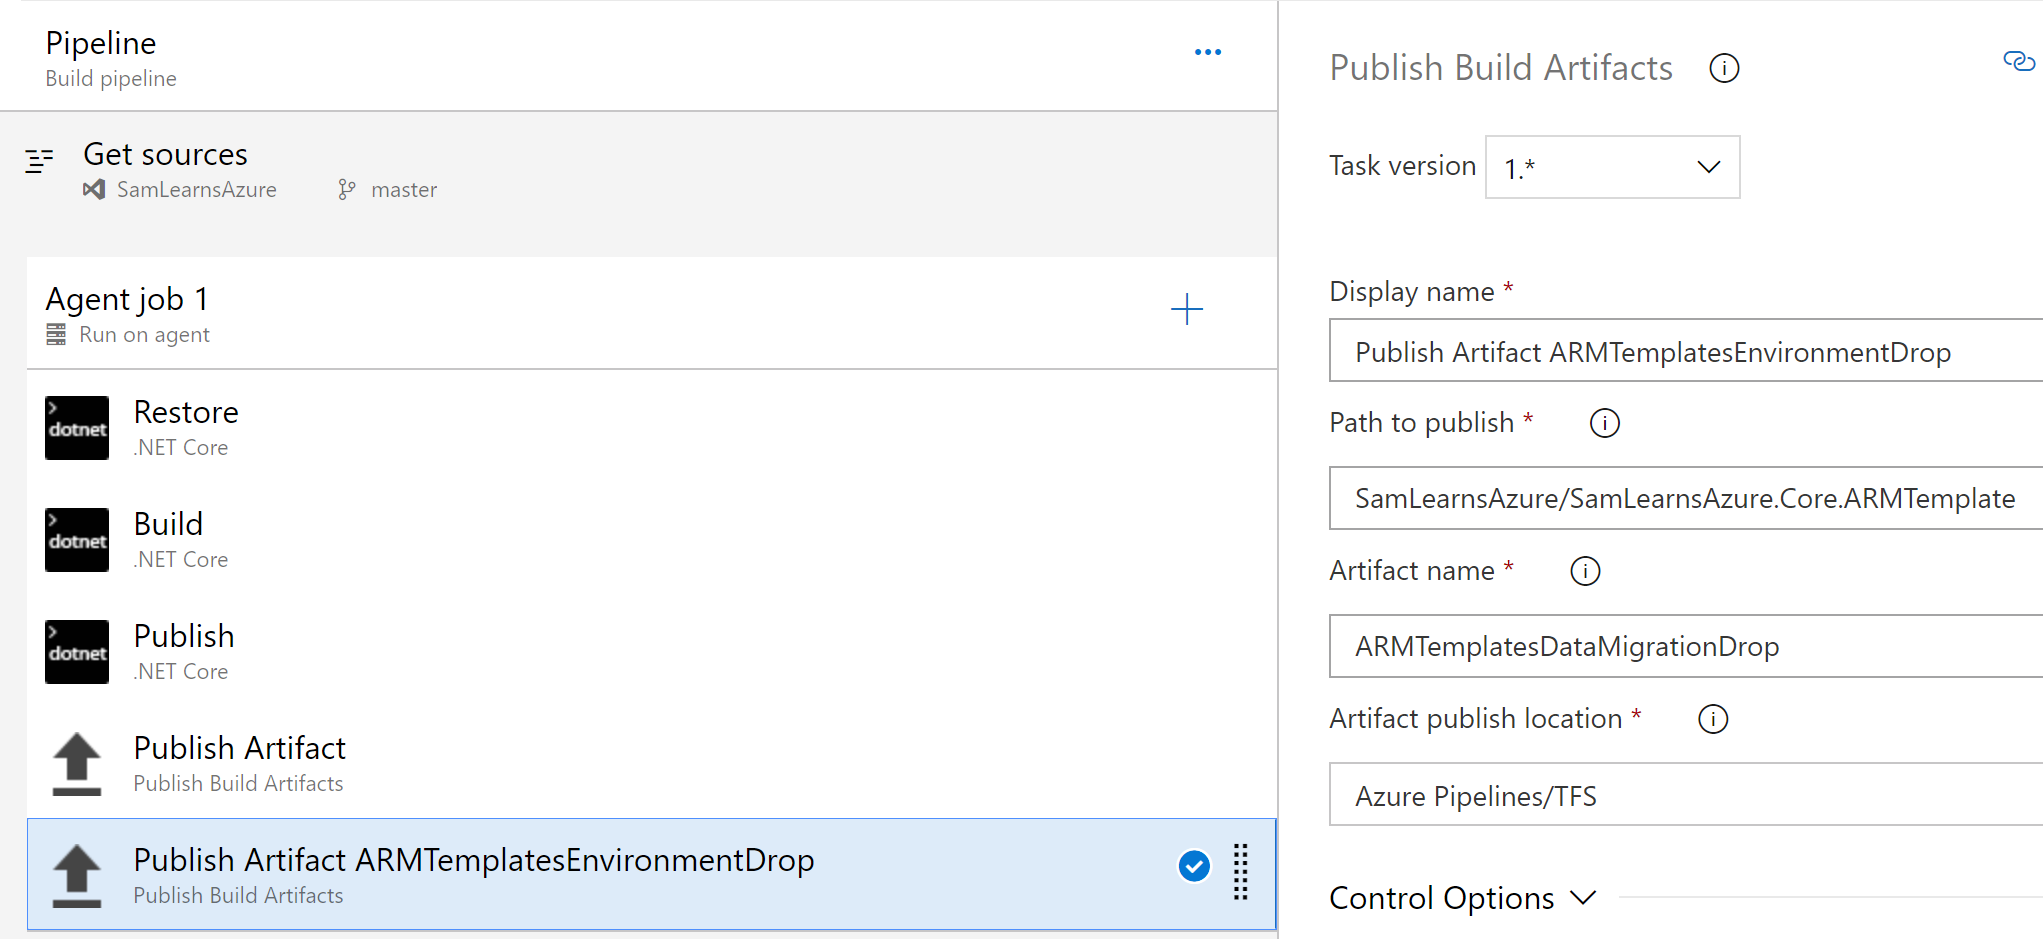
With the .NET core applications setup to build, we just need to add a second “Publish Build Artifact” task to copy the “Core.ArmTemplate” project files to a separate drop folder.
Finally set the triggers, enabling continuous integration, but specifying path filters, so that the build only runs when changes are made to the console app, function, or core ARM template.

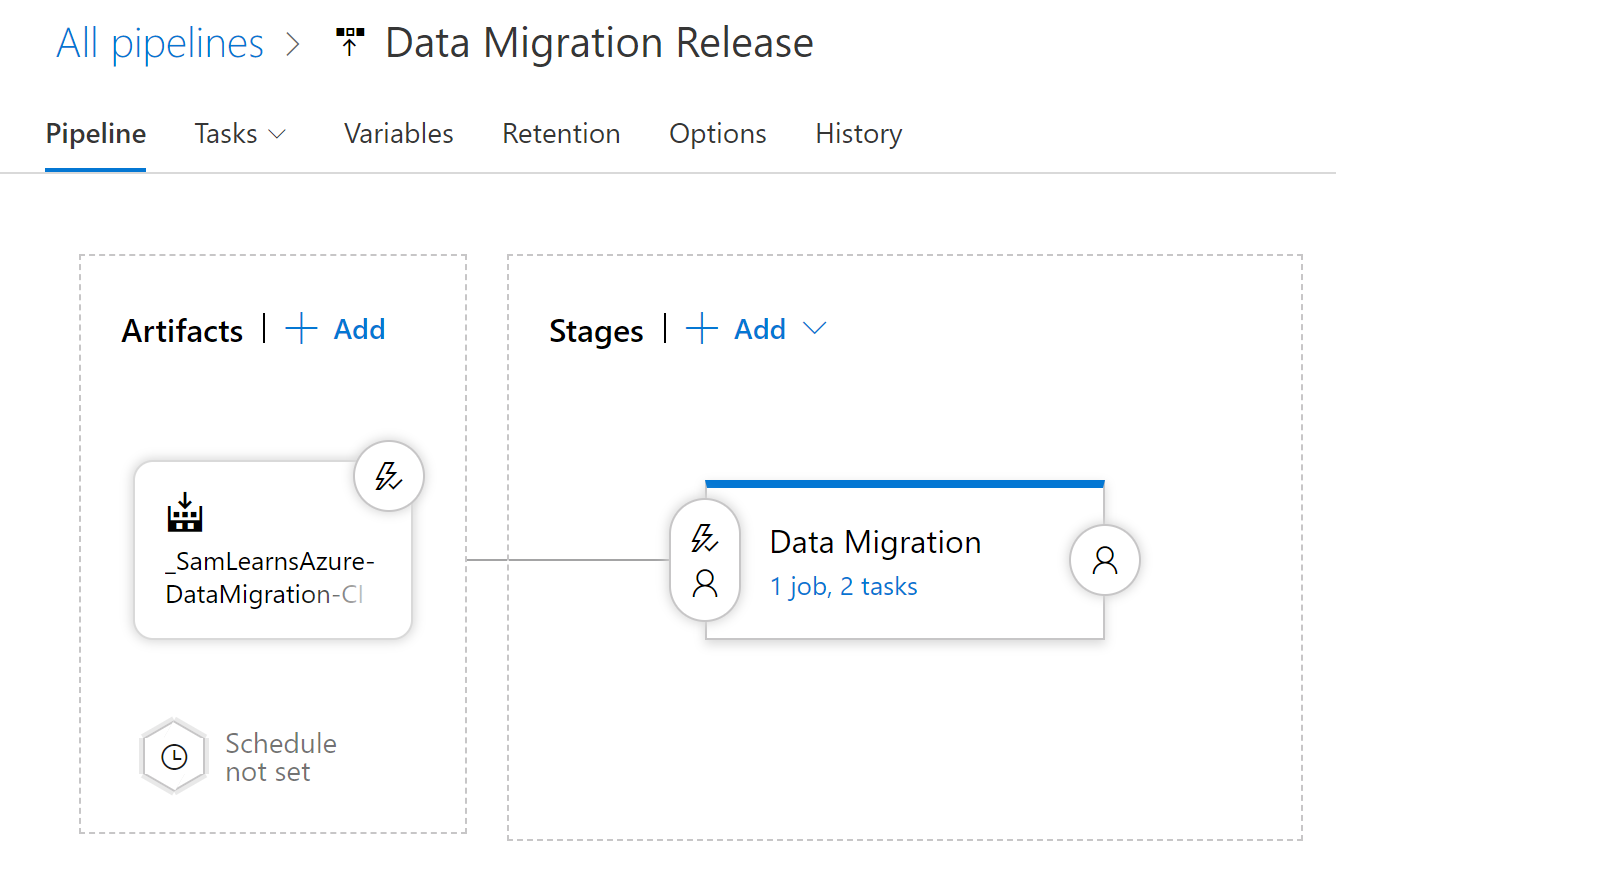
Next we need to create a new release. We start a new “empty” release, naming it “Data Migration Release”, and adding the “DataMigration-CI” build as an artifact, setting up continuous deployment, and renaming the environment to “Data Migration”.
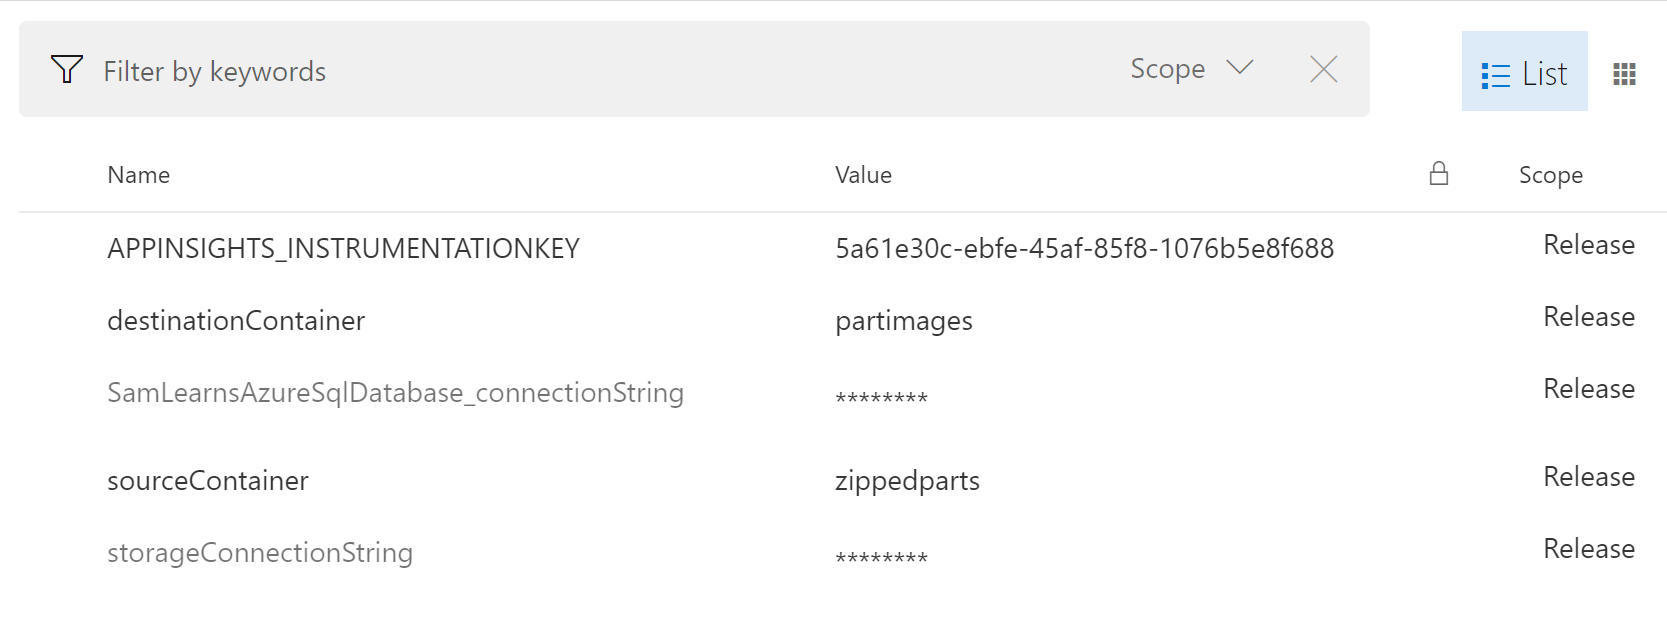
In the pipeline variables, we add six new vaiables, but as there is only one environment, the scope can stay as “release”. We add a variable for our Application Insights instrumentation key, and the destination and source container names from our Azure Storage for our Azure Function. We also add a SQL connection and Azure Storage connection, that we will pass to our Data Factory in the ARM template.
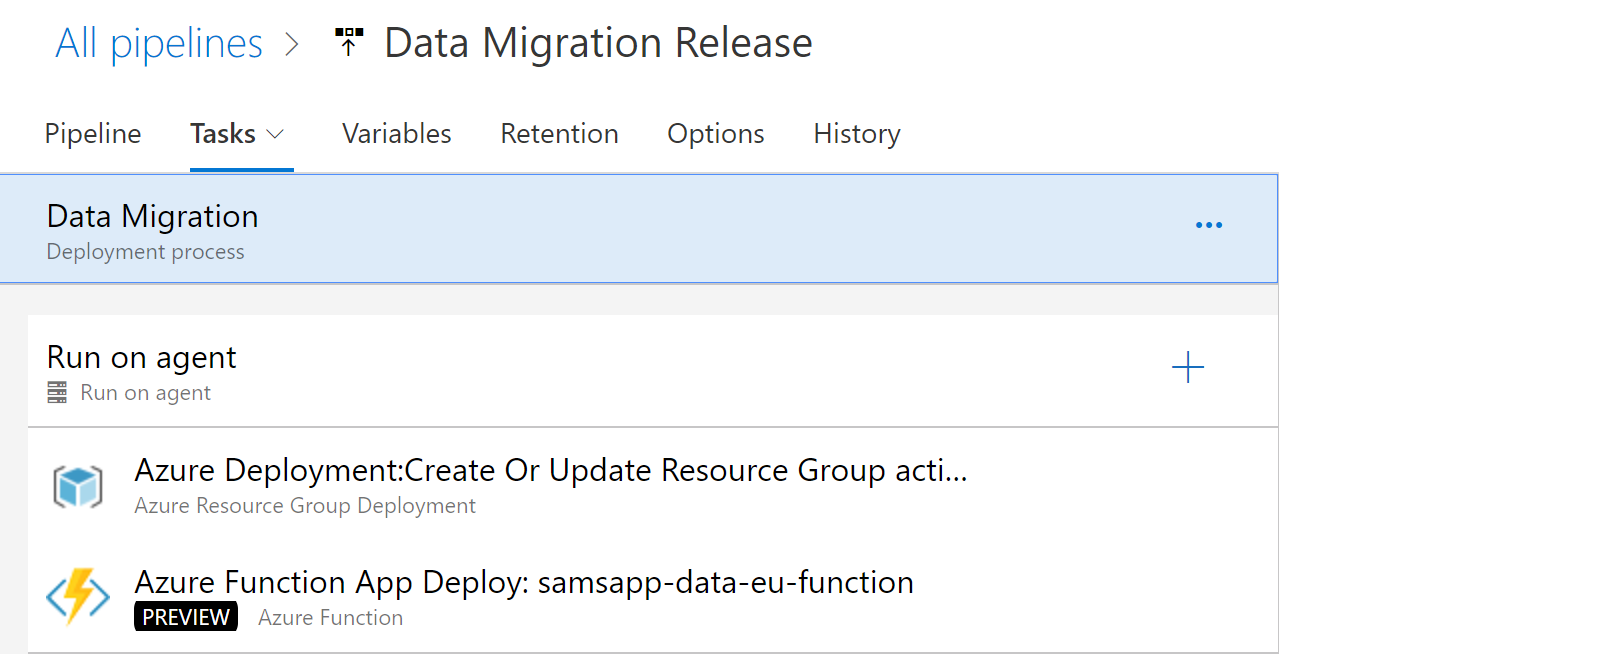
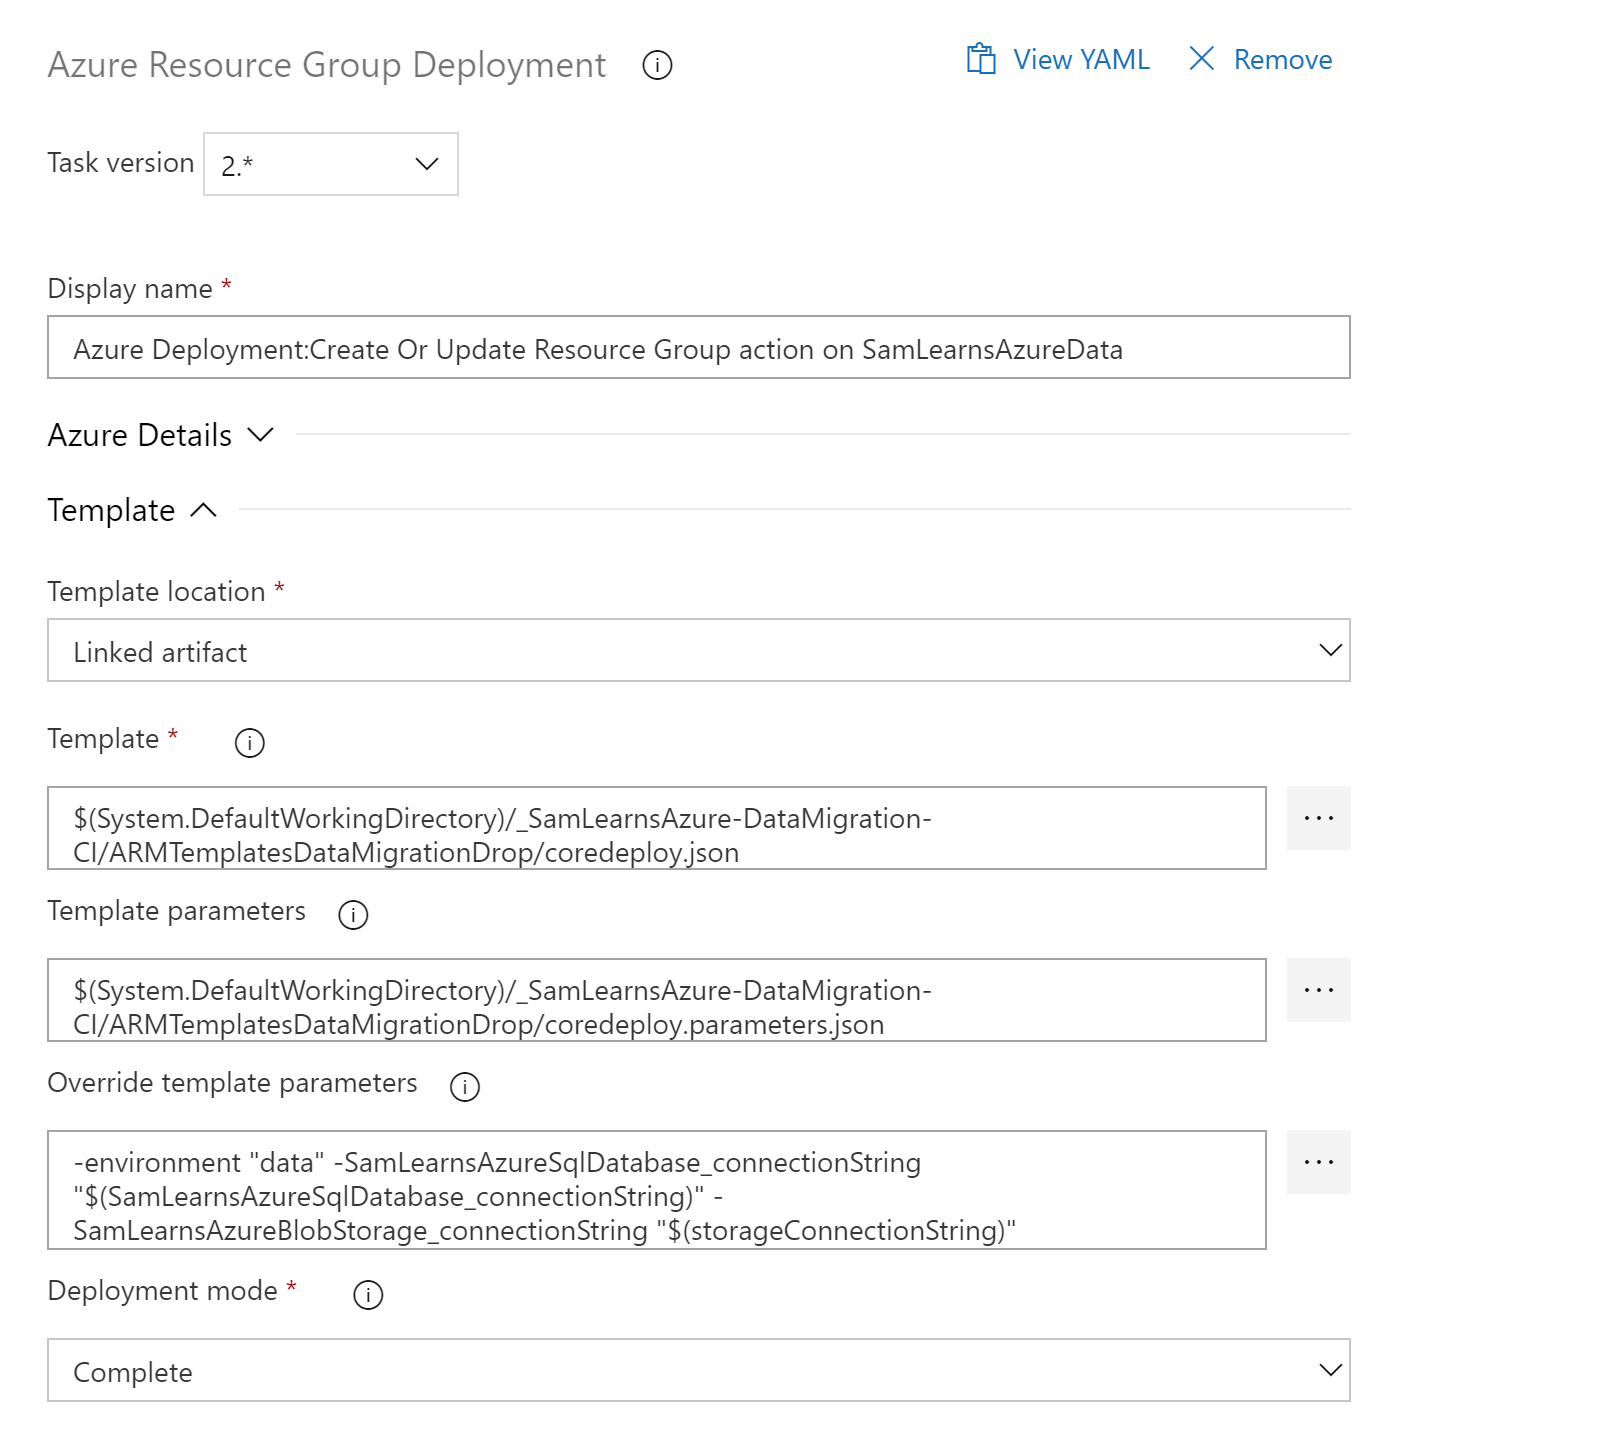
We need two tasks in our release, an “Azure Resource Group Deployment” task to deploy our ARM template, and a “Azure Function” task.
The ARM template deployment requires the basic subscription and resource group information. We then add the template and parameters file names, as well as the override parameters, using the environment name and passing in the SQL and Azure Storage connection strings. Finally we update the deployment mode to be “Complete”.
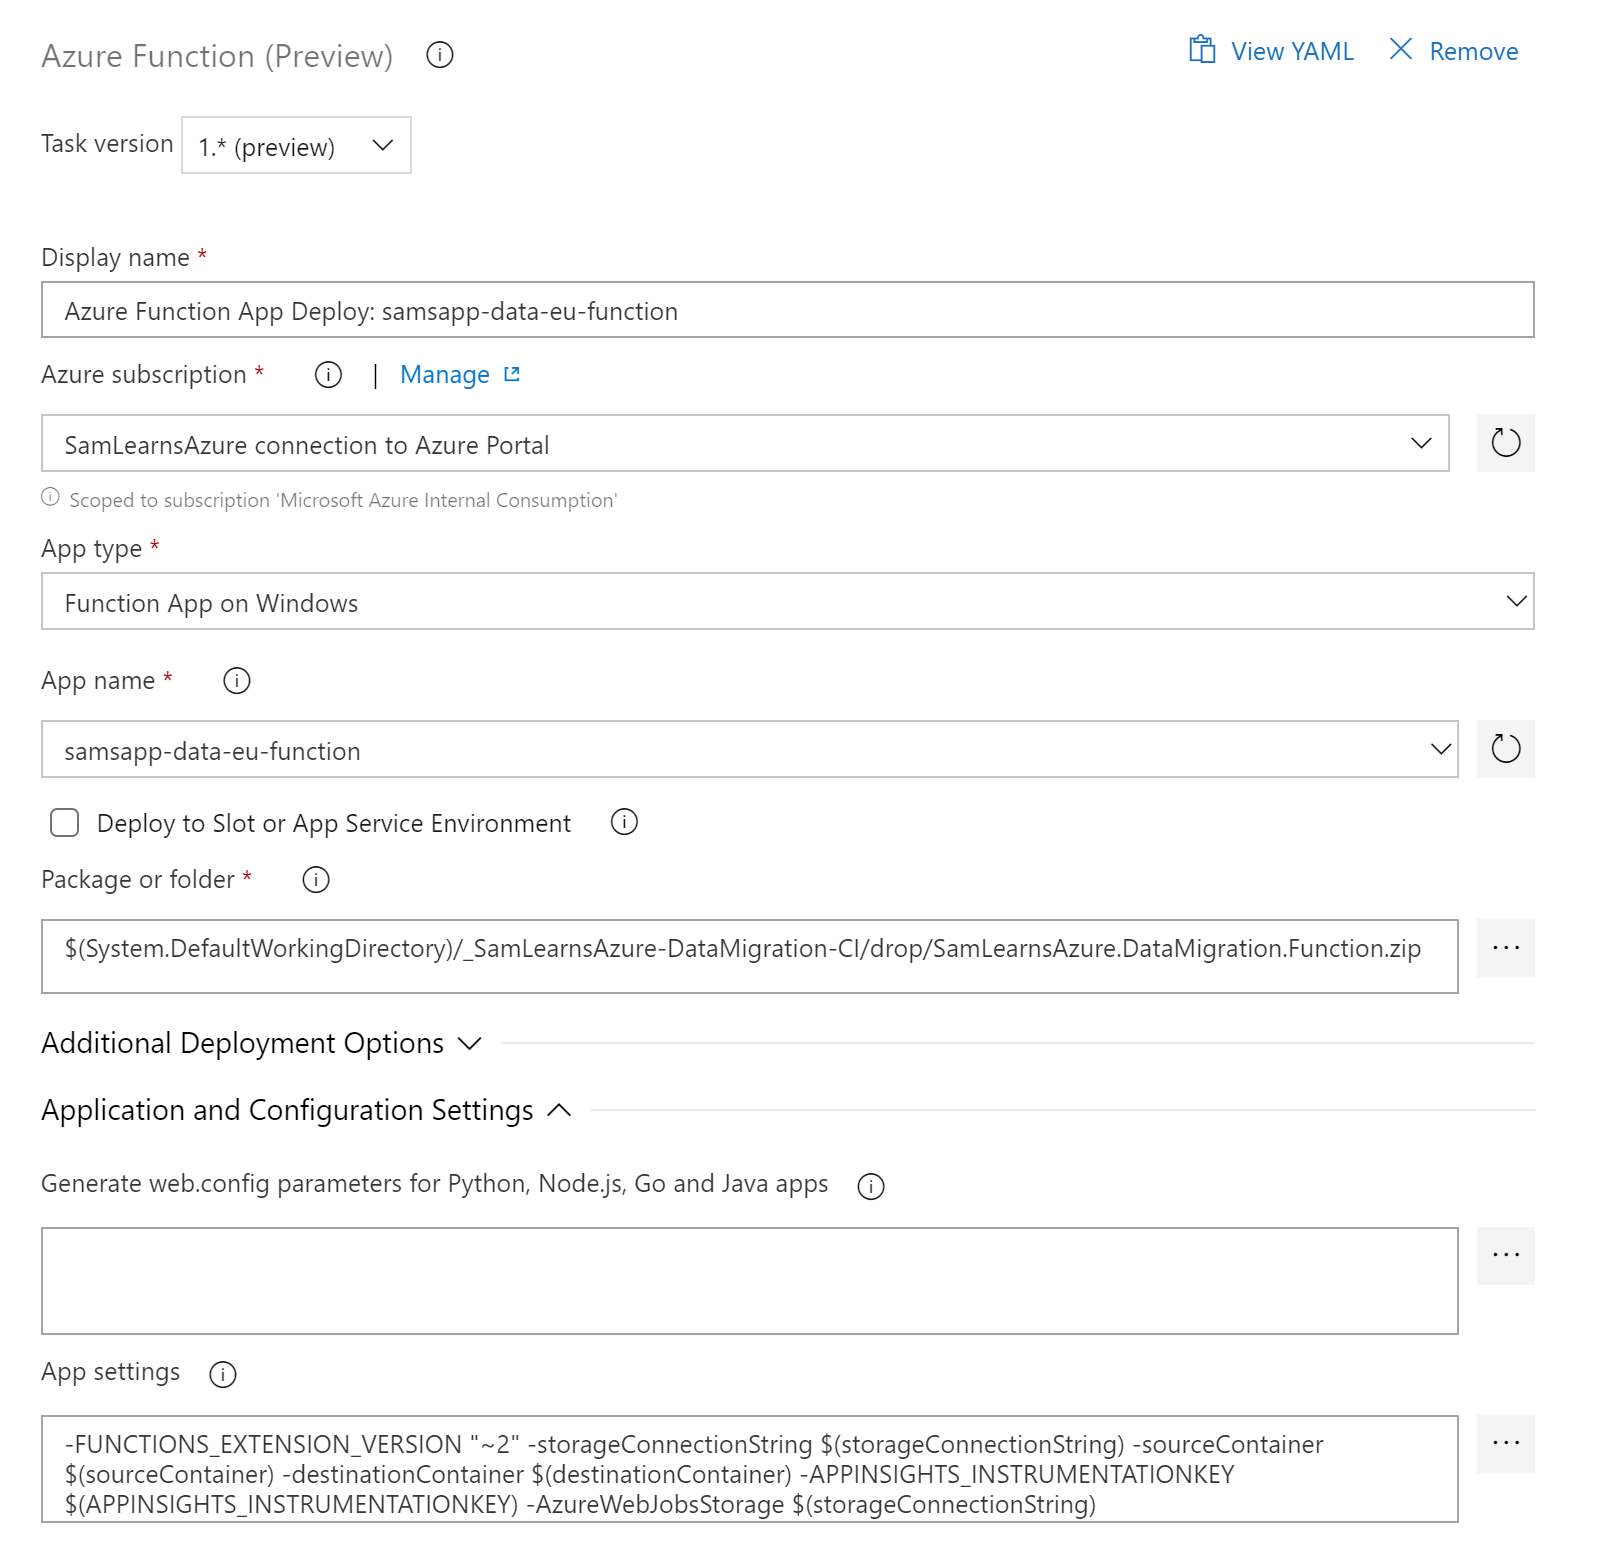
Configuring the deployment of the Azure Function turned out to require a bit more trial and error. After specifying the subscription and app name, we added the build zip file. In the “App settings” we needed to add some extra settings over the expected storage connection string, source container, destination container, and Application Insights instrumentation key. We also needed these next two items for our function to run. These don’t seem to be widely documented, but we noted they are added when you publish a function to Azure directly from Visual Studio:
- FUNCTIONS_EXTENSION_VERSION: without this parameter, the function defaults to version 1 and .Net Framework. “~2” ensures the function runs as a .Net Core function
- AzureWebJobsStorage: This parameter is also needed for the function to work. It adds some extra logging folders in our core storage.
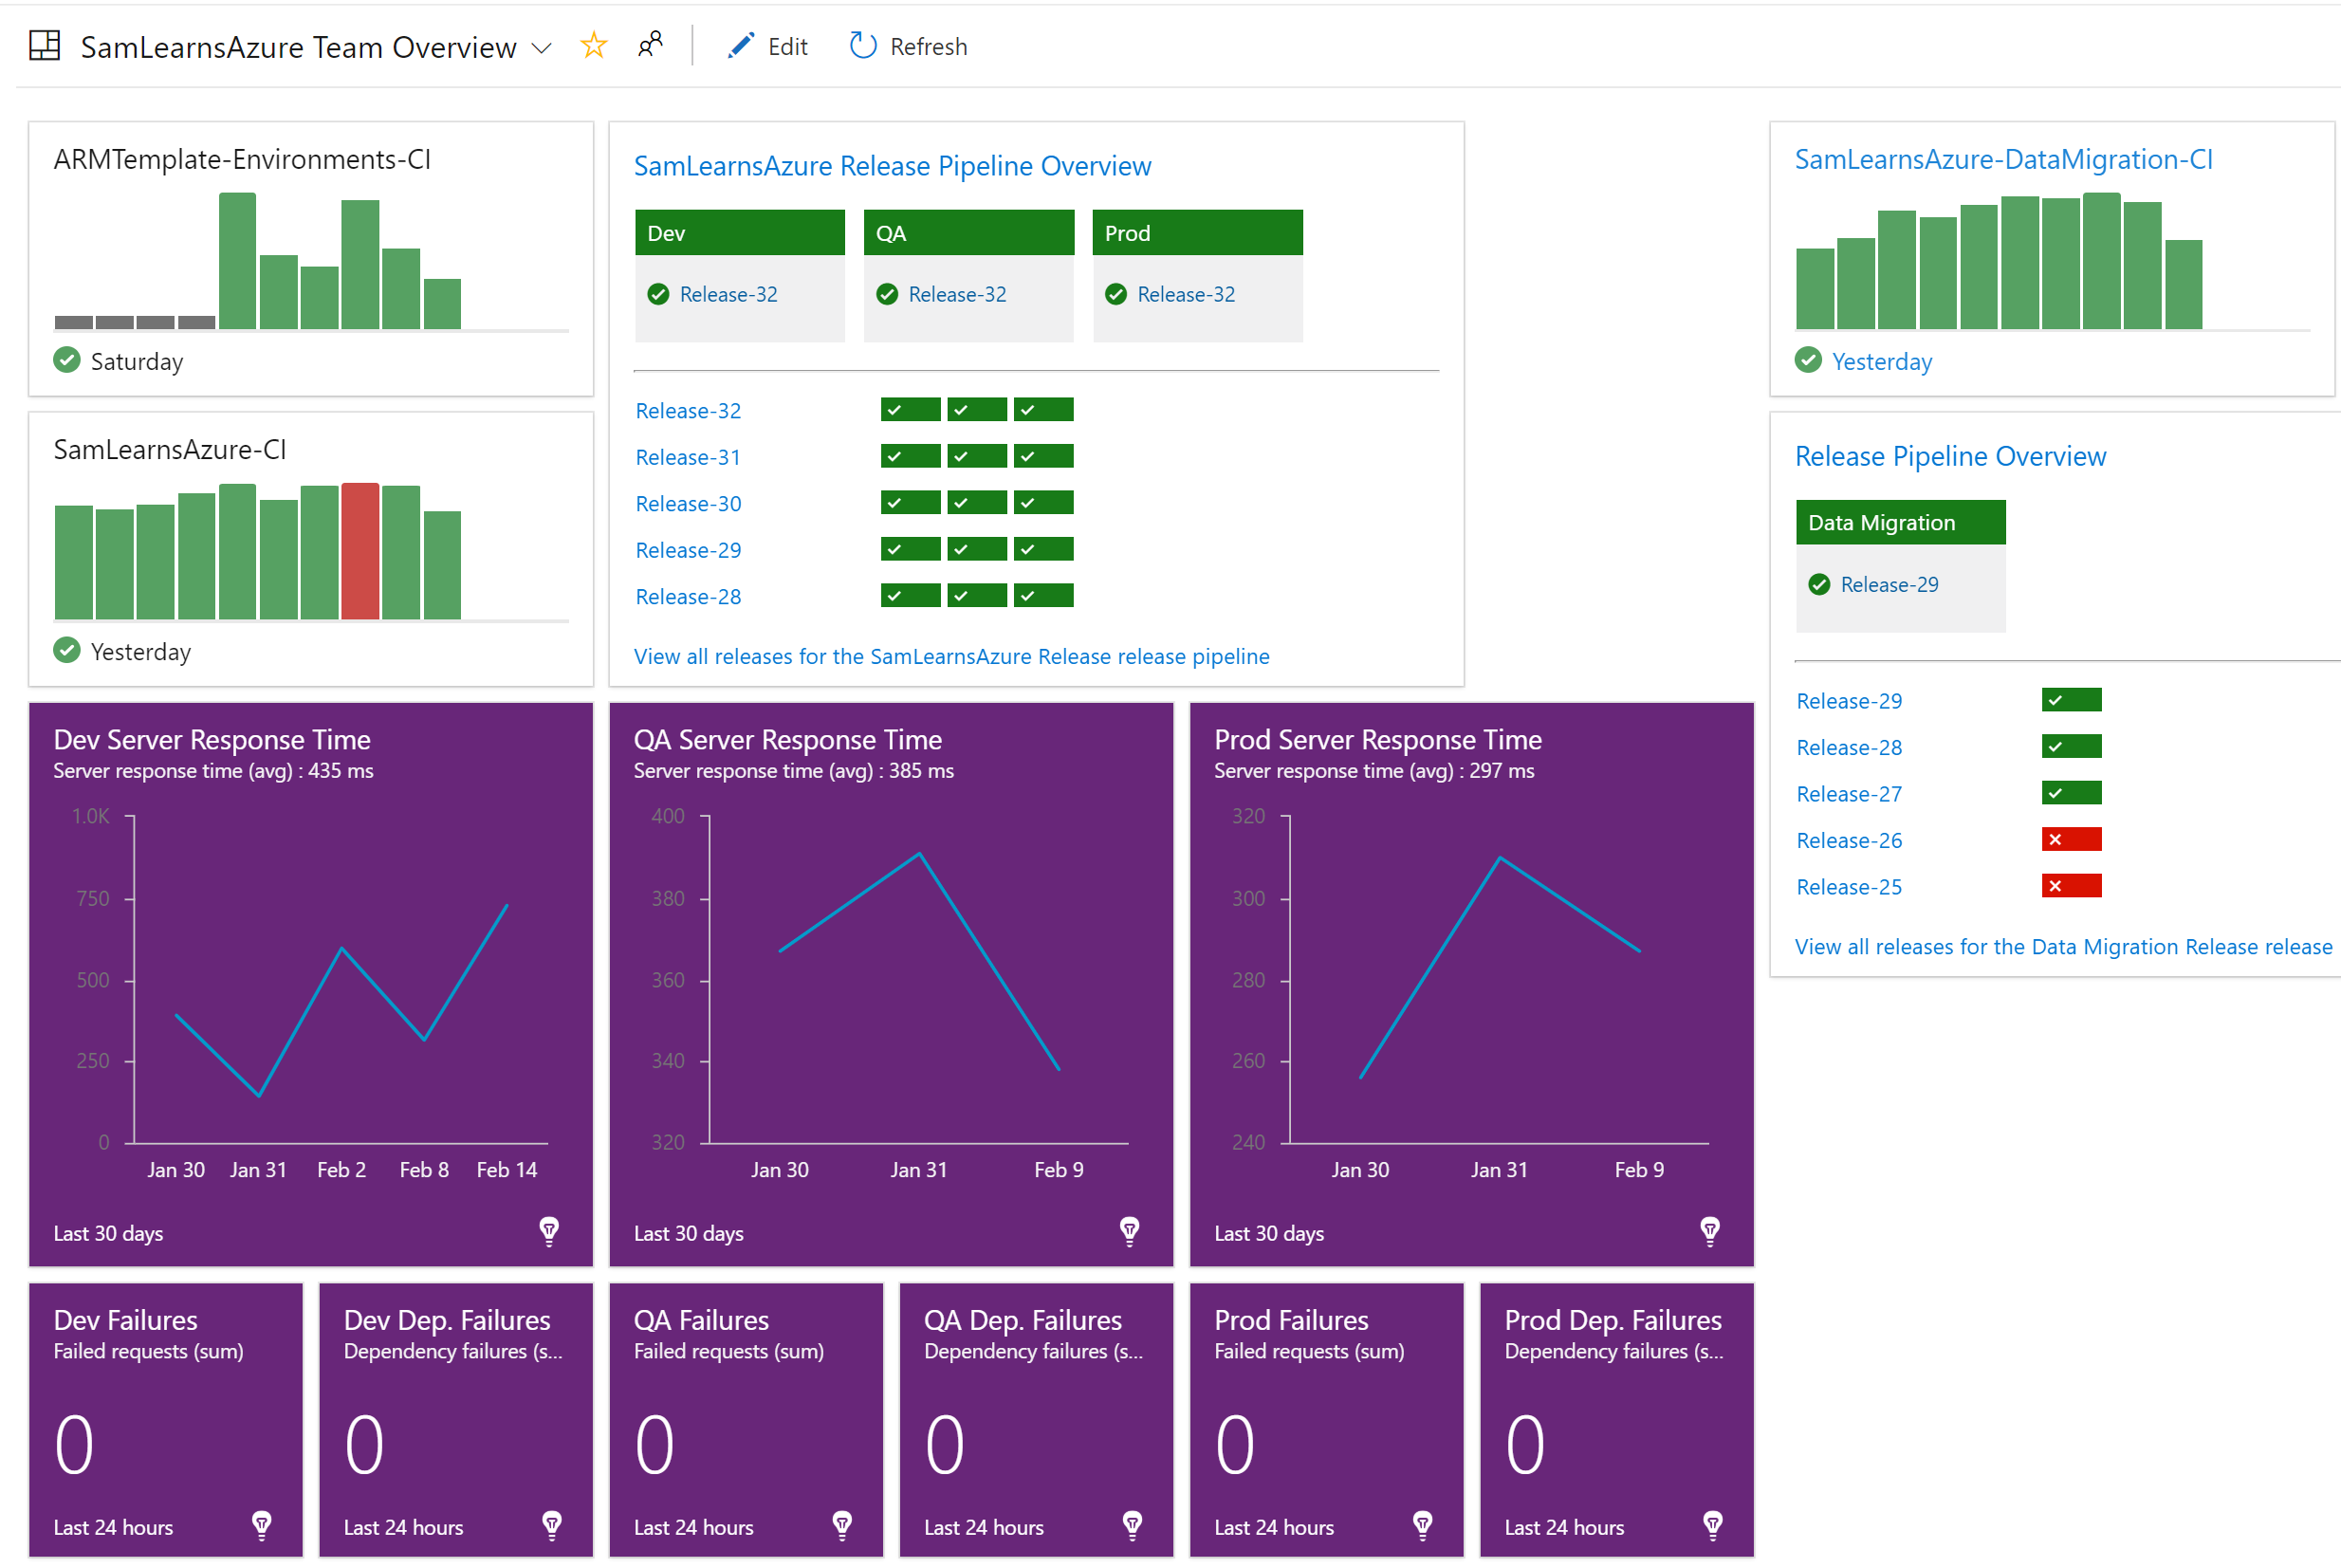
Finally, we add the build and release details to our dashboard, so we can monitor our data migrations.
Wrapup
After a number of false starts, we found the right Azure Function to solve this problem, learning a great deal about server-less architecture. We also edited a challenging ARM template to deploy our Azure Data Factory and wrapped it all up with a CI build and CD release process.
References
- Unzipping files in blobs: https://msdevzone.wordpress.com/2017/07/07/extract-a-zip-file-stored-in-azure-blob/
- Azure Function bindings: https://docs.microsoft.com/en-us/azure/azure-functions/functions-bindings-storage-blob#trigger—c-example
- Monitoring Azure Functions: https://docs.microsoft.com/en-us/azure/azure-functions/functions-monitoring

One comment