

Infrastructure as Code (IaC) is the process of managing and provisioning computing infrastructure with definition files, e.g. code. The basic idea is that you treat your IT infrastructure as software by writing it as code. This helps you to make changes rapidly, reliably, and safely. As it’s code/text, this allows our infrastructure to be managed in source control instead of traditional interactive configuration tools. There are a number of benefits of IaC:
- Consistently achieve standardized provisioning or deployment
- Accelerating provisioning or deployment rapidly
- Reusability of JSON code, for repeatable or similar provisioning or deployment
- Extensibility of JSON code, for incorporating with additional items
Given these benefits, today our goals are to:
- Create a new ARM Template project (and solution)
- Code/develop the new ARM Template
- Create a continuous integration/build pipeline in Azure DevOps
- Create a release pipeline in Azure DevOps
Creating a ARM template
As we haven’t developed in this project yet, the first step is to browse to the repo and clone it, we are going to use the Visual Studio option.
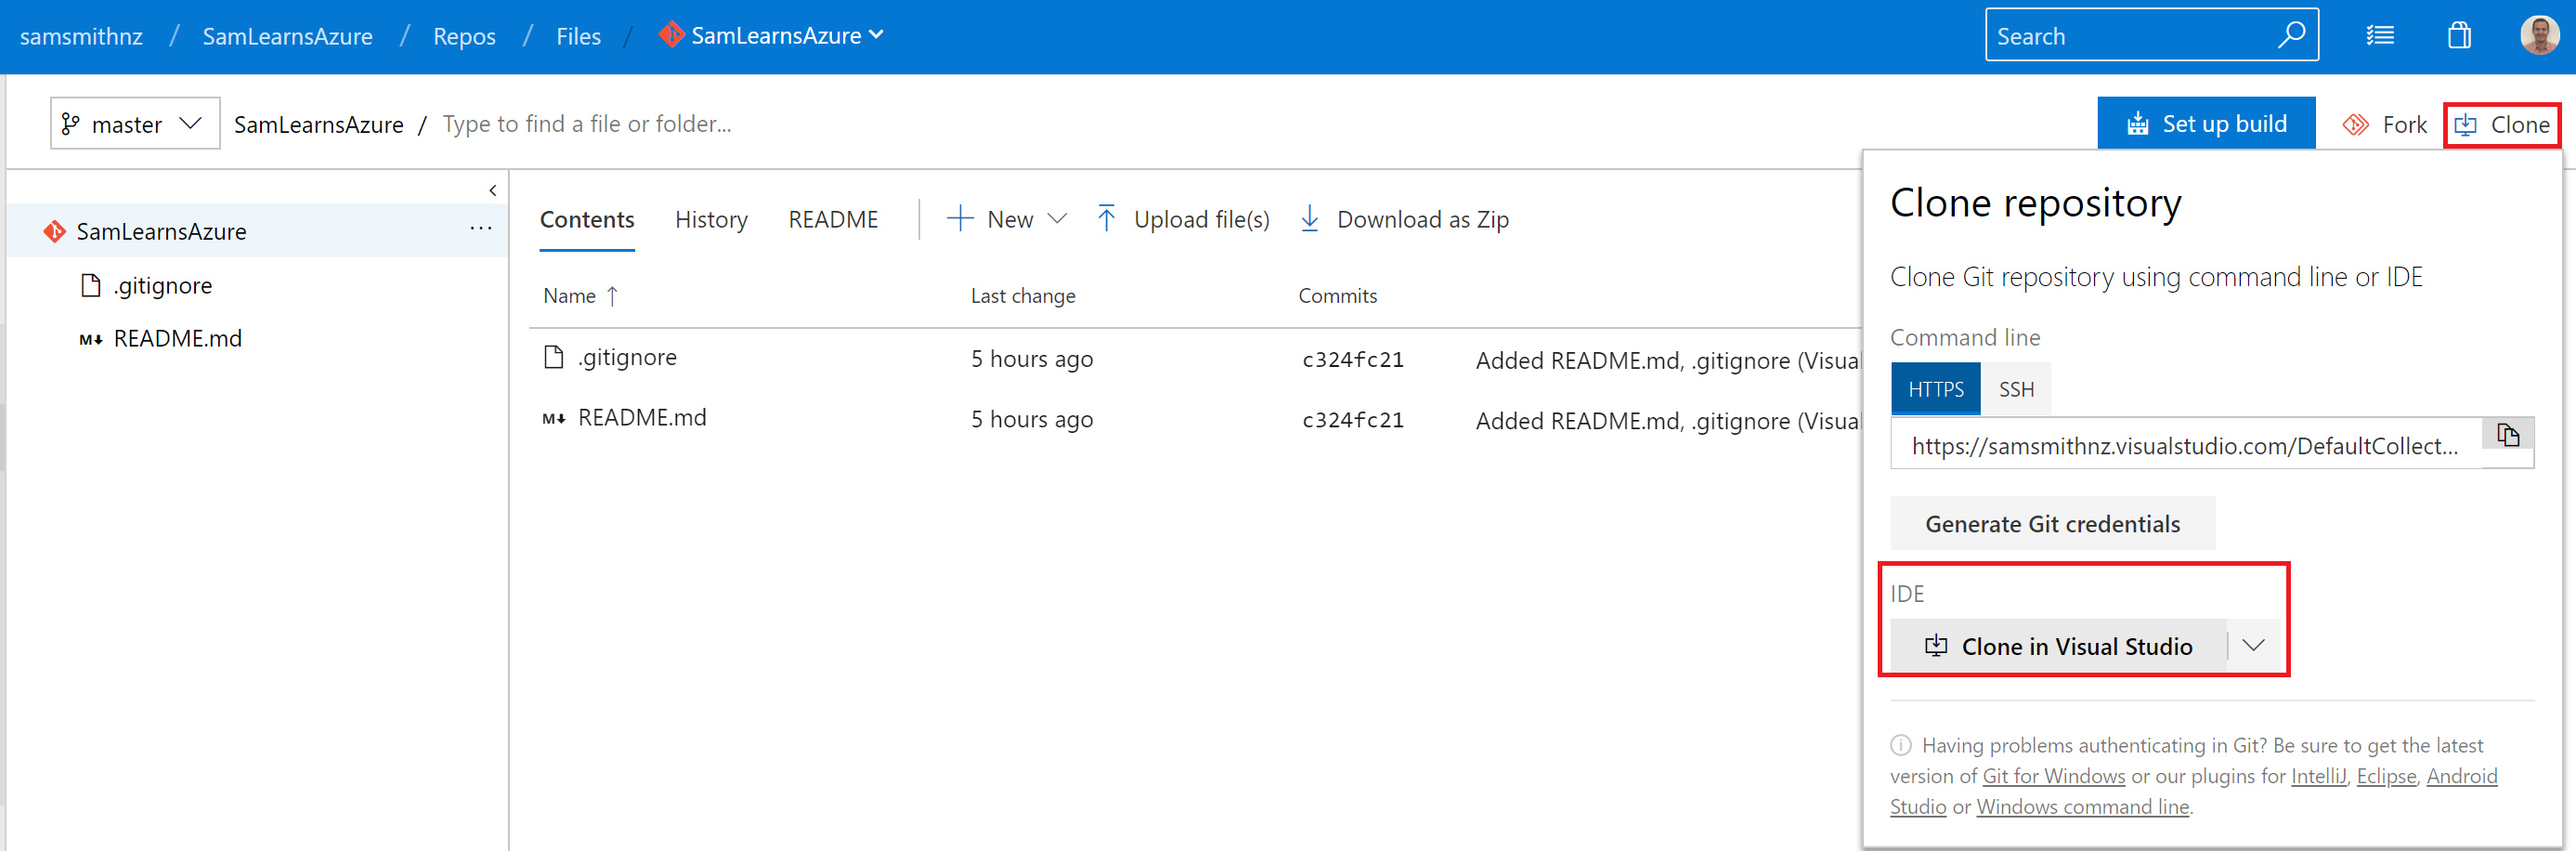
This opens Visual Studio, (sometimes with a browser warning message we need to accept), and displays a popup that allows us to choose where to put our code.

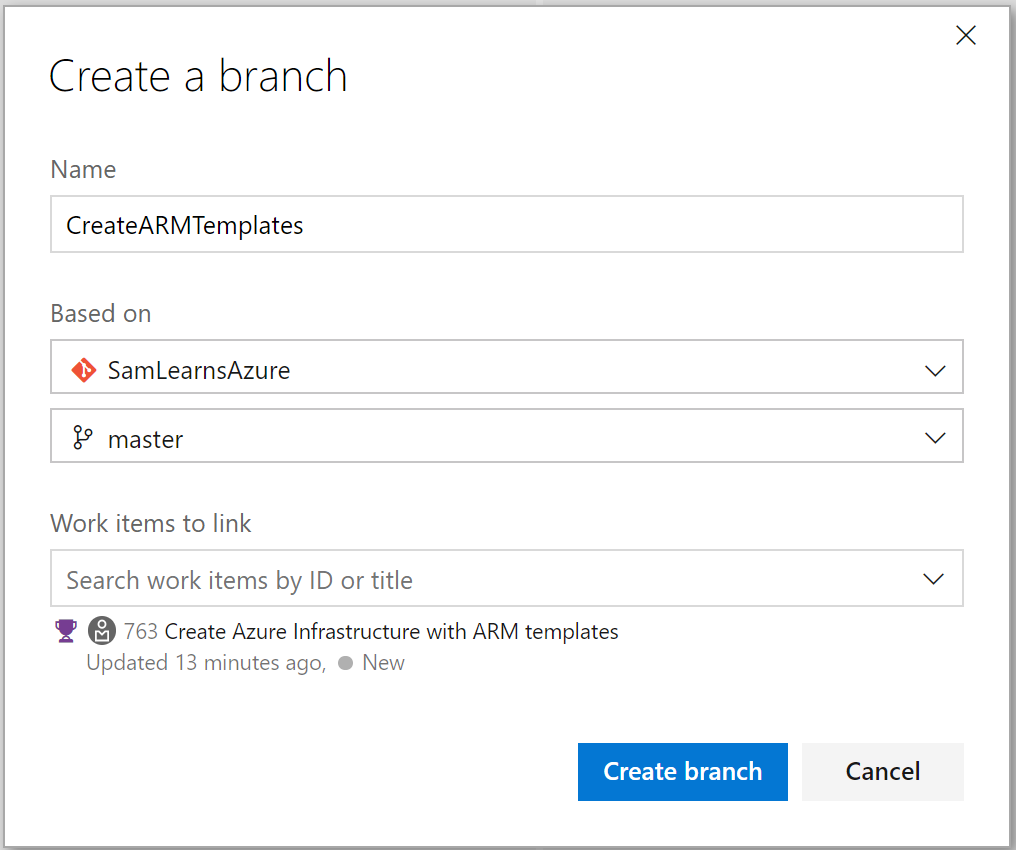
Next, we can go back to Azure DevOps, to the Azure Boards, and finding the feature we are going to work on, open the context menu and click the “New Branch” item. Note that we have added a number of items to our backlog that you can review – remember this is a public Azure DevOps project!

This will show the “Create a branch” popup, where we can enter in a name for our new branch, taking a branch from our master branch. Attached to this work you’ll notice it’s already linked our “#763, Create Azure Infrastructure with ARM templates” work item. This is important later, as we merge back to the master branch, where it will show the complete work flow – we will get back to this again later.
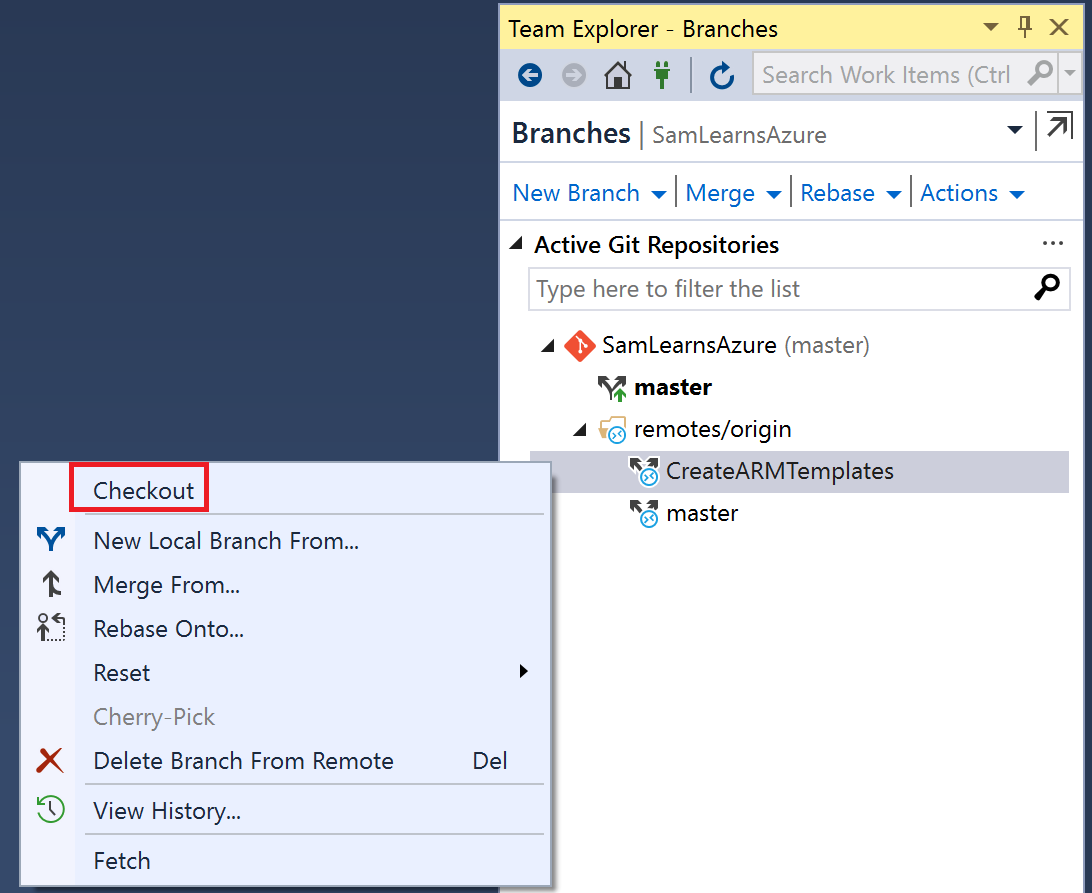
Moving back to Visual Studio, we open the “branches” tab in the “Team Explorer” panel and right click on the remotes/origin > CreateARMTemplates branch, and then select “Checkout”, to download the branch locally, switch to the branch and open it in Visual Studio.
In Visual Studio, we create a new solution, “SamLearnsAzure”, and add a “Azure Resource Group” project for the ARM template’s, named “SamLearnsAzure.Environment.ArmTemplate”.
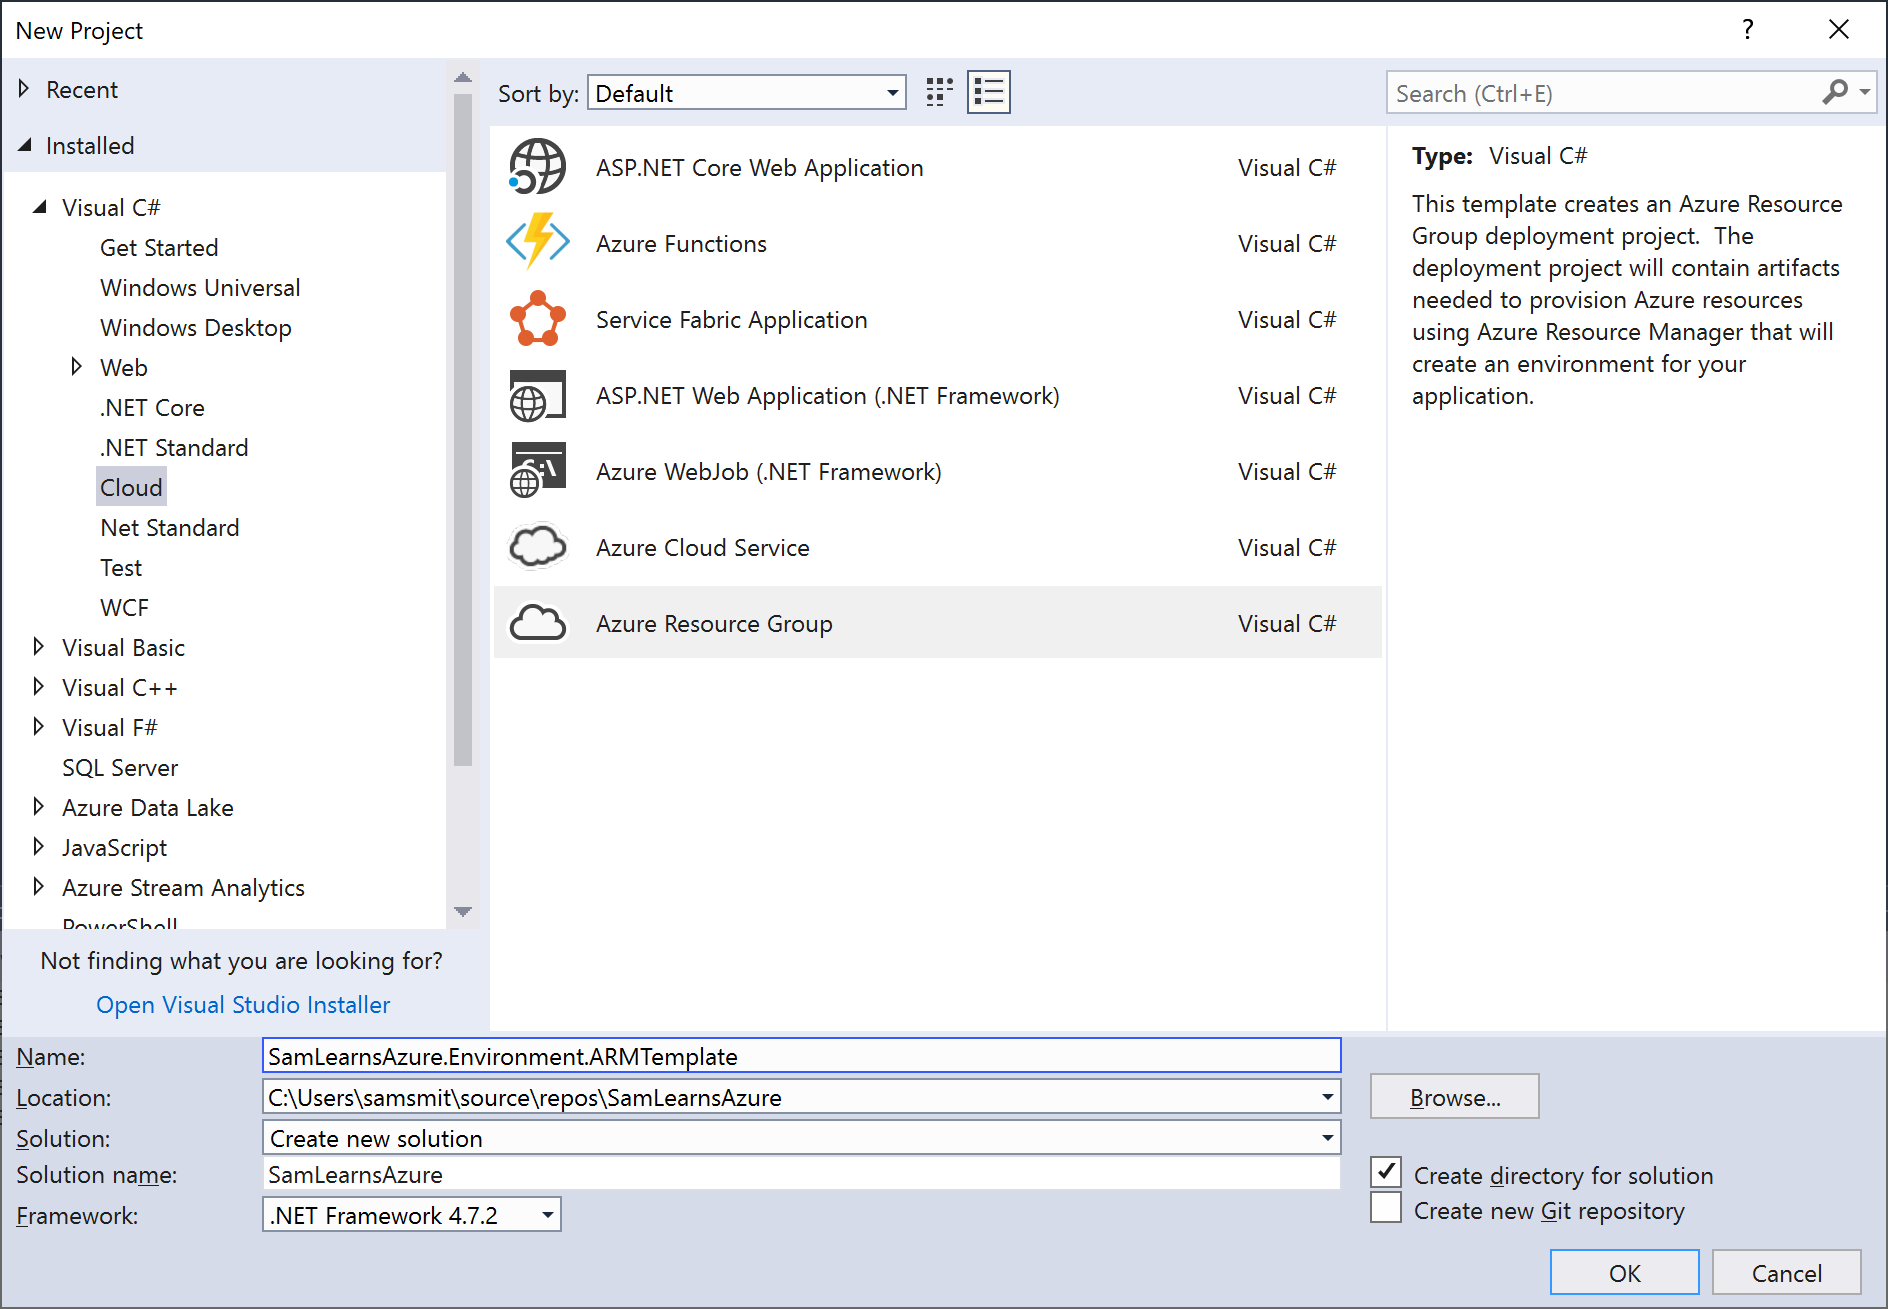
Note that if you don’t see the “Azure Resource Group” project template, ensure that you have installed the following workloads in “Visual Studio Installer” first:
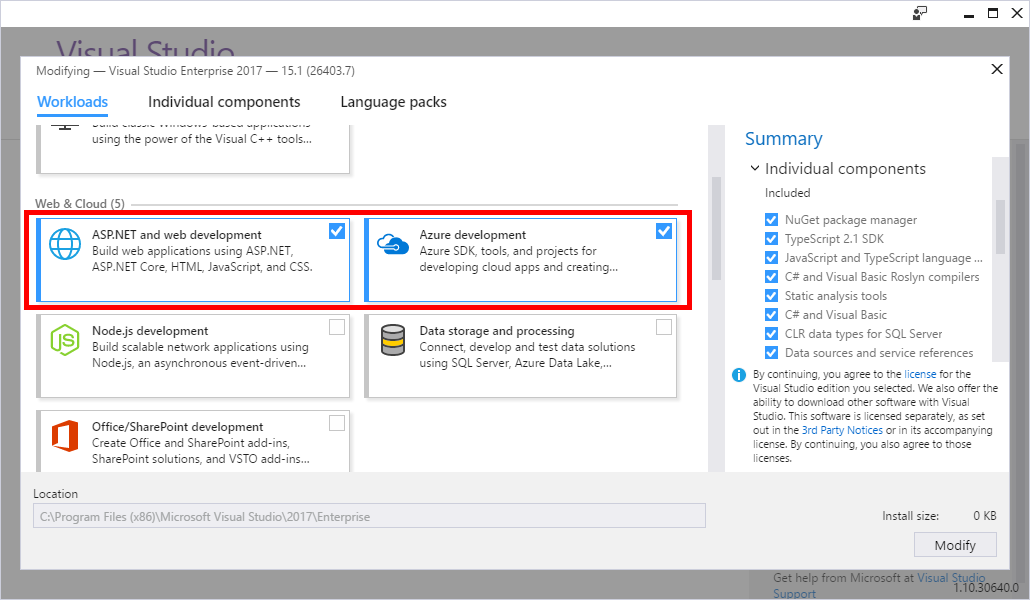
This new project comes with an empty ARM template. We are going to replace this with the ARM template files from this GitHub repo: https://github.com/mspnp/reference-architectures/tree/master/managed-web-app/basic-web-app. This contains the architecture for a Basic Azure Web Architecture.

Coding the ARM template
ARM Templates are JSON files. You can generate them by browsing to an existing resource group in Azure and clicking the automate button. Note that this generates everything in the resource group as one template, so if you need just one element, we recommend you create a single new object in a separate resource group. When coding ARM Templates there are basically four main commands you will use to make your template dynamic. (Note that all dynamic commands must be contained in square brackets ([ ])
- parameters: When we deploy the ARM Template, we pass in parameters. The “parameters” command helps us to access these items. For example, to access the parameter ‘environment’: “[parameters(‘environment’)]”
- concat: Joins strings together. For example, to concatenate a parameter and the string ‘-service’: “[concat(parameters(‘appPrefix’), ‘-service’)]”
- variables: accesses a variable defined earlier. For example, to access the variable sqlserverName : “[variables(‘sqlserverName’)]”
- references: Dynamically accesses another resources’ properties on the fly. For example, to get a websites principal id: “[reference(concat(resourceId(‘Microsoft.Web/sites’, variables(‘serviceAPIName’)), ‘/providers/Microsoft.ManagedIdentity/Identities/default’), ‘2015-08-31-PREVIEW’).principalId]”

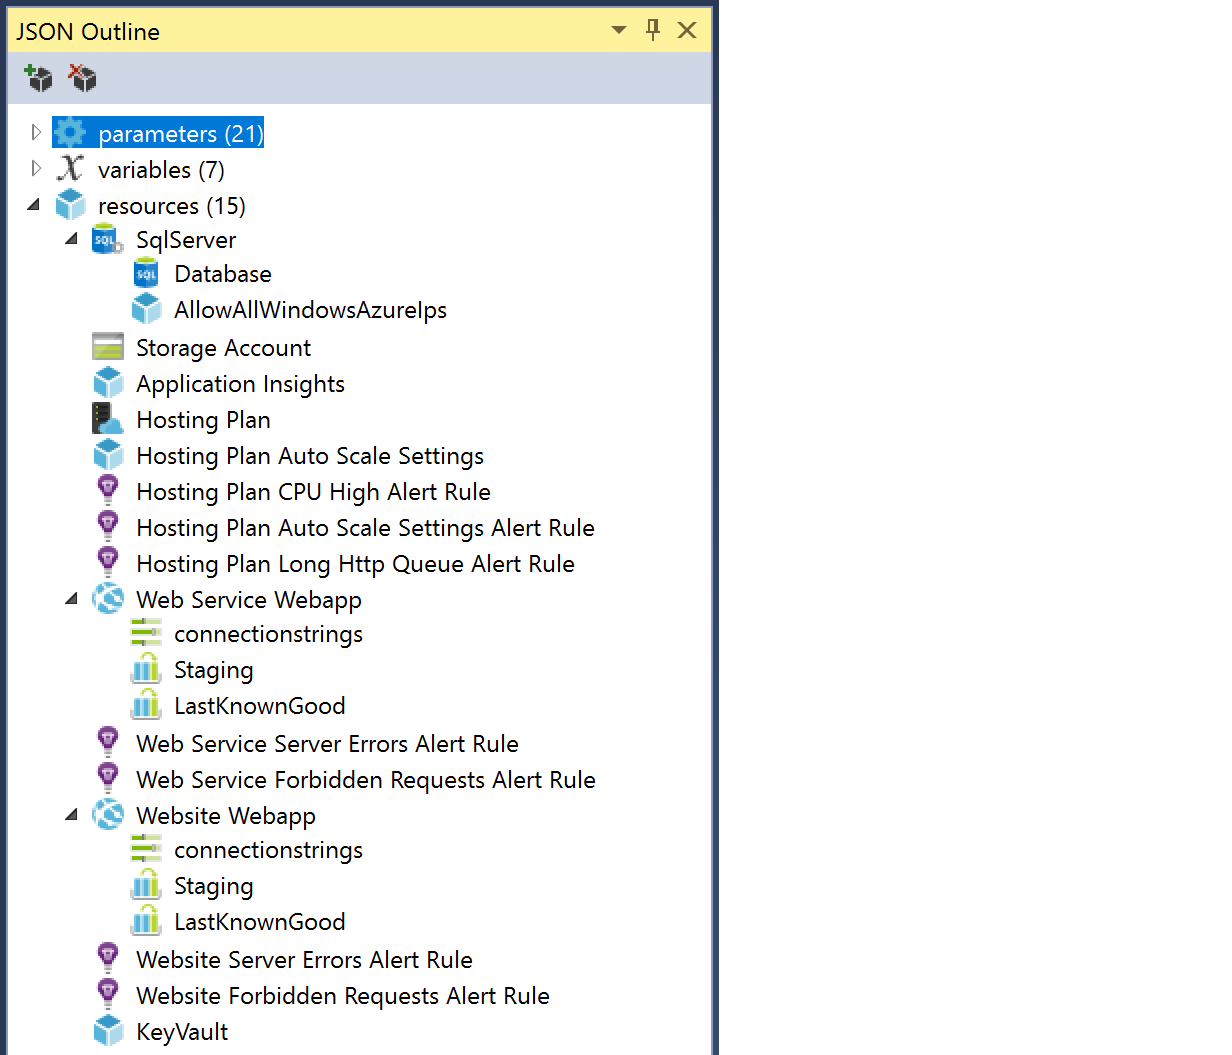
Looking at what we’ve created in Visual Studio based on the template we downloaded and edited, we have 15 resources that will be deployed to our Resource group
- An Azure SQL Server, with SQL database and firewall rules
- A Storage Account, we will use for a variety of activities, including logging and any data needs we may have later (e.g. files for a CDN)
- An Application Insights instance, that our website and web service will share
- A Hosting Plan, essentially the web server for our website and web service. There are also some Auto-scale settings and alerts for High CPU, AutoScale Settings, and Long Http Queues.
- The Web Service WebApp, with connection strings and two slots, Staging and LastKnownGood. We also have two alerts for Server Errors and Forbidden requests.
- The Website WebApp, with connection strings and two slots, Staging and LastKnownGood. We also have two alerts for Server Errors and Forbidden requests.
- An Azure KeyVault, where we will store all of the secrets for this environment
Getting the PrincipalID’s for the Key Vault
When we are coding the Key Vault, we need to define the principal id’s for the Azure DevOps SPN and the administrator (me) in code. Creating these manually is painful, and without this step these security roles will be deleted on each deployment of the ARM Templates. We can solve this with a few Azure CLI commands in the Azure Portal Shell. To access the Shell, click the icon in the screenshot of the Azure Portal below. This may ask you to configure a Azure Storage container – the portal requires this container to run.

We can use the Get-AzureRMADServicePrincipal command to get the Azure DevOps service principal, but first we need to find the object id. If we open Azure DevOps, and browse to the Service Connection we created in the seperate blog post, there is an “use full version of the service connection dialog” link we will open. This full version dialog has useful information we don’t normally need – in fact we only need this once – today.
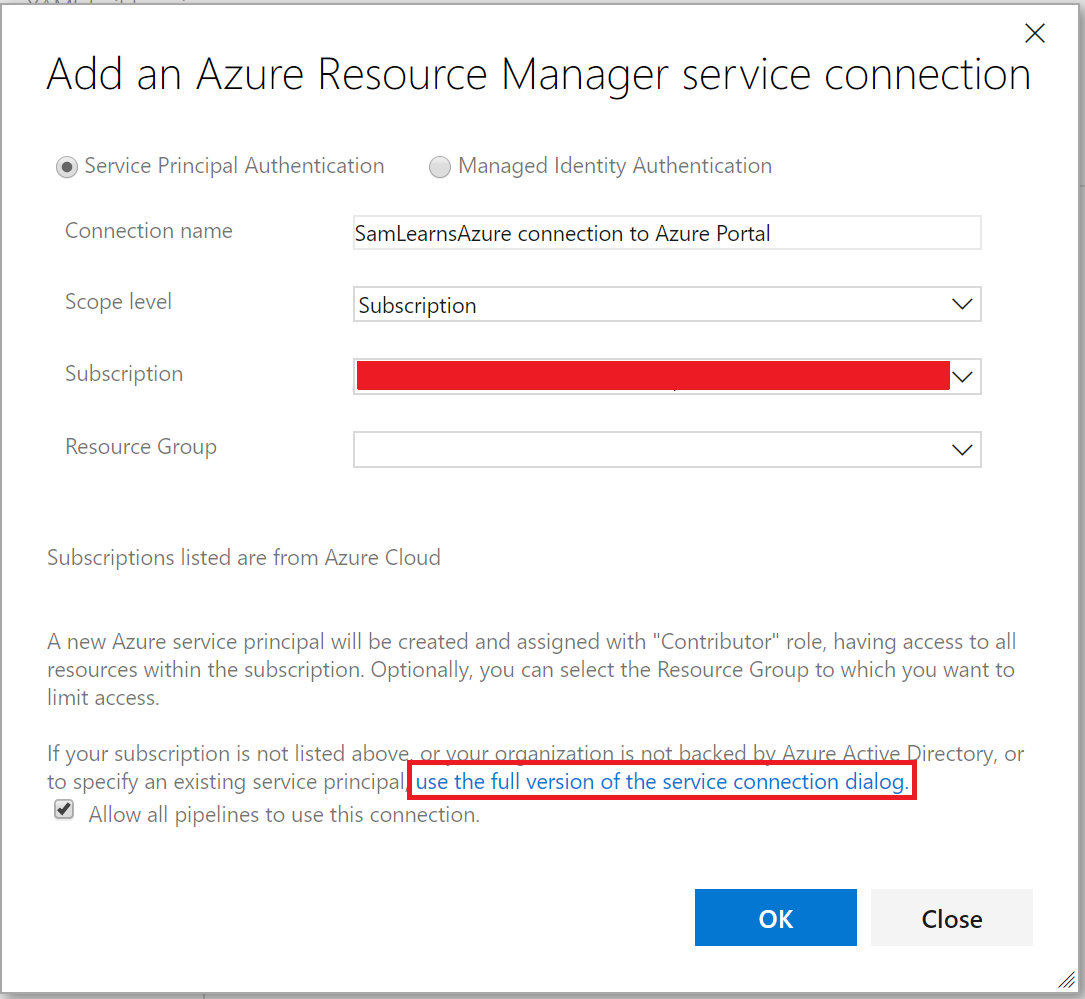
Clicking on the link, we can now see a Service principal client ID, the application id, that we will use with our Get-AzureRMADServicePrincipal command

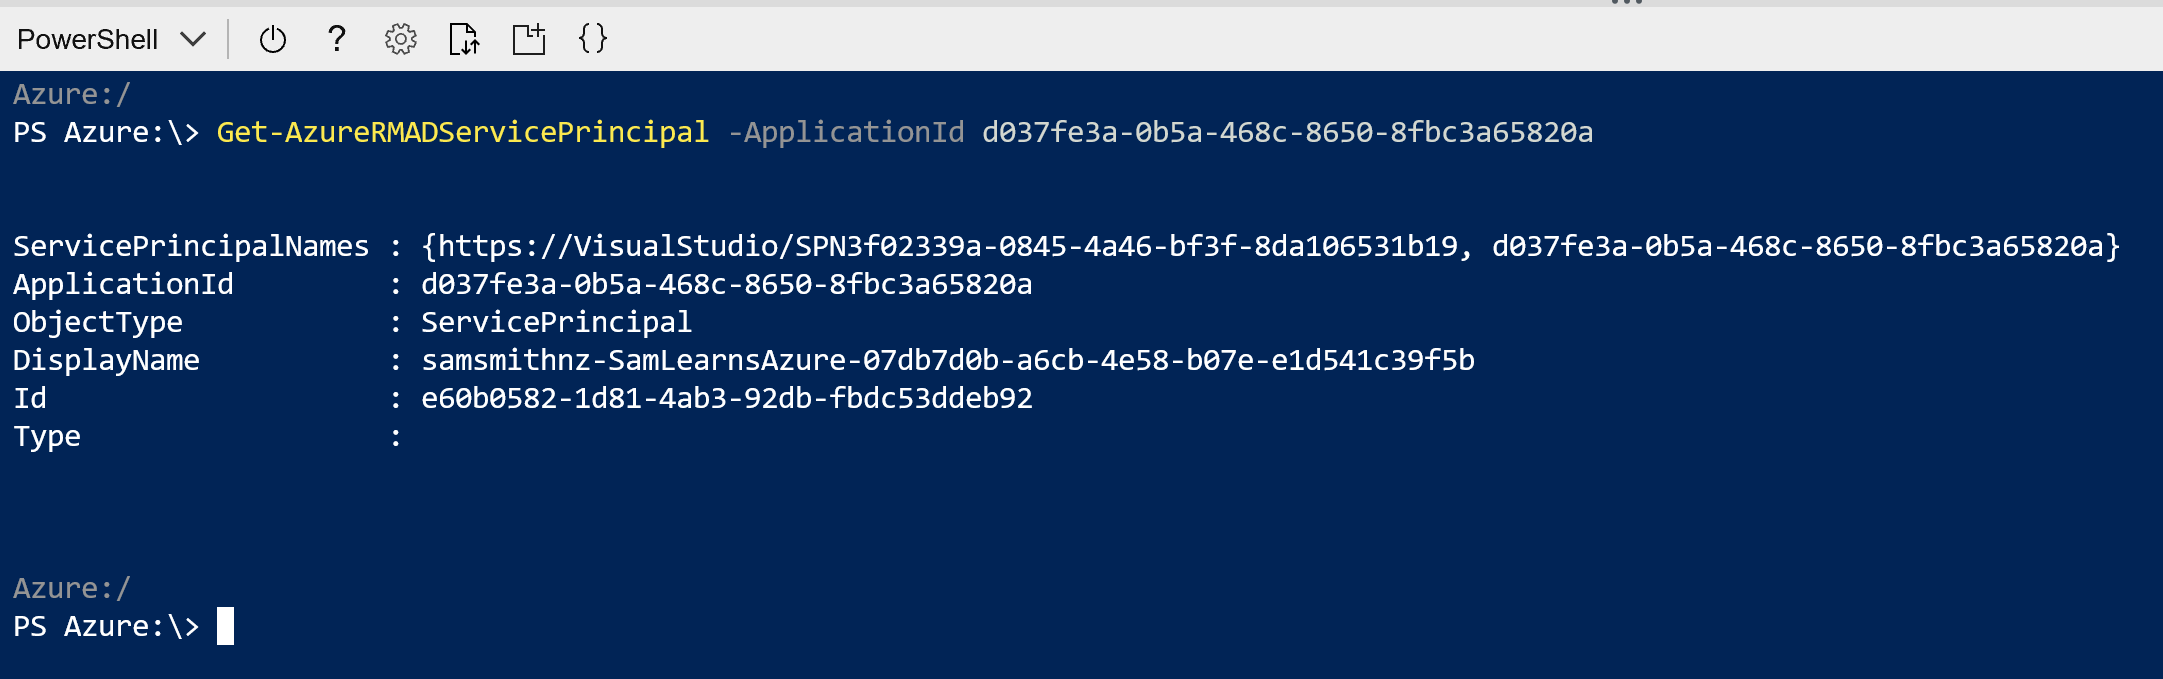
Back in our Azure CLI window, we run the command Get-AzureRMADServicePrincipal -ApplicationId d037fe3a-0b5a-468c-8650-8fbc3a65820a, to get an Id, which we make note of for a little later.
We also run a similar command, Get-AzureRmADUser -userprincipalname “my@emailaddress.com”, to get the administrator Id.

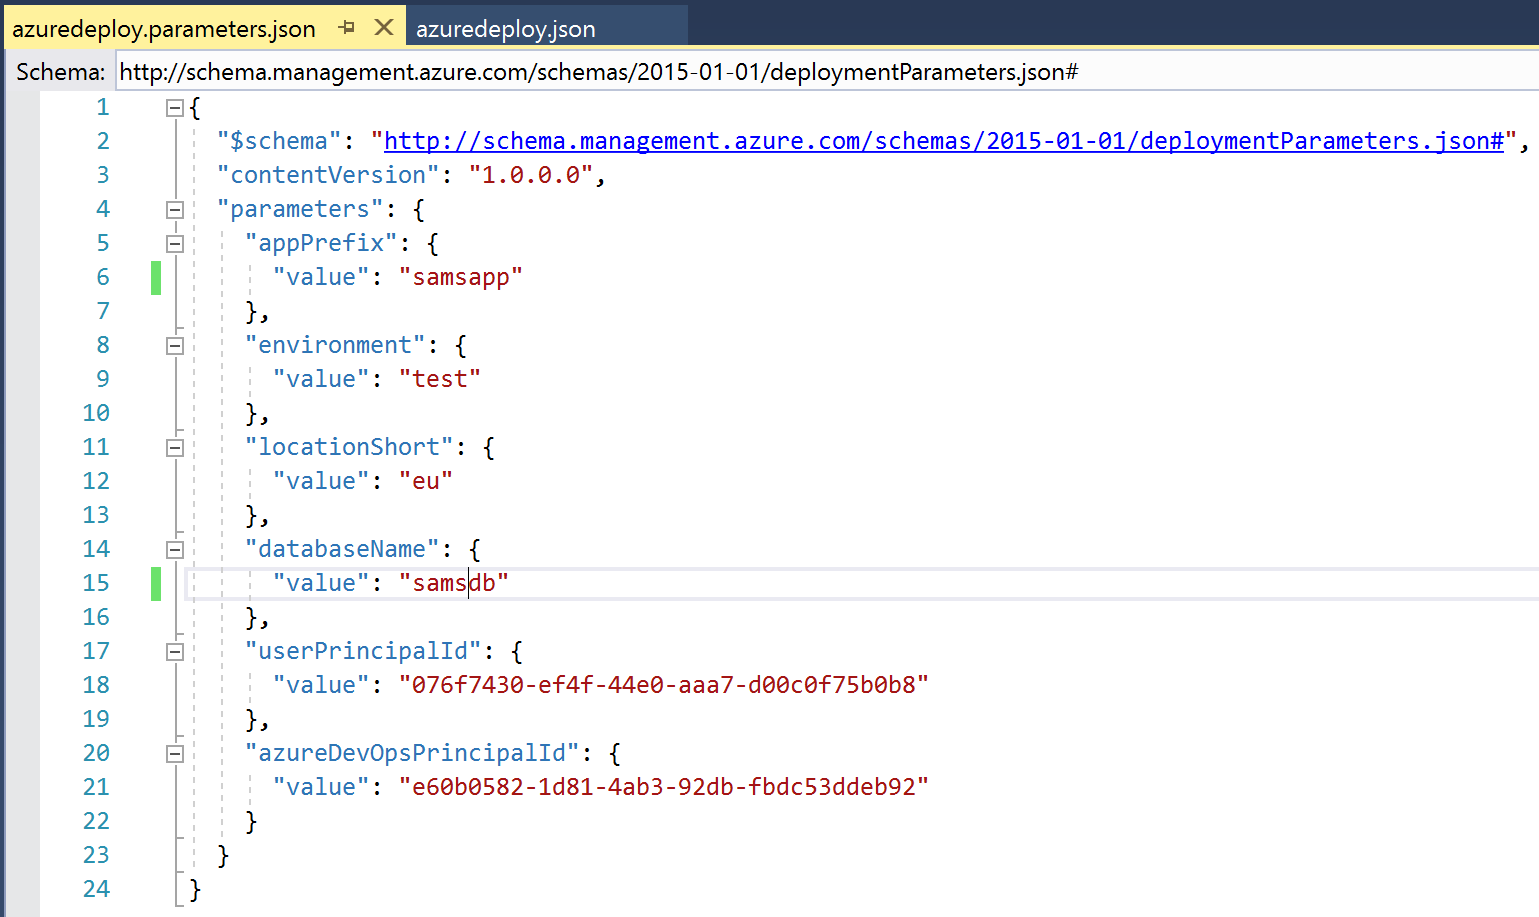
Using this Id information we can add some parameter defaults to our ARM Template parameters file, including the application prefix “SamsApp”, the environment “test”, the location “eu” (short for the Azure East US region), the database name “SamsDB”, and the user and Azure DevOps prefixes. All of our other properties will be set dynamically depending on the context. You can see more details of this in the code, which as we mentioned earlier, is in a public Azure DevOps project.
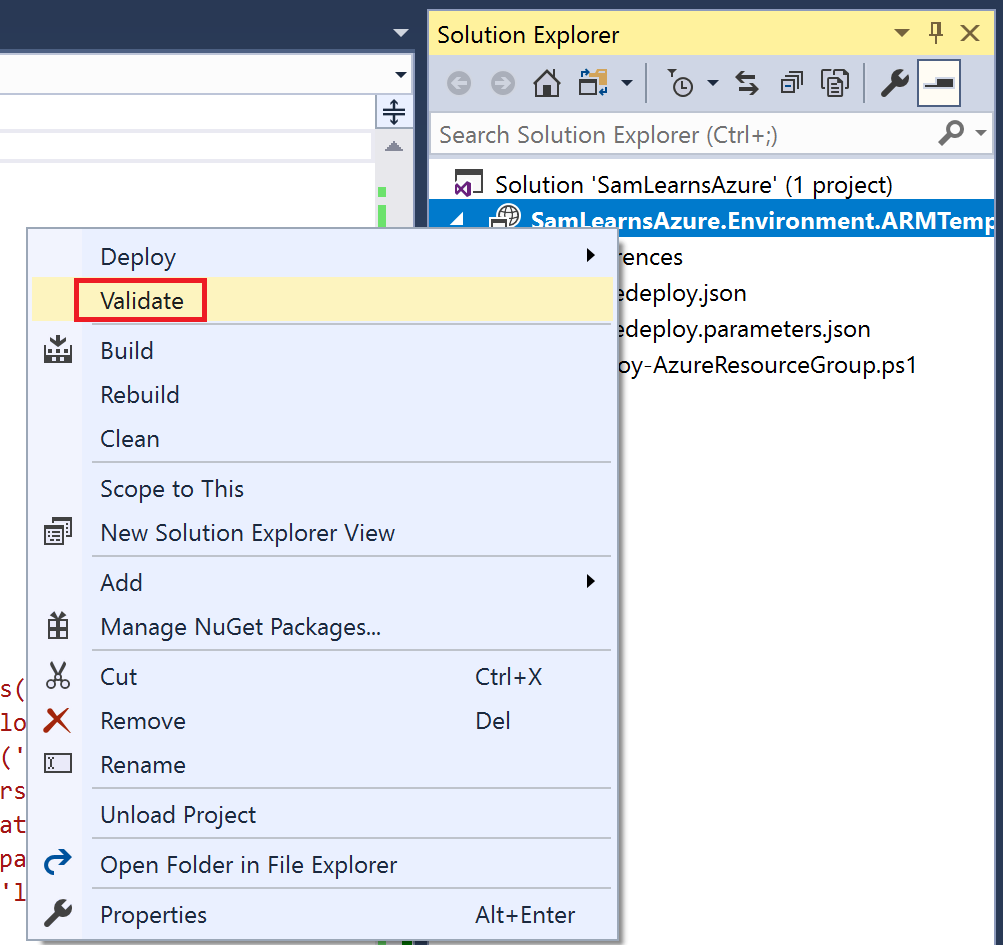
With the ARM Template built, it’s time to validate and test a deployment. To validate the template, we right click on the project and select “Validate”. Validating allows us to mock a deployment to Azure, which confirms that all of the syntax of our ARM Template is correct. There is a little bug here – sometimes the Validate menu item doesn’t appear and you need to close Visual Studio and reopen it.
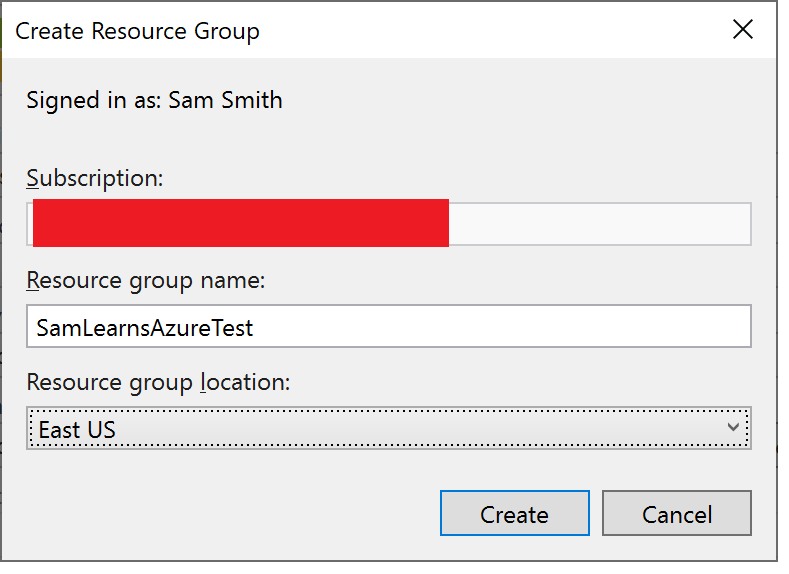
Validating requires an existing resource group, which we can create by clicking on the resource group drop down and selecting “Create New”. In this screenshot I’ve created the resource group already.
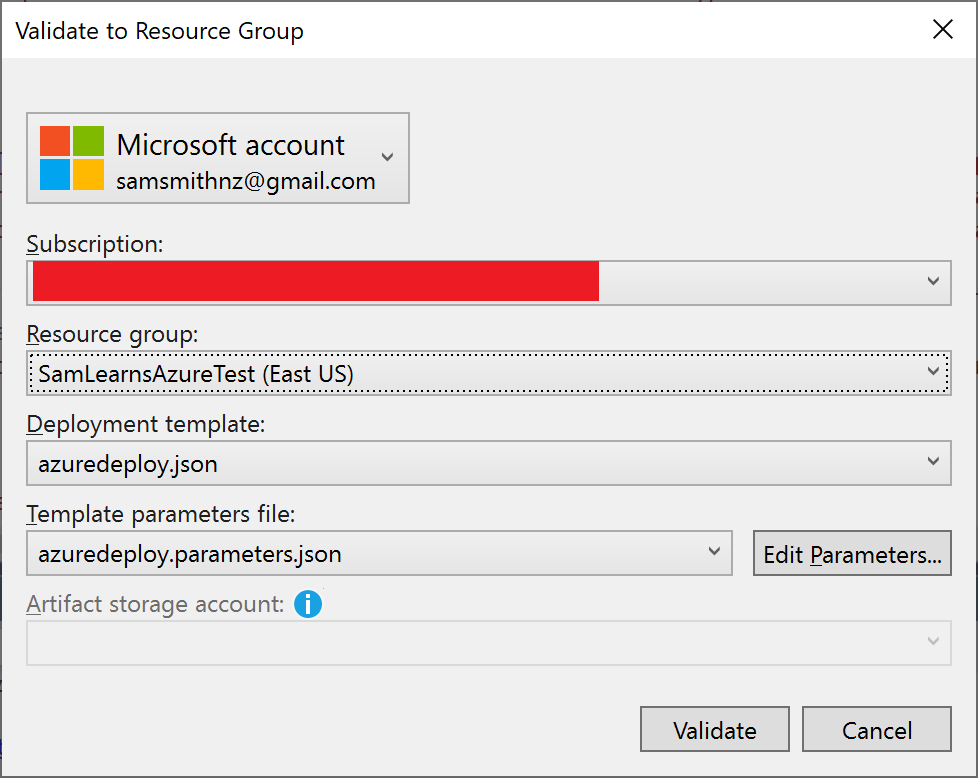
Here we select our subscription, a resource group name and location.
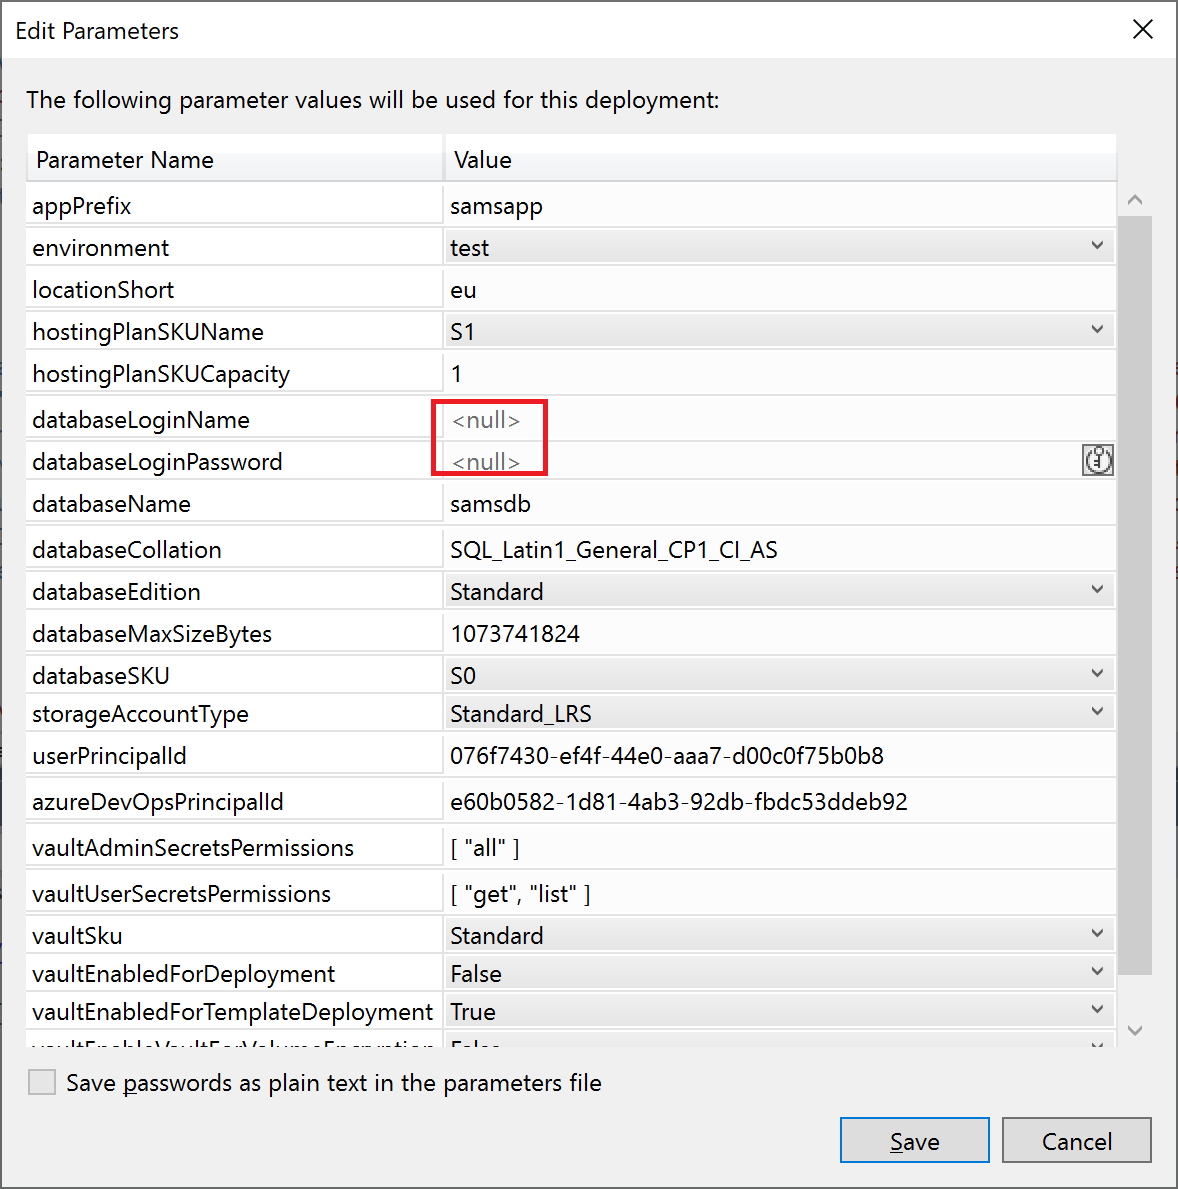
With the resource group selected, we can click on the “Edit parameters” button and see all of our parameters. This is where we can see how all of our default parameters are pre-populated – everything except for two, the database login and password. We don’t want these secrets stored in our code, that isn’t secure, so we are going to leave them blank and fill them out as we deploy, as we will see shortly. Note that if you do fill them out here, they will be saved into the parameters file – e.g. in code, and then will be visible in your source control – this is not good!
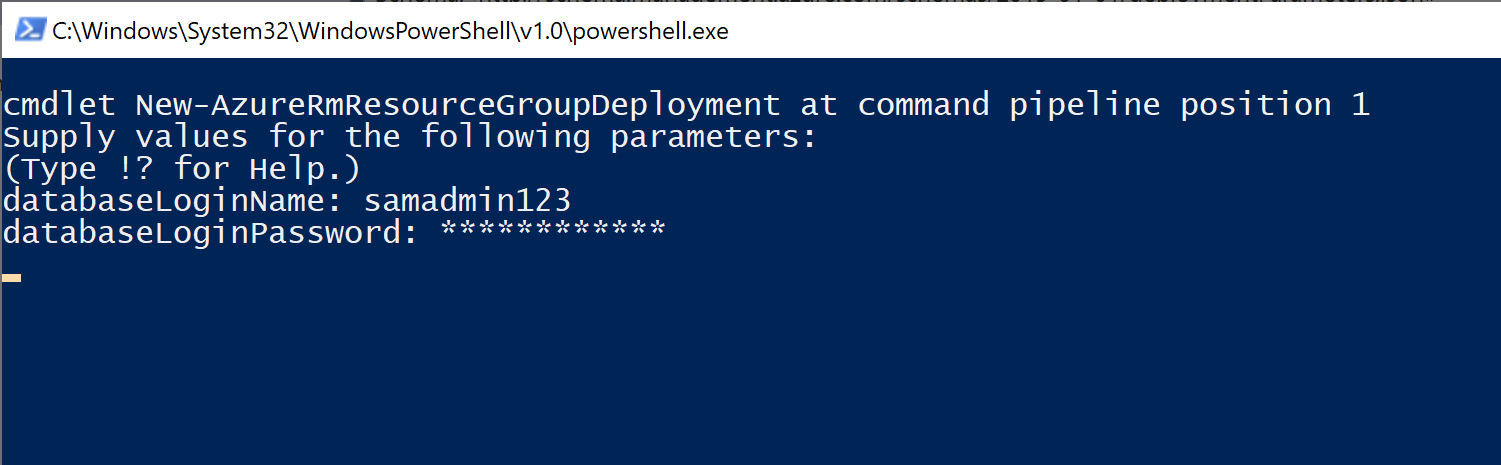
Starting the validation, a PowerShell window opens and prompts us for any missing parameters – in this case the database login and password. Since we aren’t actually deploying resources, we can type whatever we like here. Note that sometimes this PowerShell window minimizes, and you need to reactivate it – otherwise it appears as though the deployment has frozen.
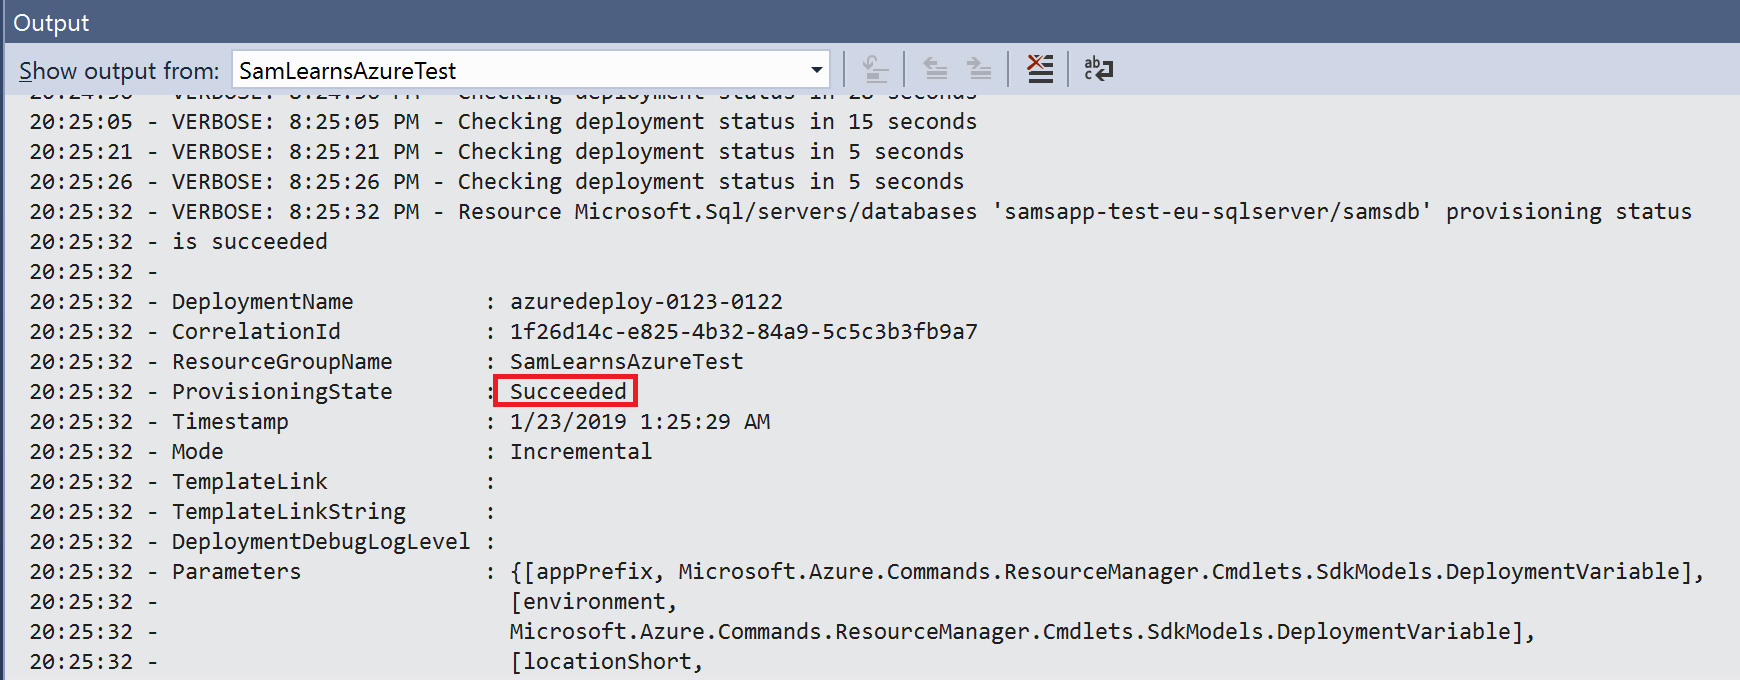
We can monitor the validation and can see it succeeded. With the validation complete, we complete this process but with a deployment instead of a validation. We want to be sure that everything is created correctly.
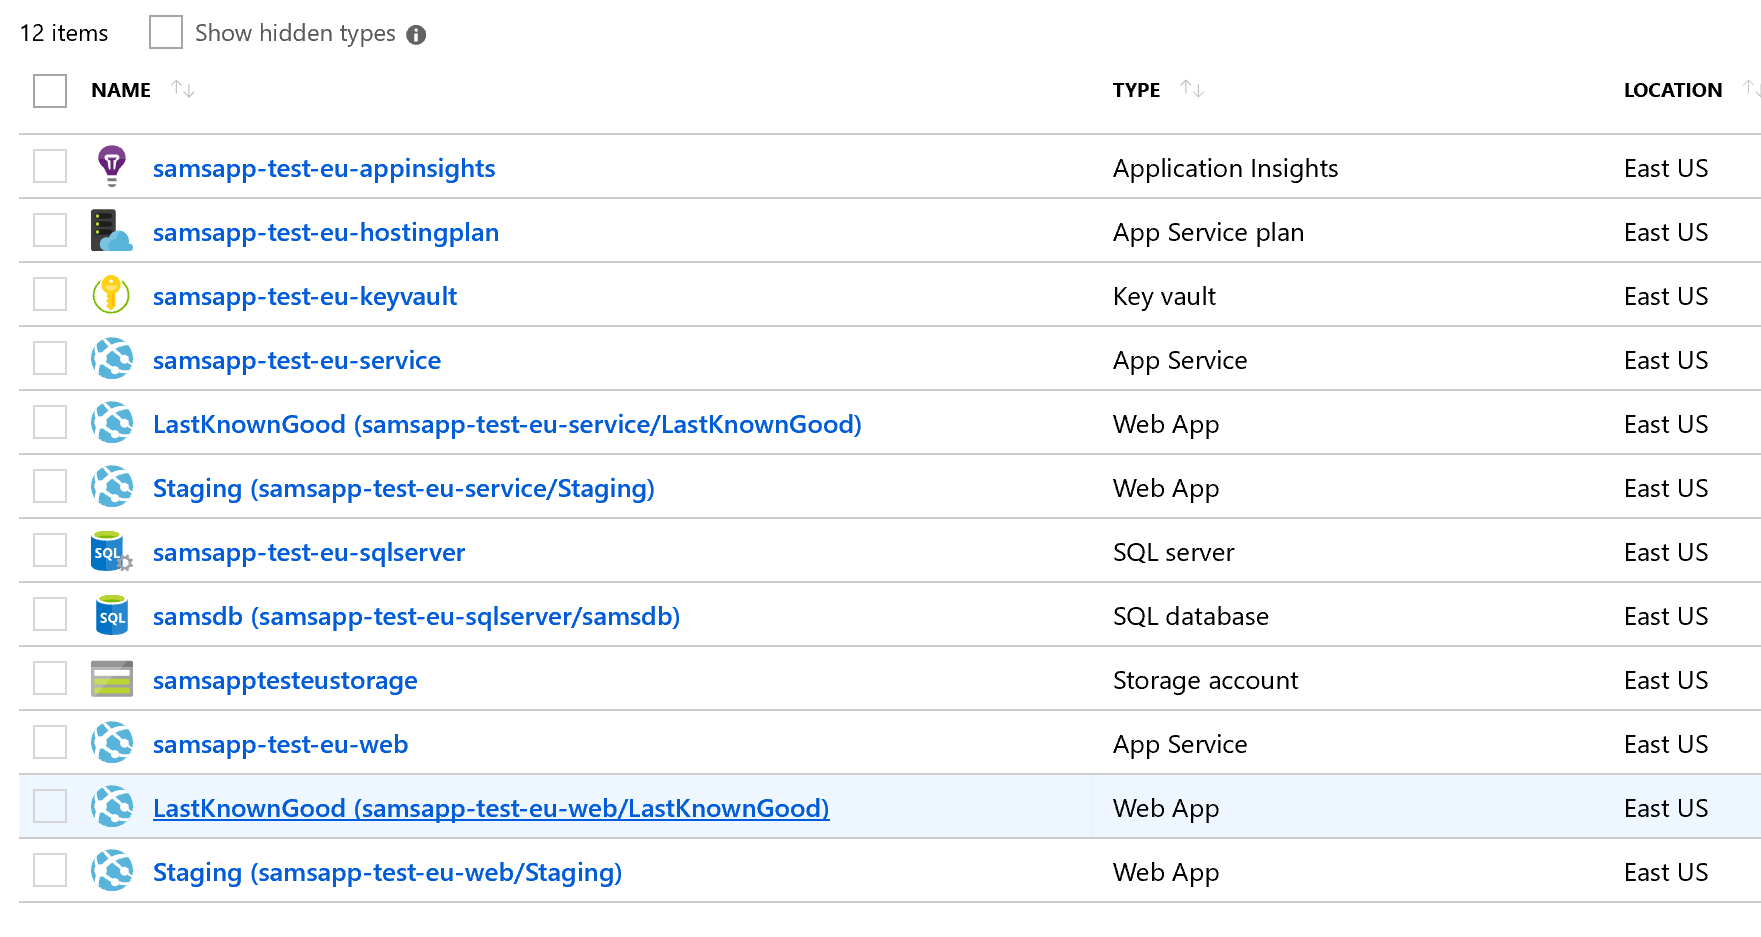
After a few minutes, the output shows the deployment succeeded, and we can confirm this by looking at the resource group in the portal – all of the resources have been created and look great. Since this was a test deployment and we want Azure DevOps to do the actual deployment, (and we want to save money), we delete this test resource group and everything inside it, we won’t need it again.
Pushing our code and creating the Pull Request
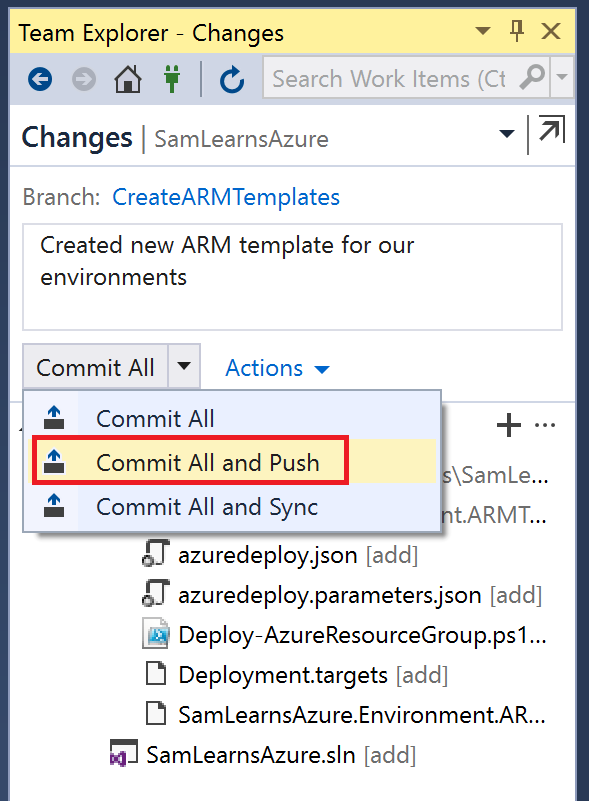
With our development and testing complete, we are ready to push our changes to Azure DevOps. In the Team Explorer, we write a comment, “commit all and push” our changes to the server.
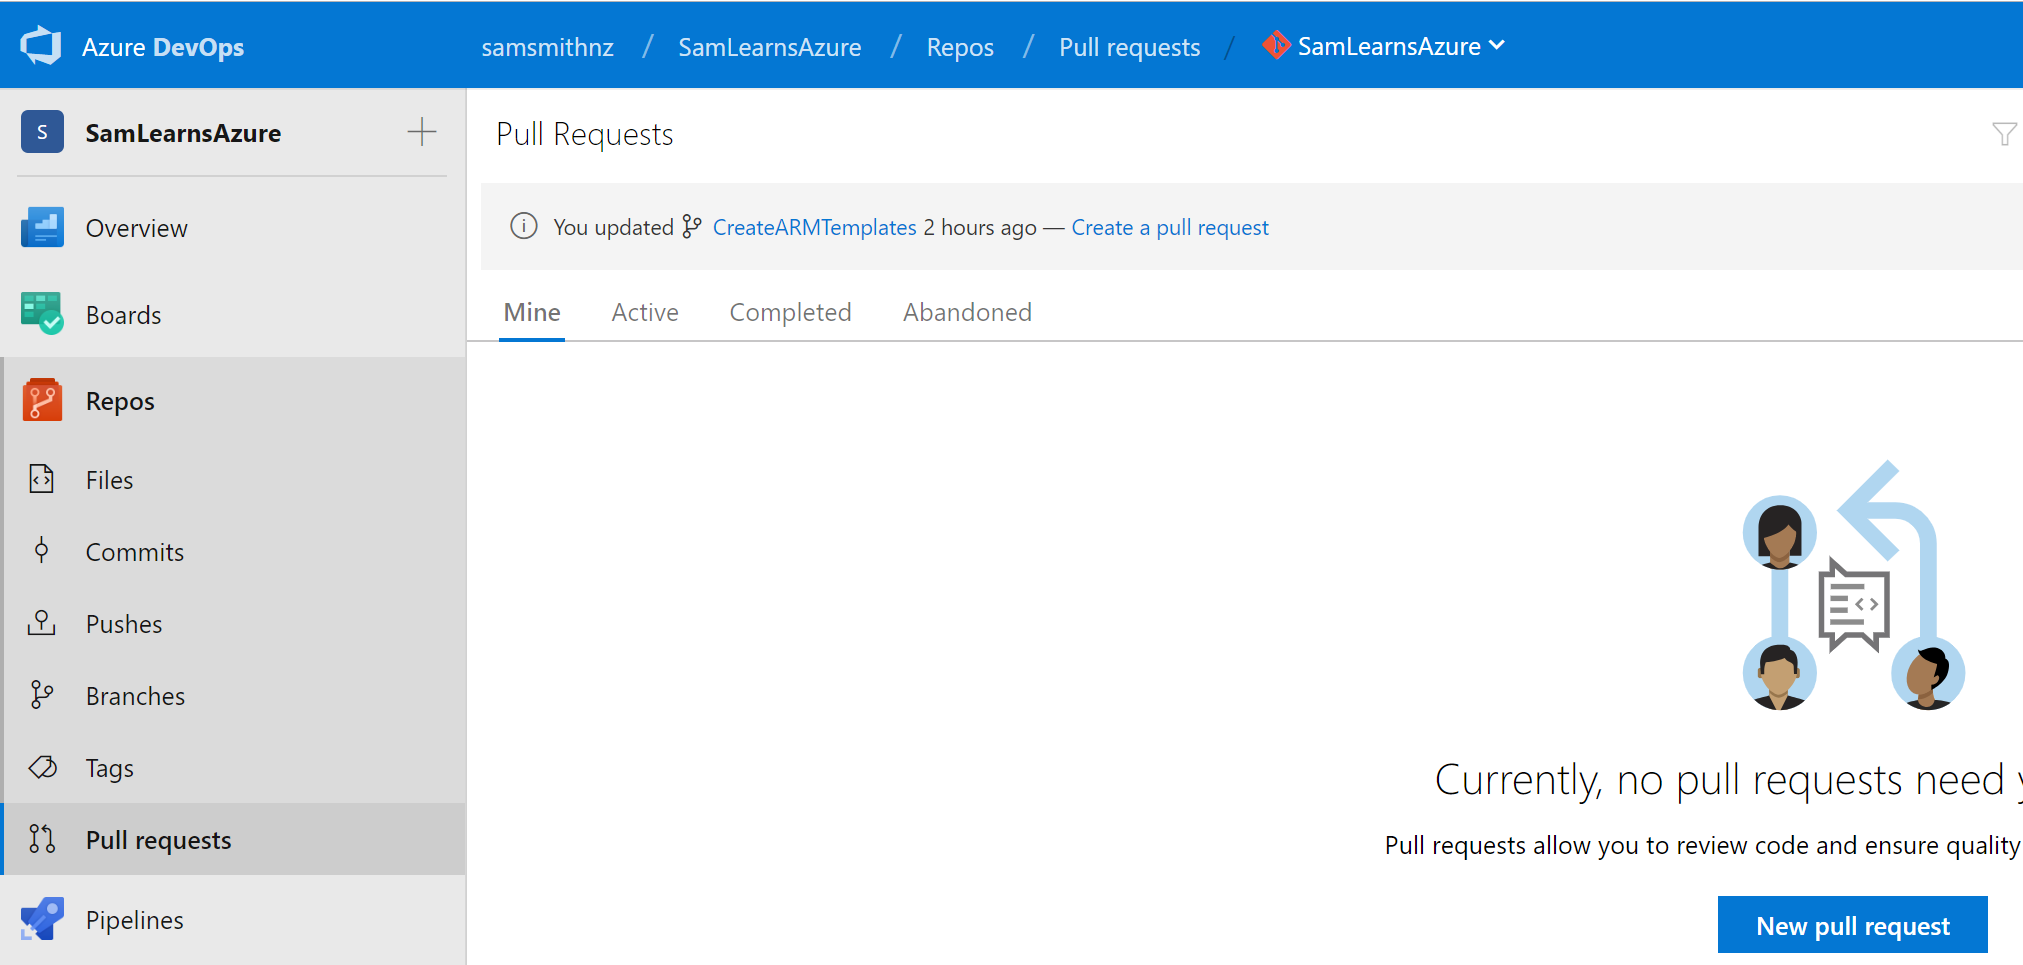
To create a Pull Request, we browse to “Azure Repos” and select the “Pull requests” menu item. We can click the “New pull request” button, or click the helpful link that detects a recent code push – we are clicking on this link!
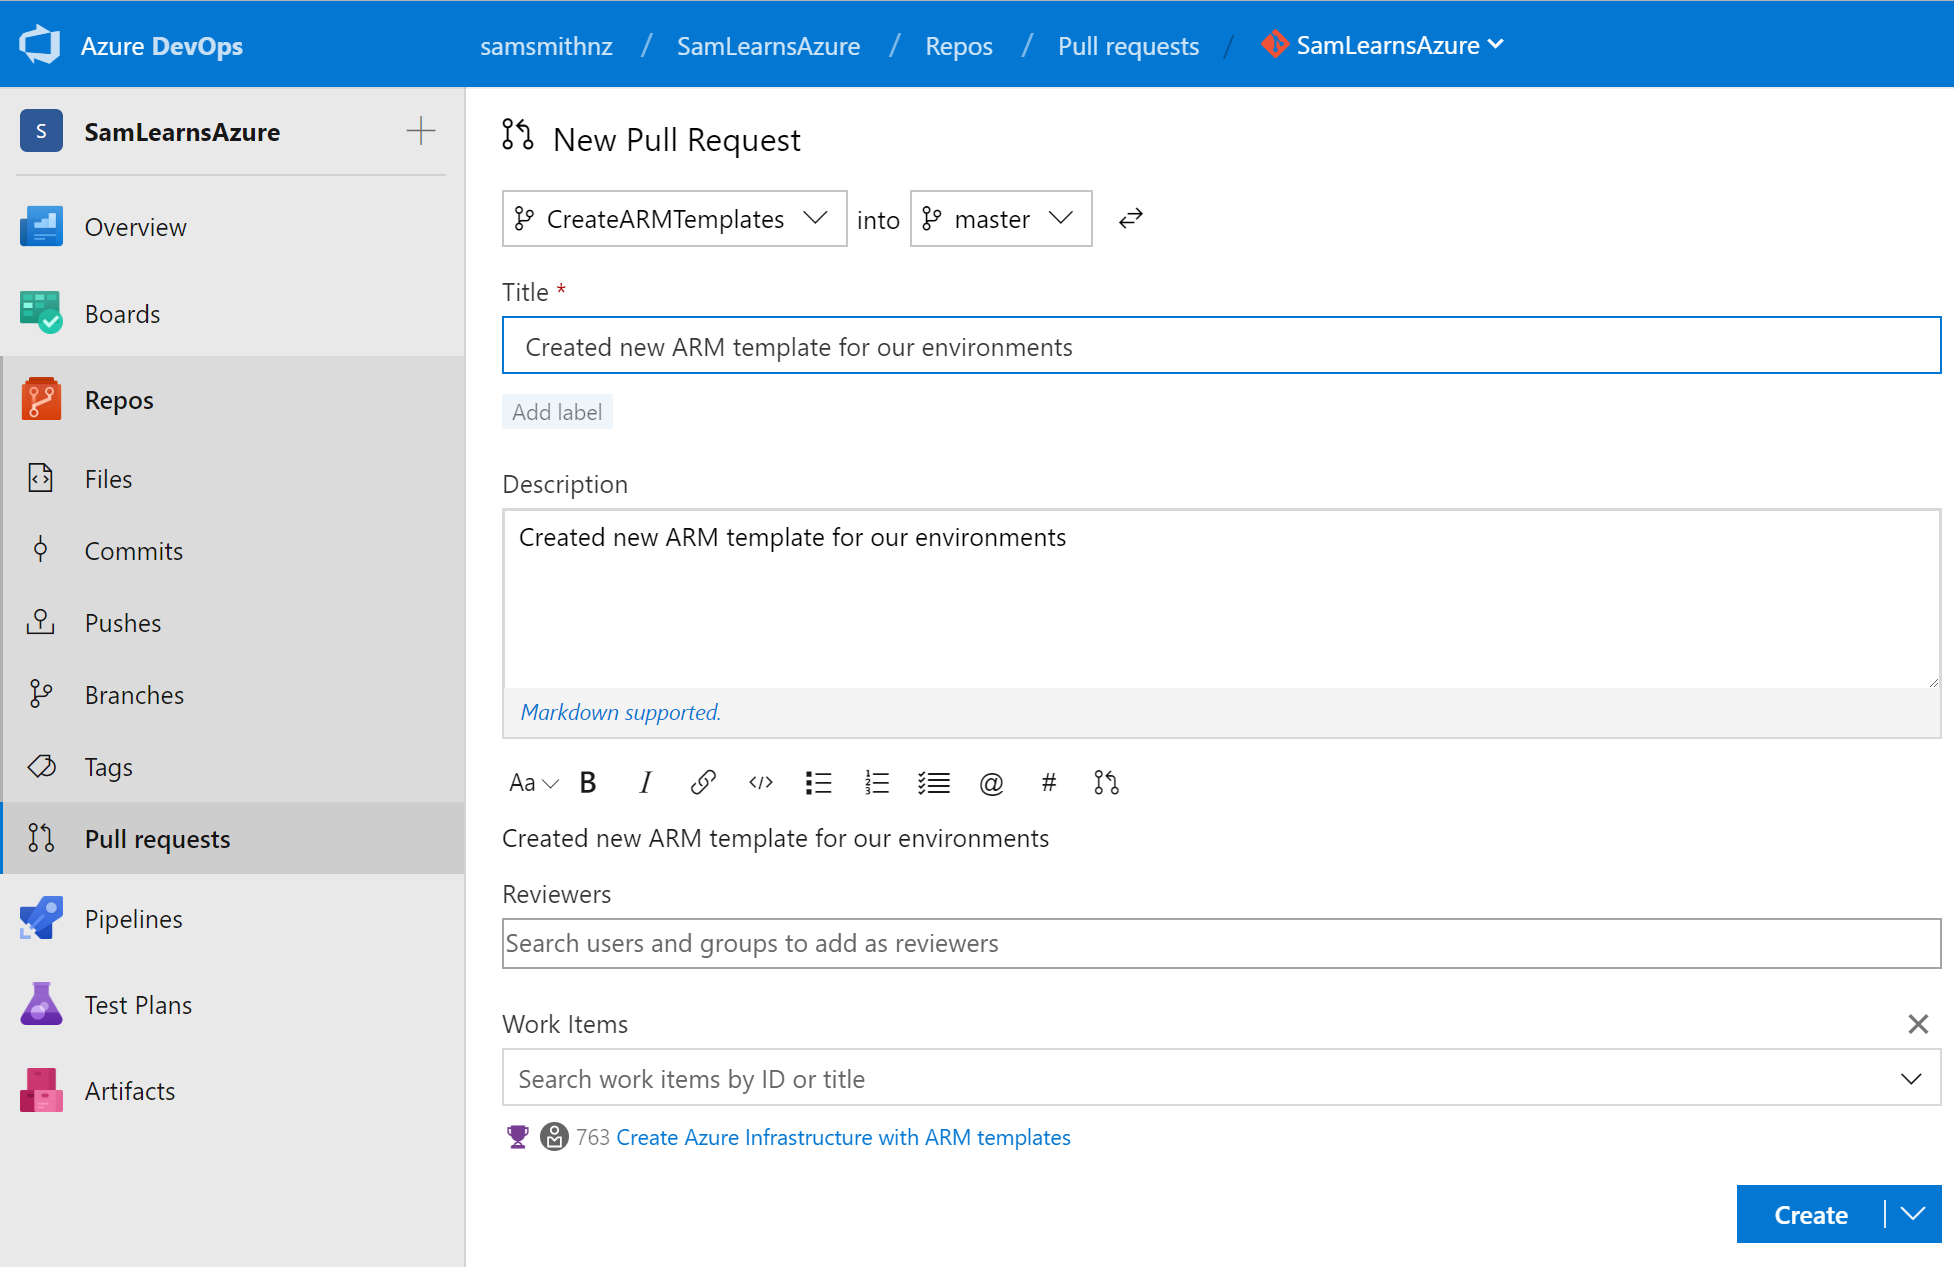
In the “New Pull Request” page, we can see our commit comment is automatically populated as the title and description, and the work item we branched from is also linked. We click the “Create” button.
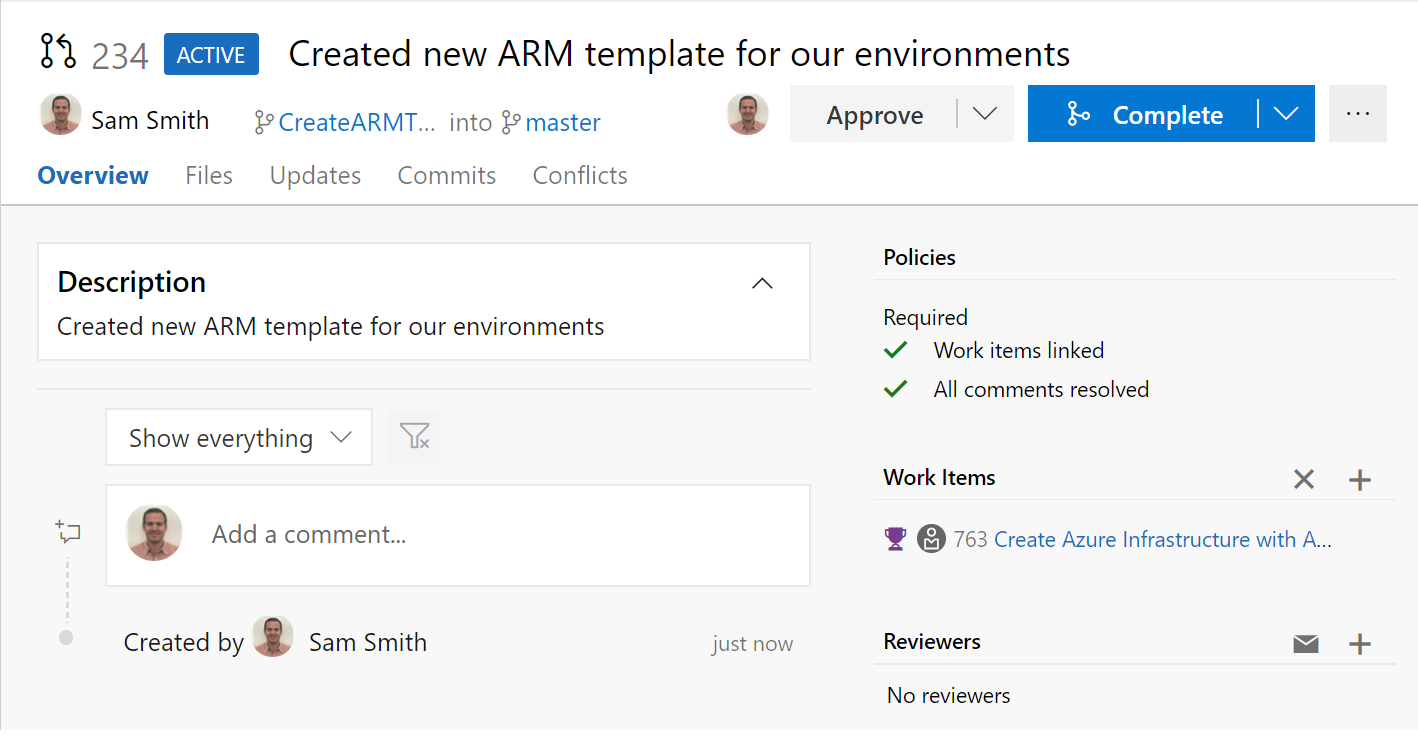
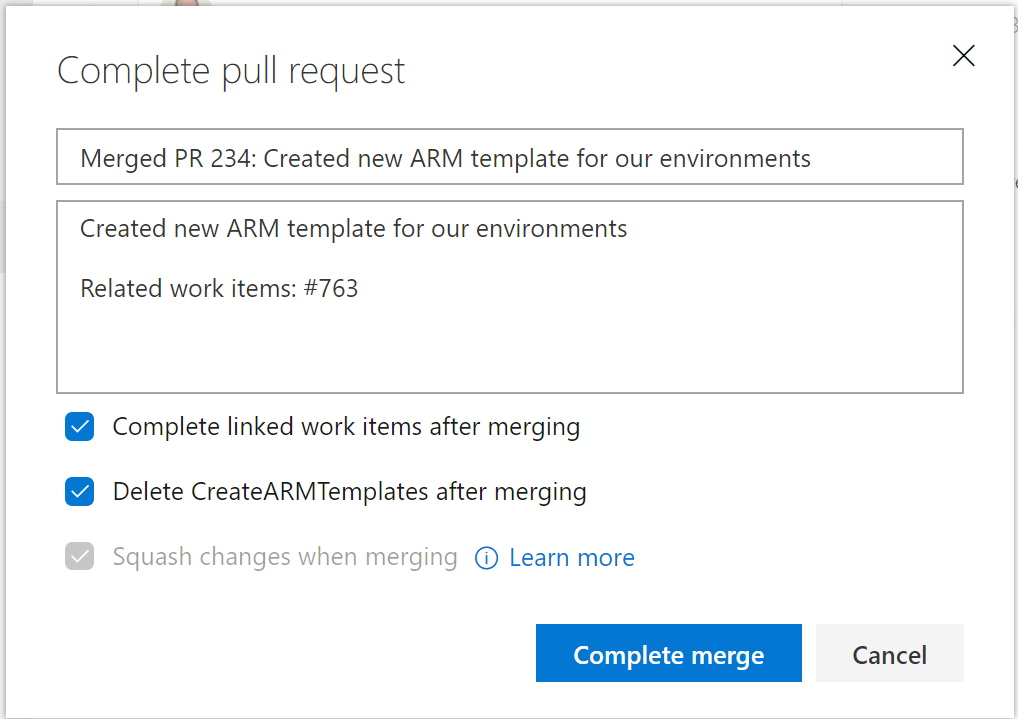
In the actual Pull Request we can see our policies in action in the top right corner – these are very simple at the moment, but as long as we see green checkmarks we can complete the Pull Request. We click the “Complete” button…
This shows the “Complete pull request” popup dialog. to move to the next stage and merge the CreateArmTemplate branch into the Master branch. Note the “Complete linked work items after merging” checkbox that automatically completes work items. This is a huge feature, especially for team members who have to chase developers for work item status.
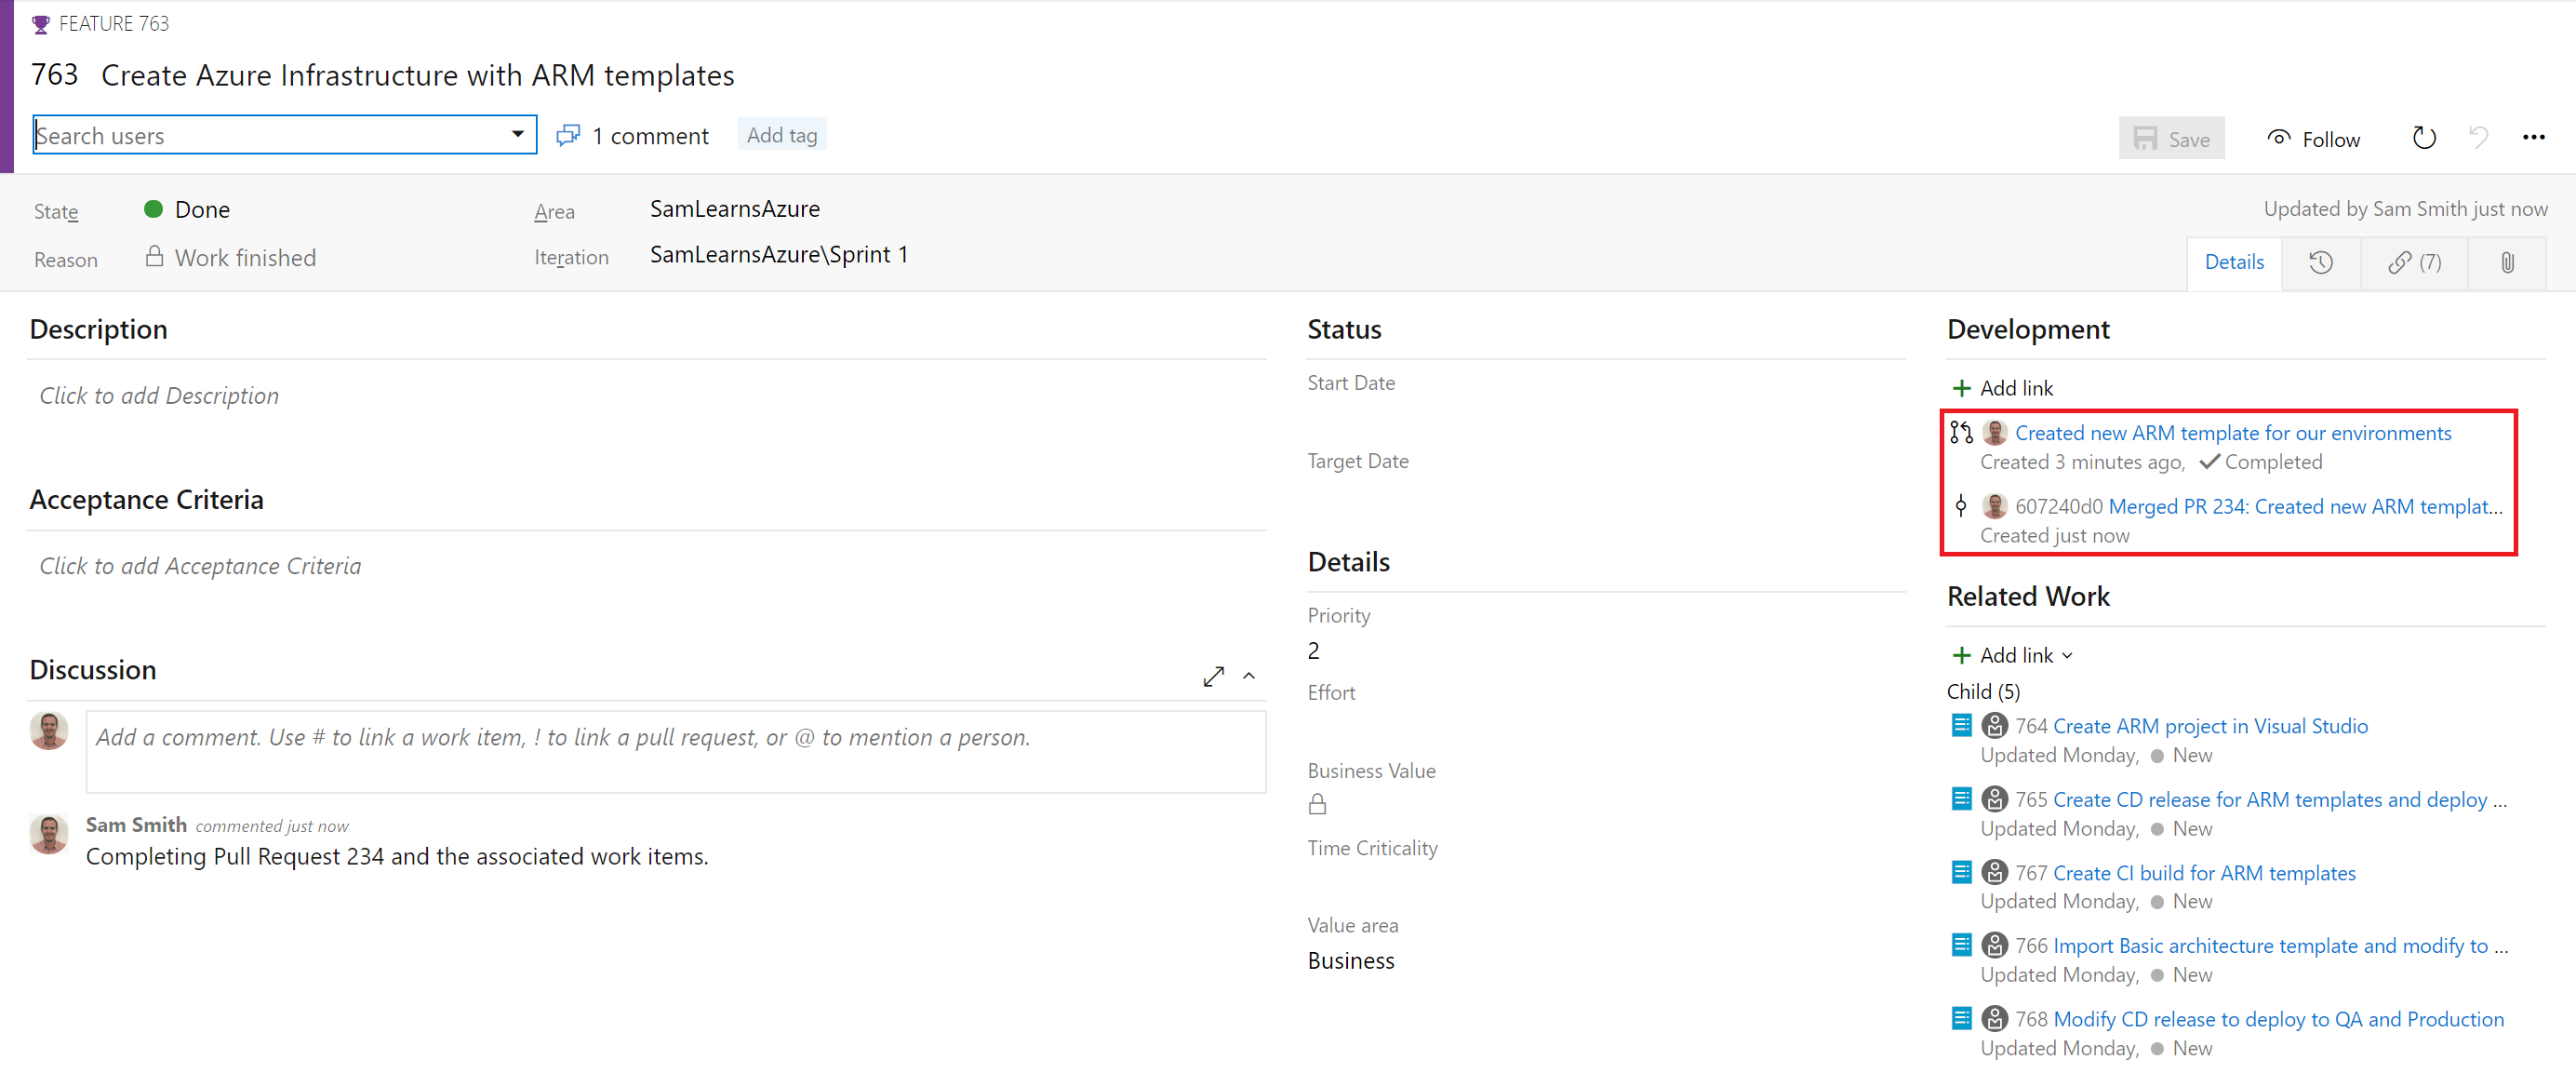
If we open that work item, in the right side we can see a “Development” section, where we can see the commit and the pull request information. Later we will also see the build details in this section.
Creating a build for ARM Templates
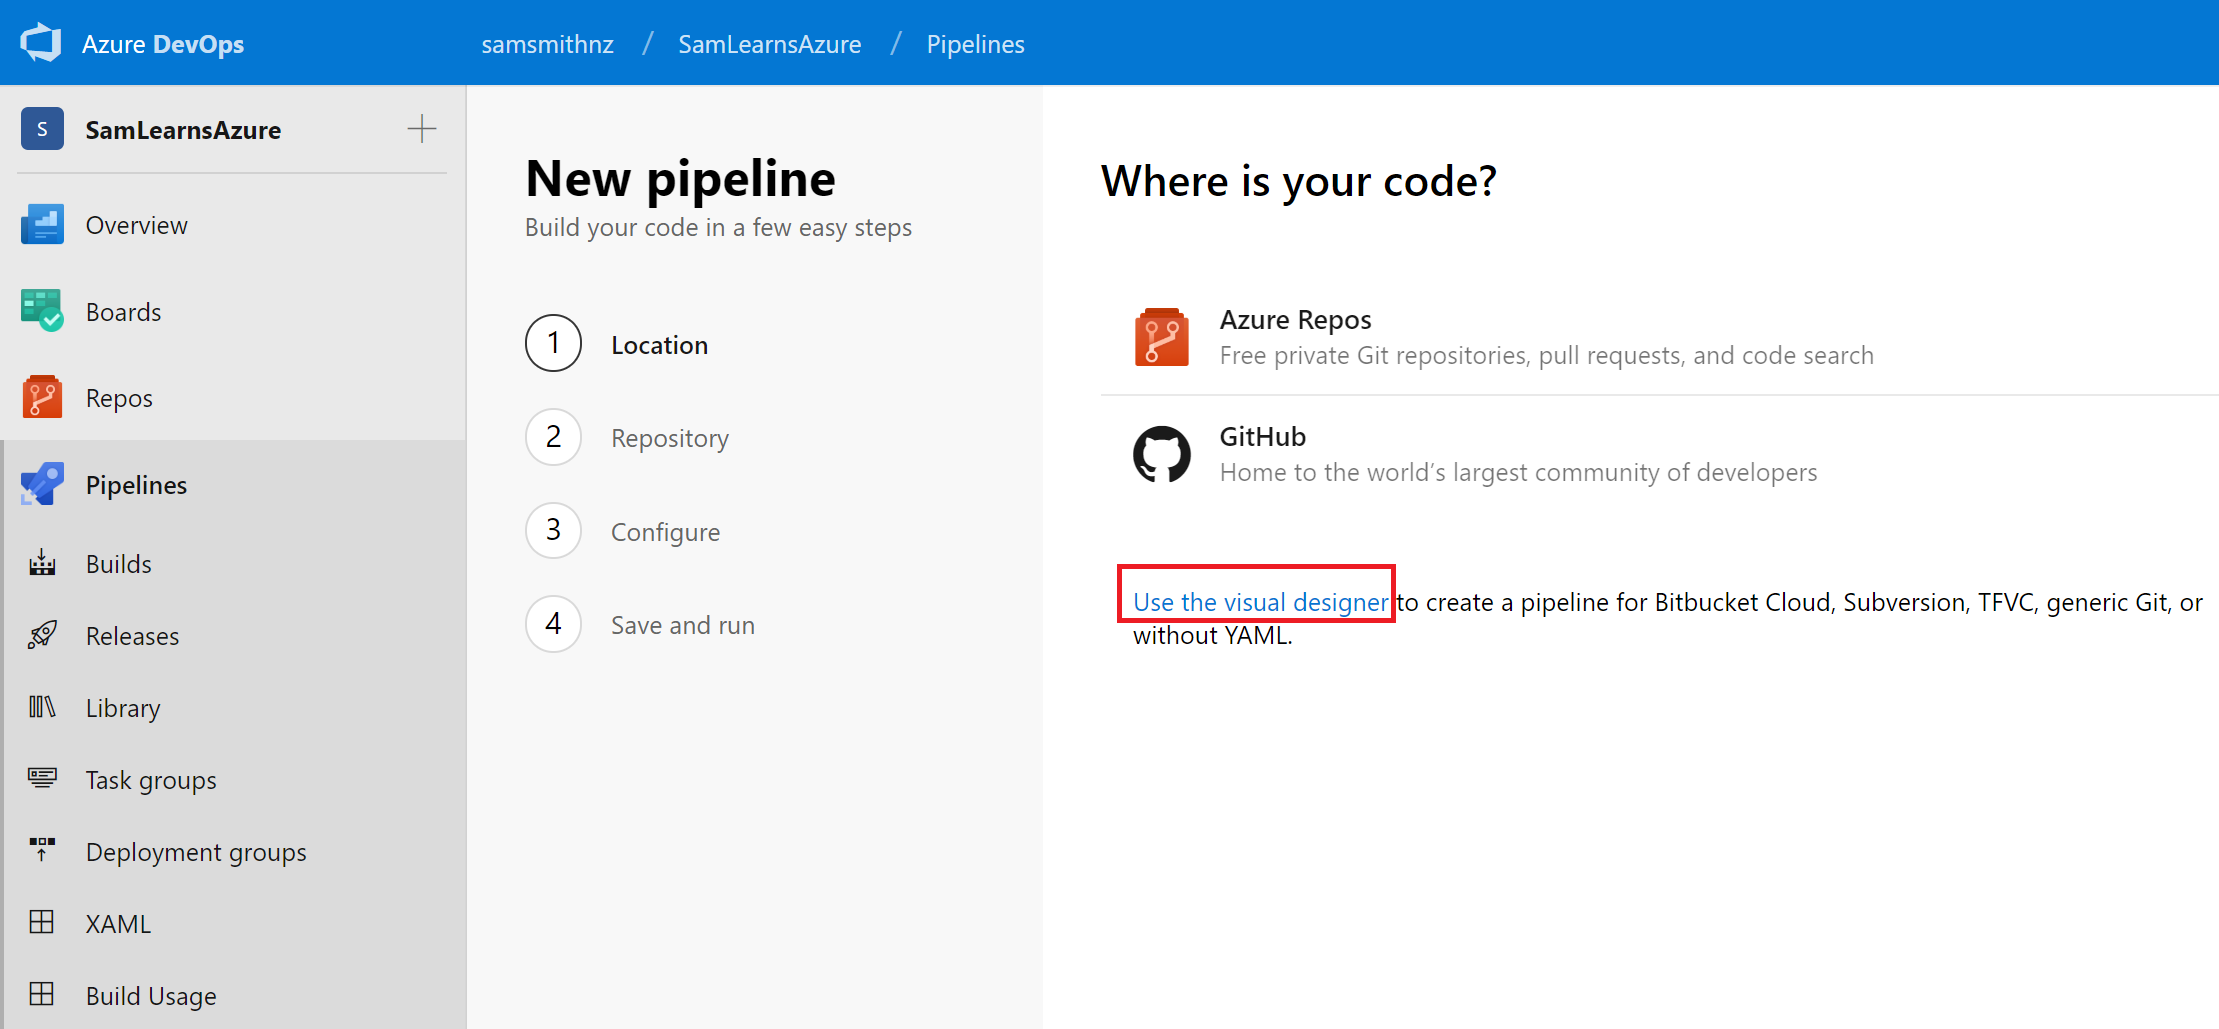
It’s time to create the build. As we aren’t actually building any code, this will be straight forward. First, we click new pipeline. We aren’t going to use YAML yet, so we will click the “Use the visual designer” link.
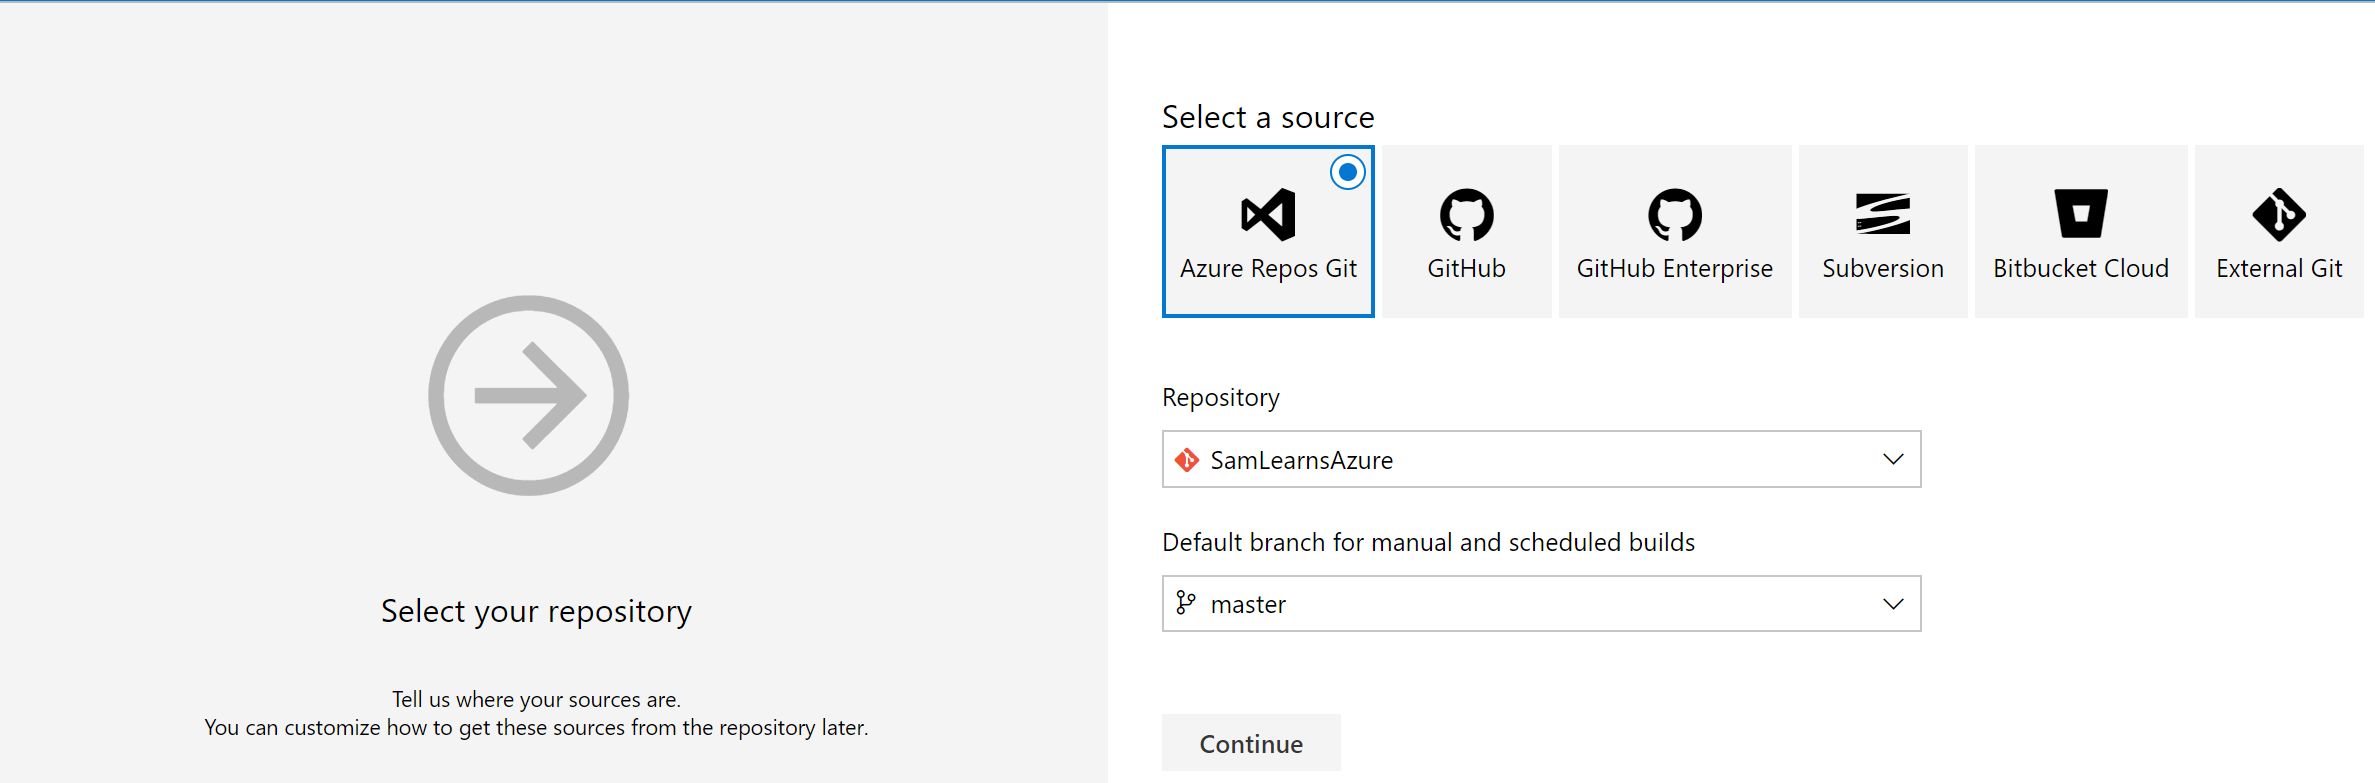
On the “select your repository” page, we select the repository and master branch.
on the “Choose a template” page, we are going to select “empty job”, to create a blank build template.

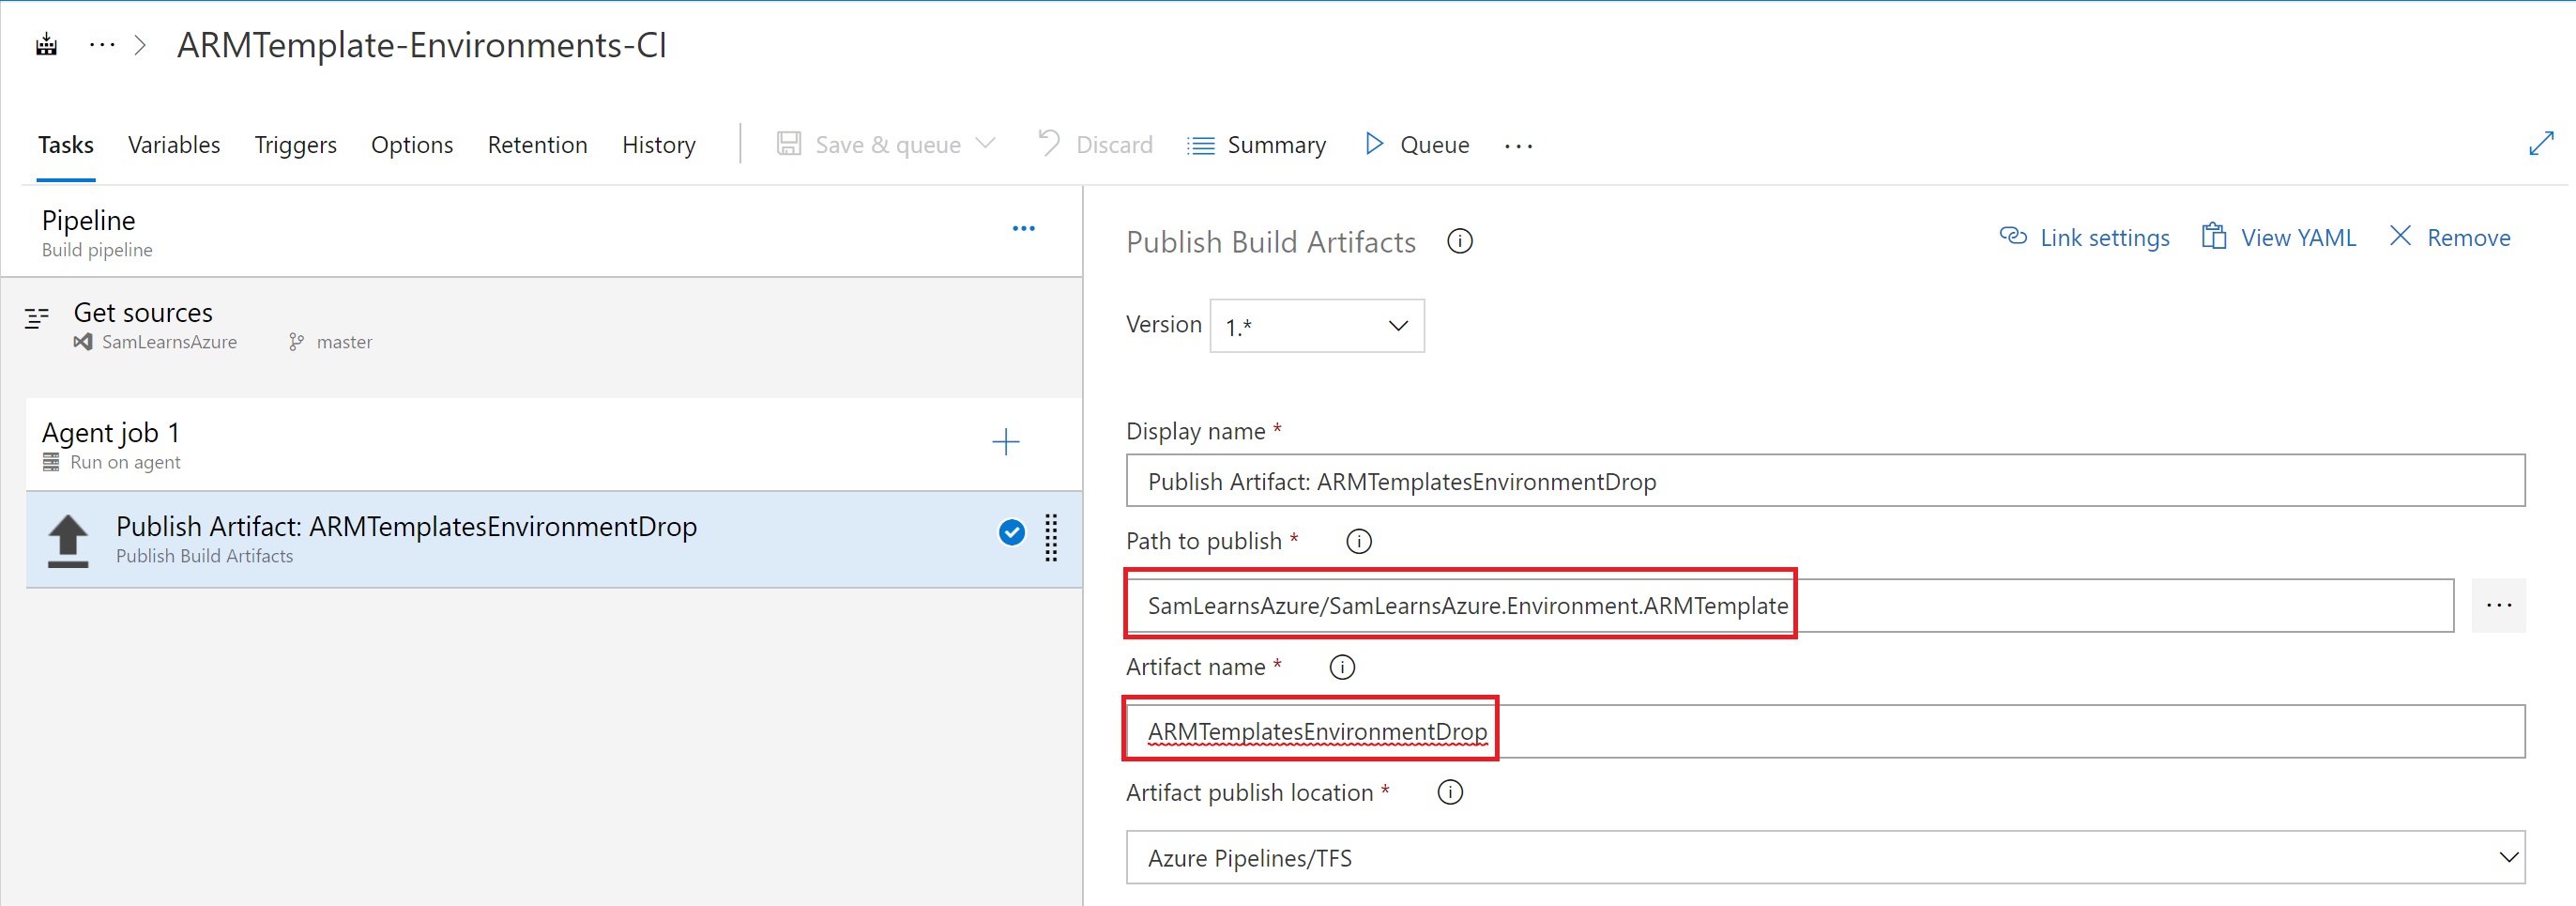
On the new pipeline, we rename it to “ARMTemplate-Environments-CI” and add a new “Publish Build artifacts” task, updating the path to publish to our arm template files, and rename the artifact name to “ARMTemplatesEnvironmentDrop”. As we aren’t compiling code, we just need to arrange the ARM template JSON files in a drop folder so we can use it in the Release step.
Finally, we update the triggers, so that whenever the ARM template code changes, we trigger a new build. We use the path filters – specifying the location of the ARM template files, to ensure that this build will only trigger if a change to the ARM template project is made.

We queue a build, and watch it finish successfully quickly!

Creating a release for ARM templates
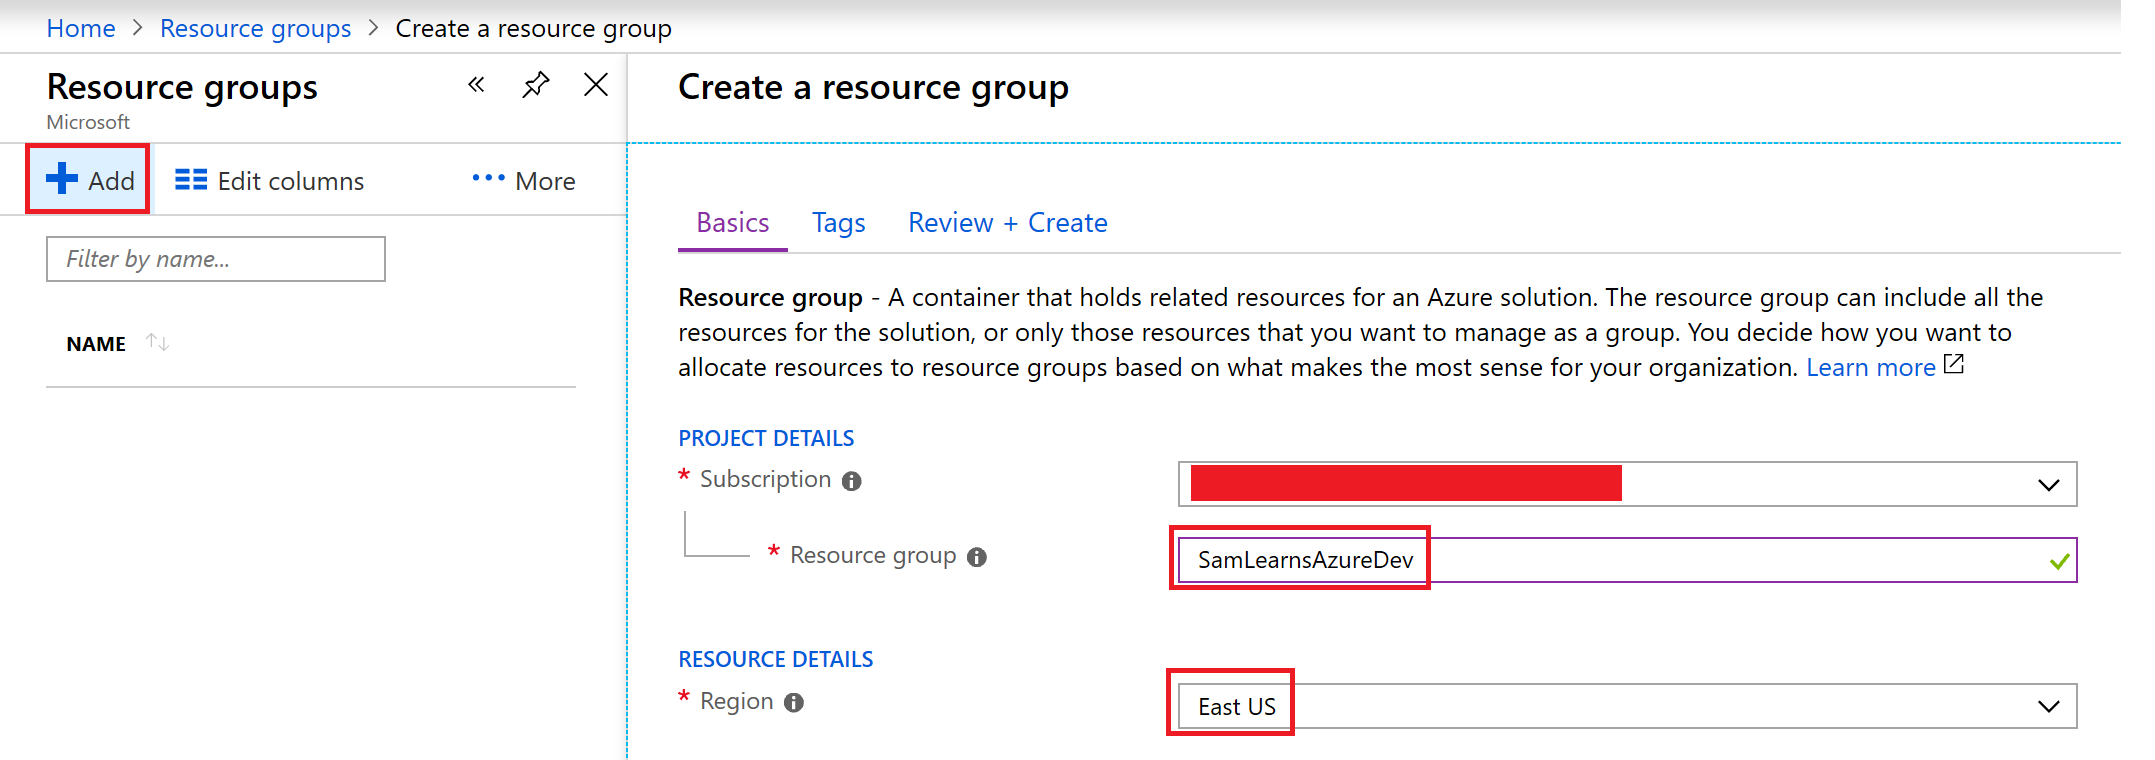
Next we are moving to create a release and deploy our ARM Template! First we need to setup the resource groups – our target for the deployments, in the portal. We are starting with 3 resource groups, one each for Development (dev), QA (qa), and Production (prod), all in the East US resource group, which is our target region.
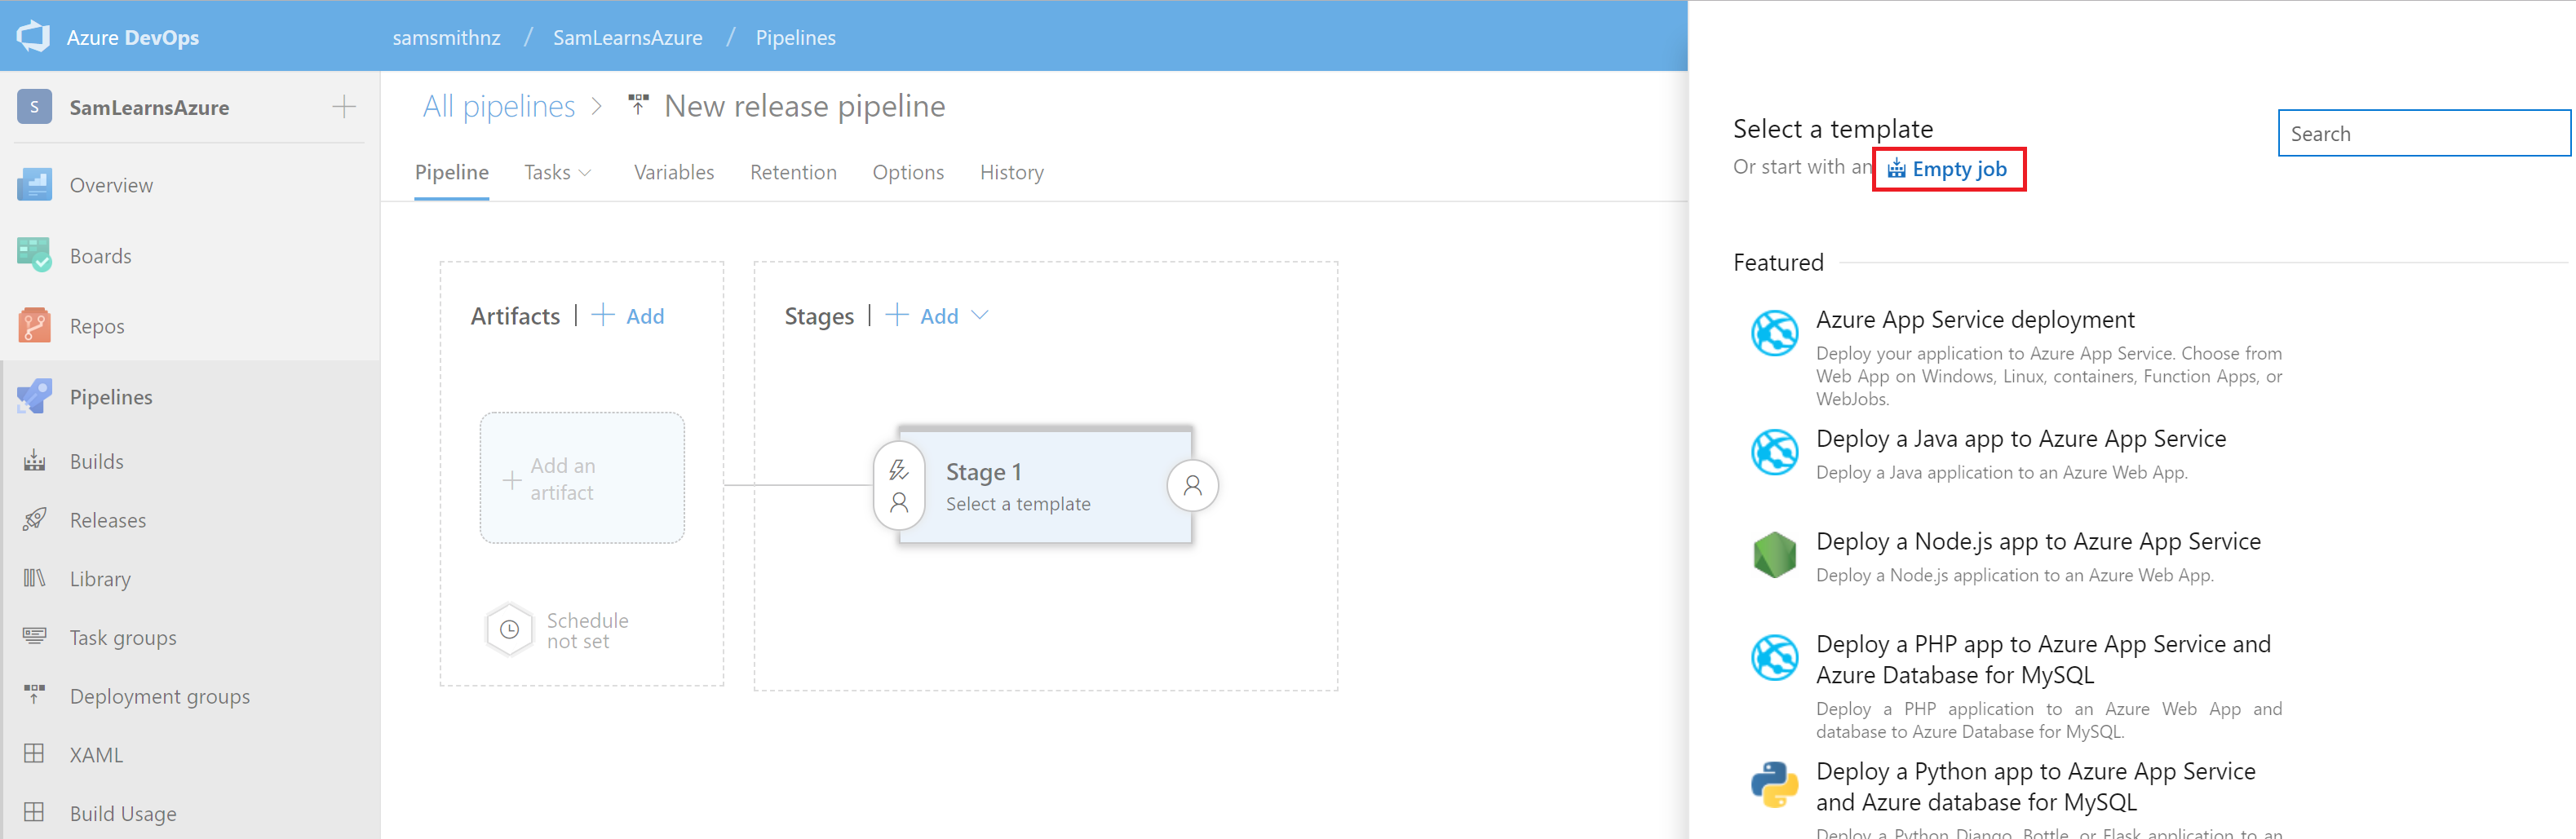
Next, we are going to start the new release. In Azure Pipelines, in the Releases section, we click the “New release pipeline” button. In the screen that shows, we are going to select the “Empty job” template.
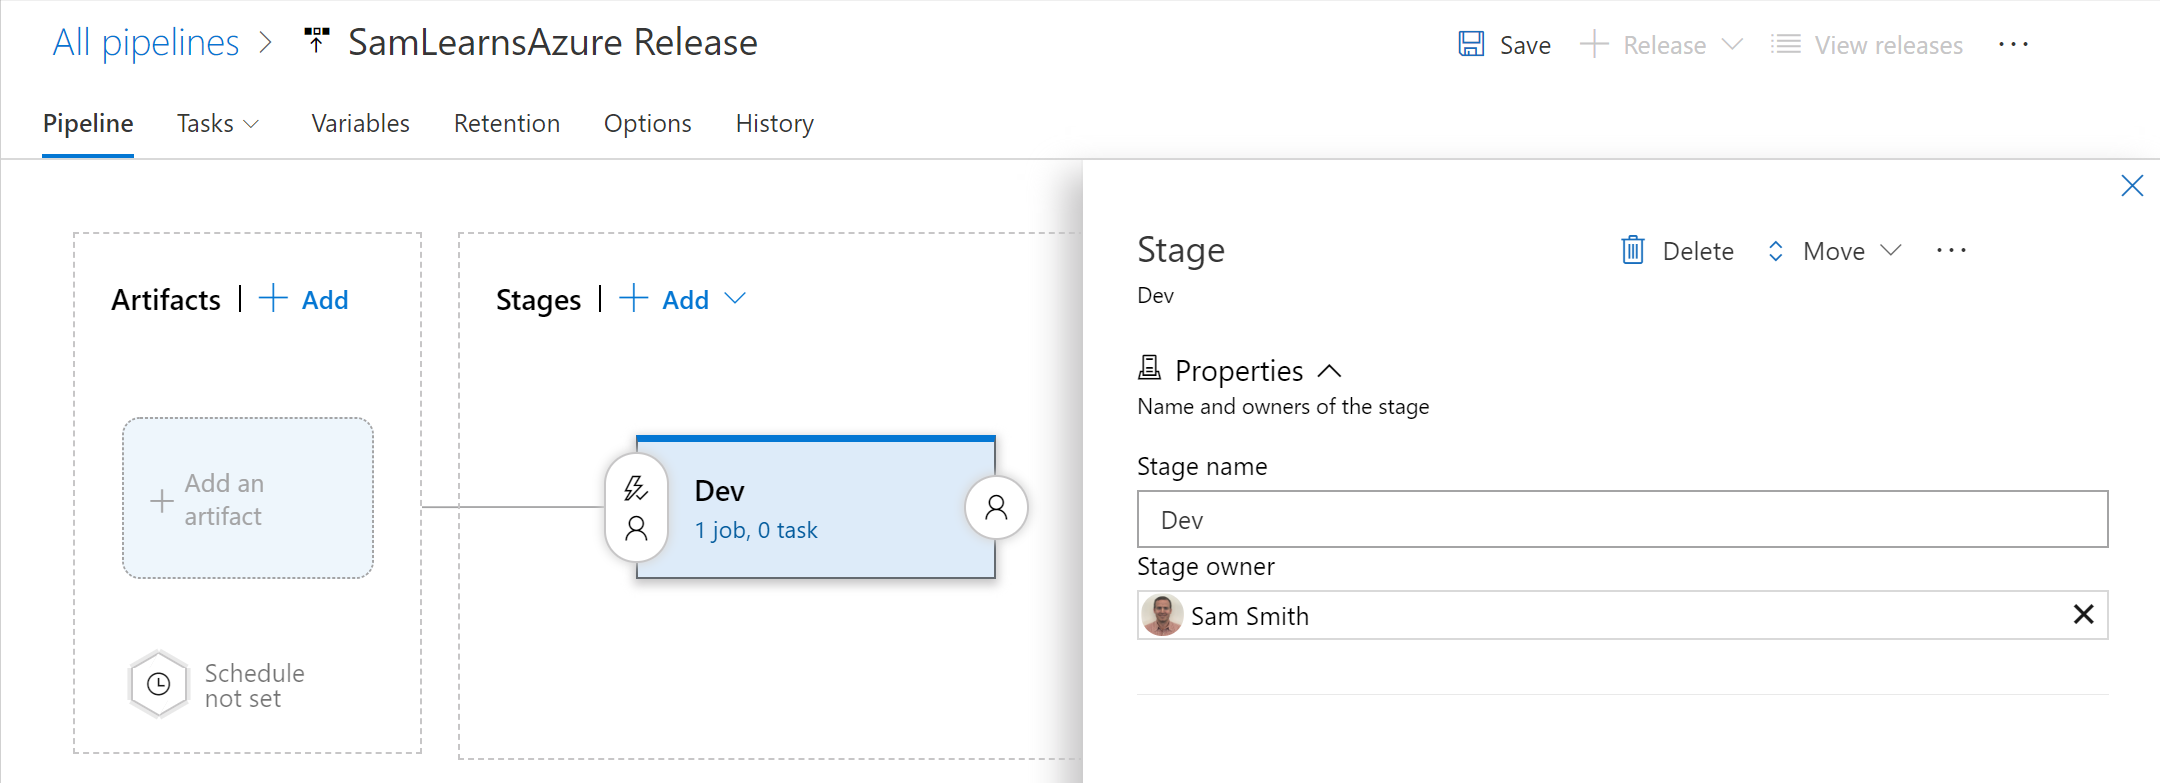
Next we are going to update the release and stage properties. First we will rename the release to “SamLearnsAzure Release”, and the stage to “Dev”
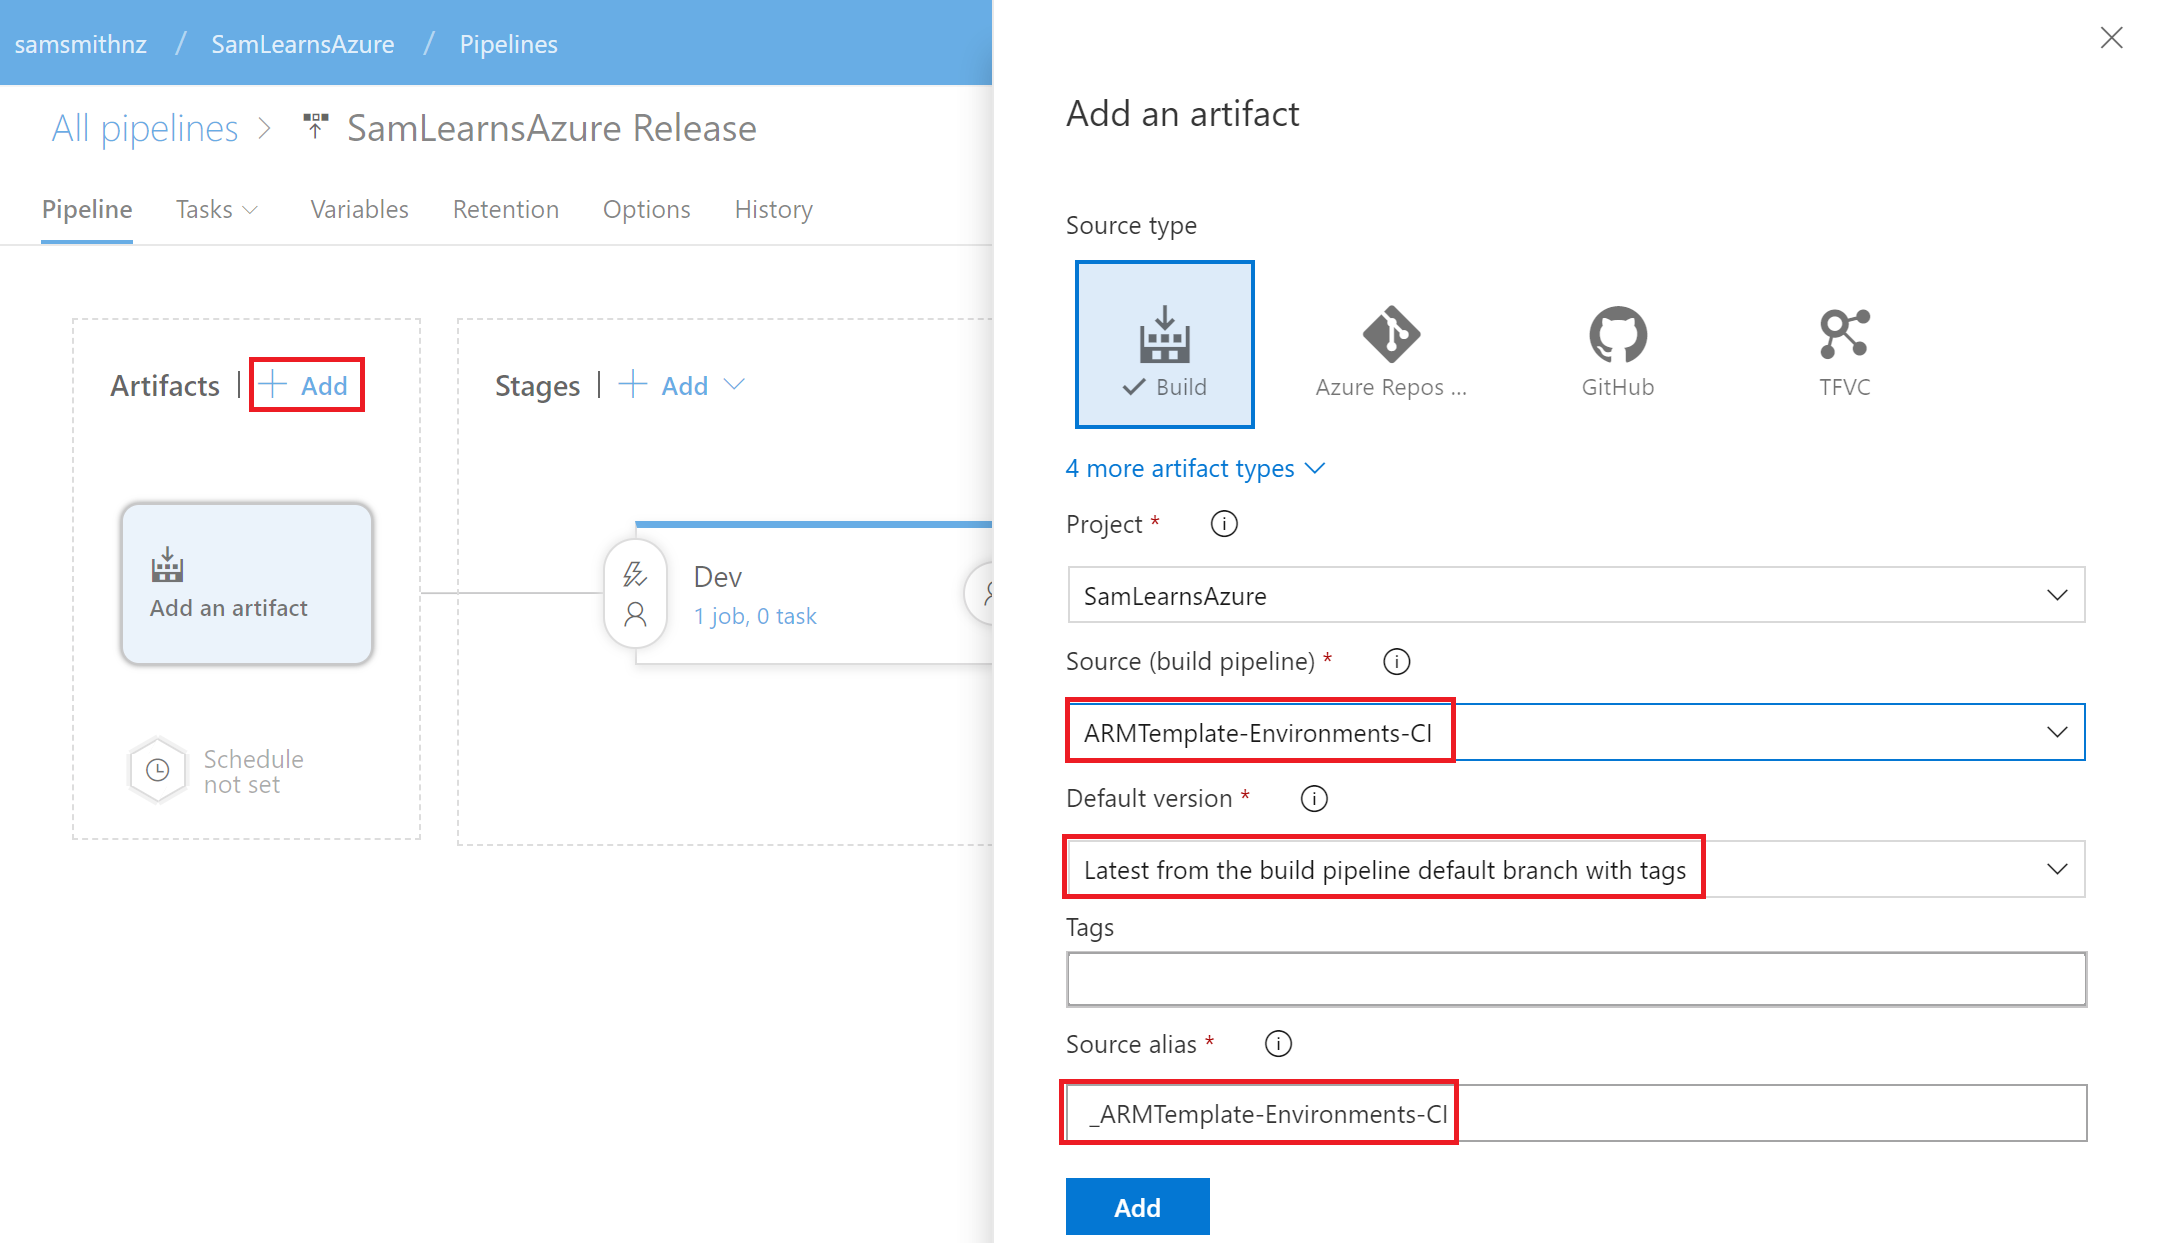
Next we are adding the build artifacts. By clicking the highlighted “+Add” button, we can add the “ArmTemplate-Environments-CI” build, specifying the default version (latest from the default/master branch). We don’t need to specify tags, and use the default source alias.
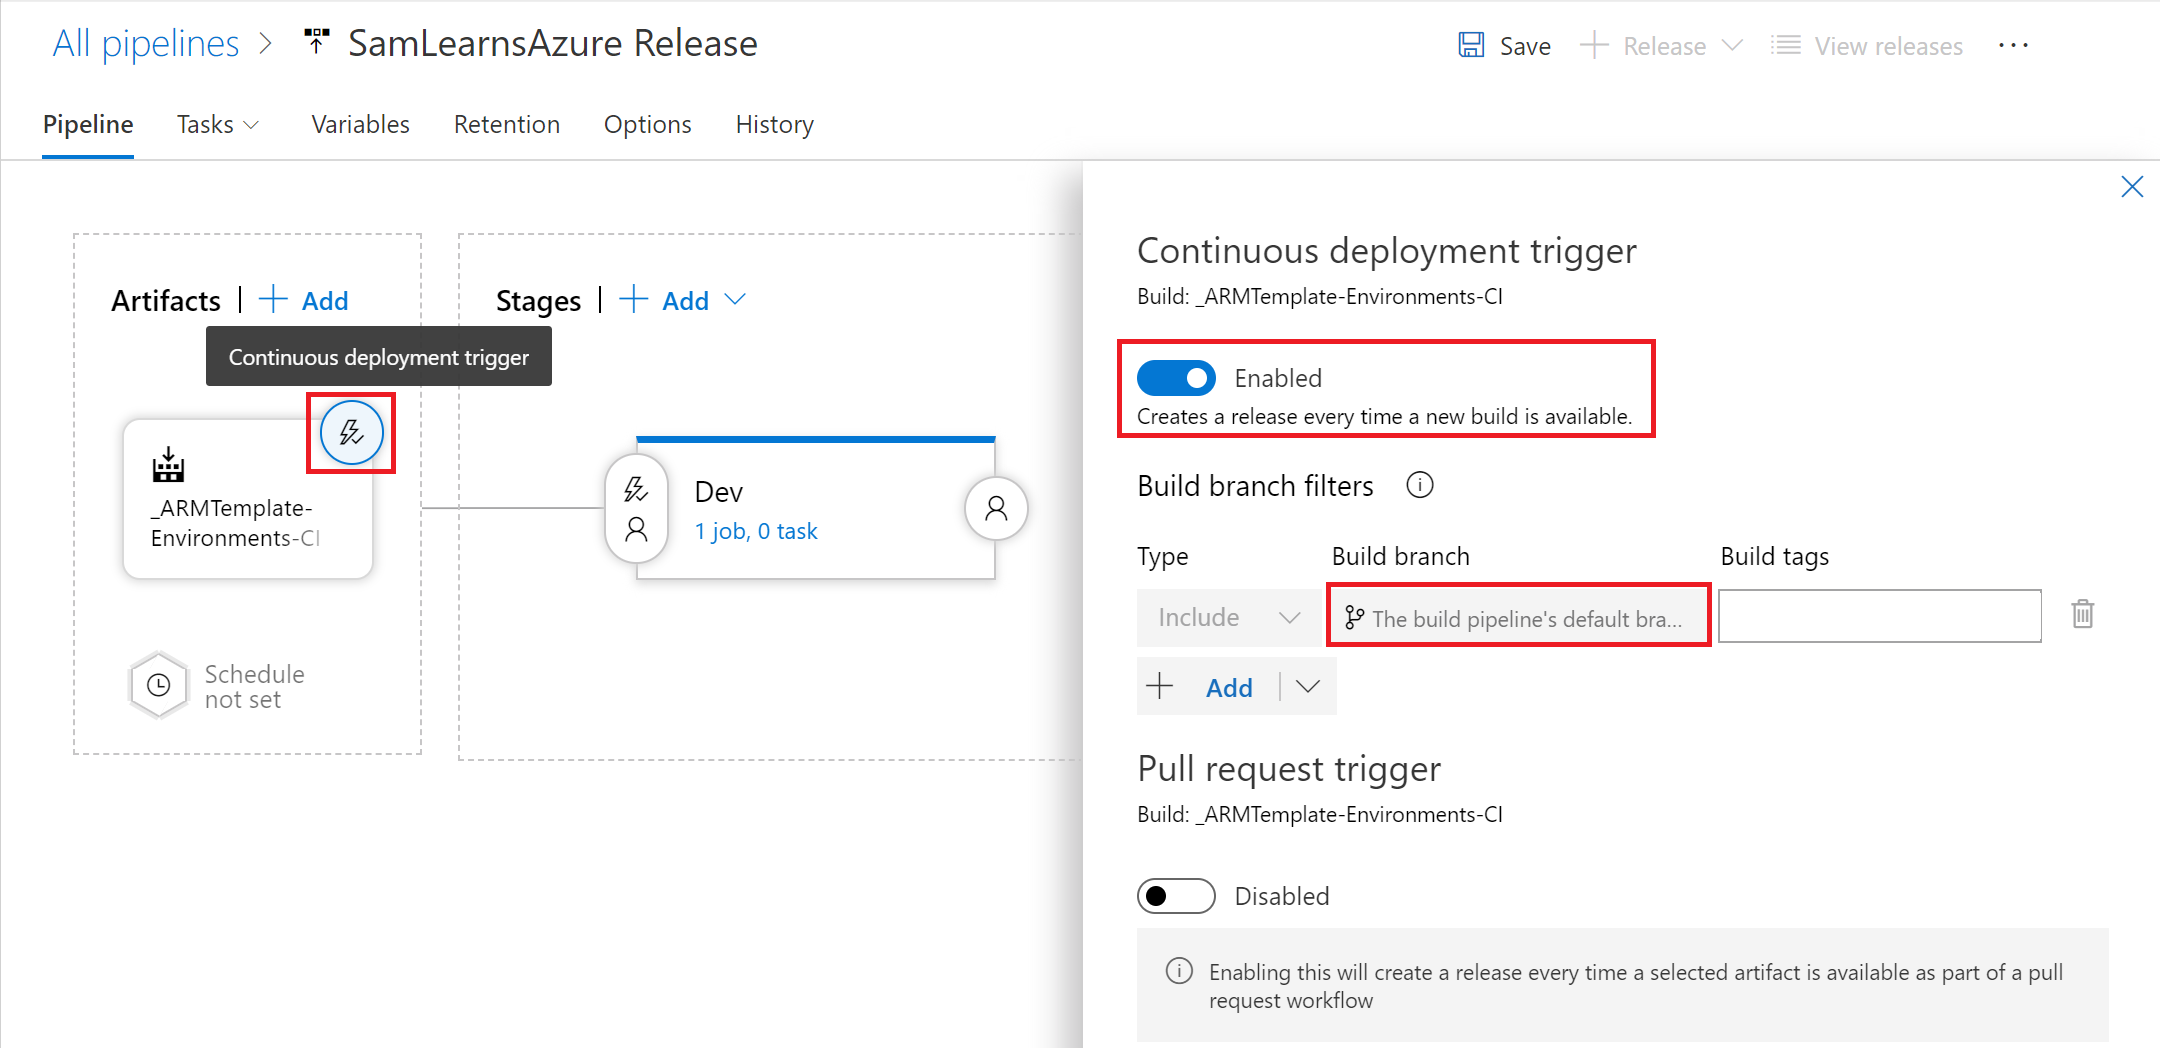
Next we are going to setup the continuous deployment trigger, by clicking the lightning bolt icon in the top right of the artifact. We checked the “Enabled” radio button, and set the “build branch” to be the default/master branch. This is important, so that a Pull Request build won’t trigger a release.
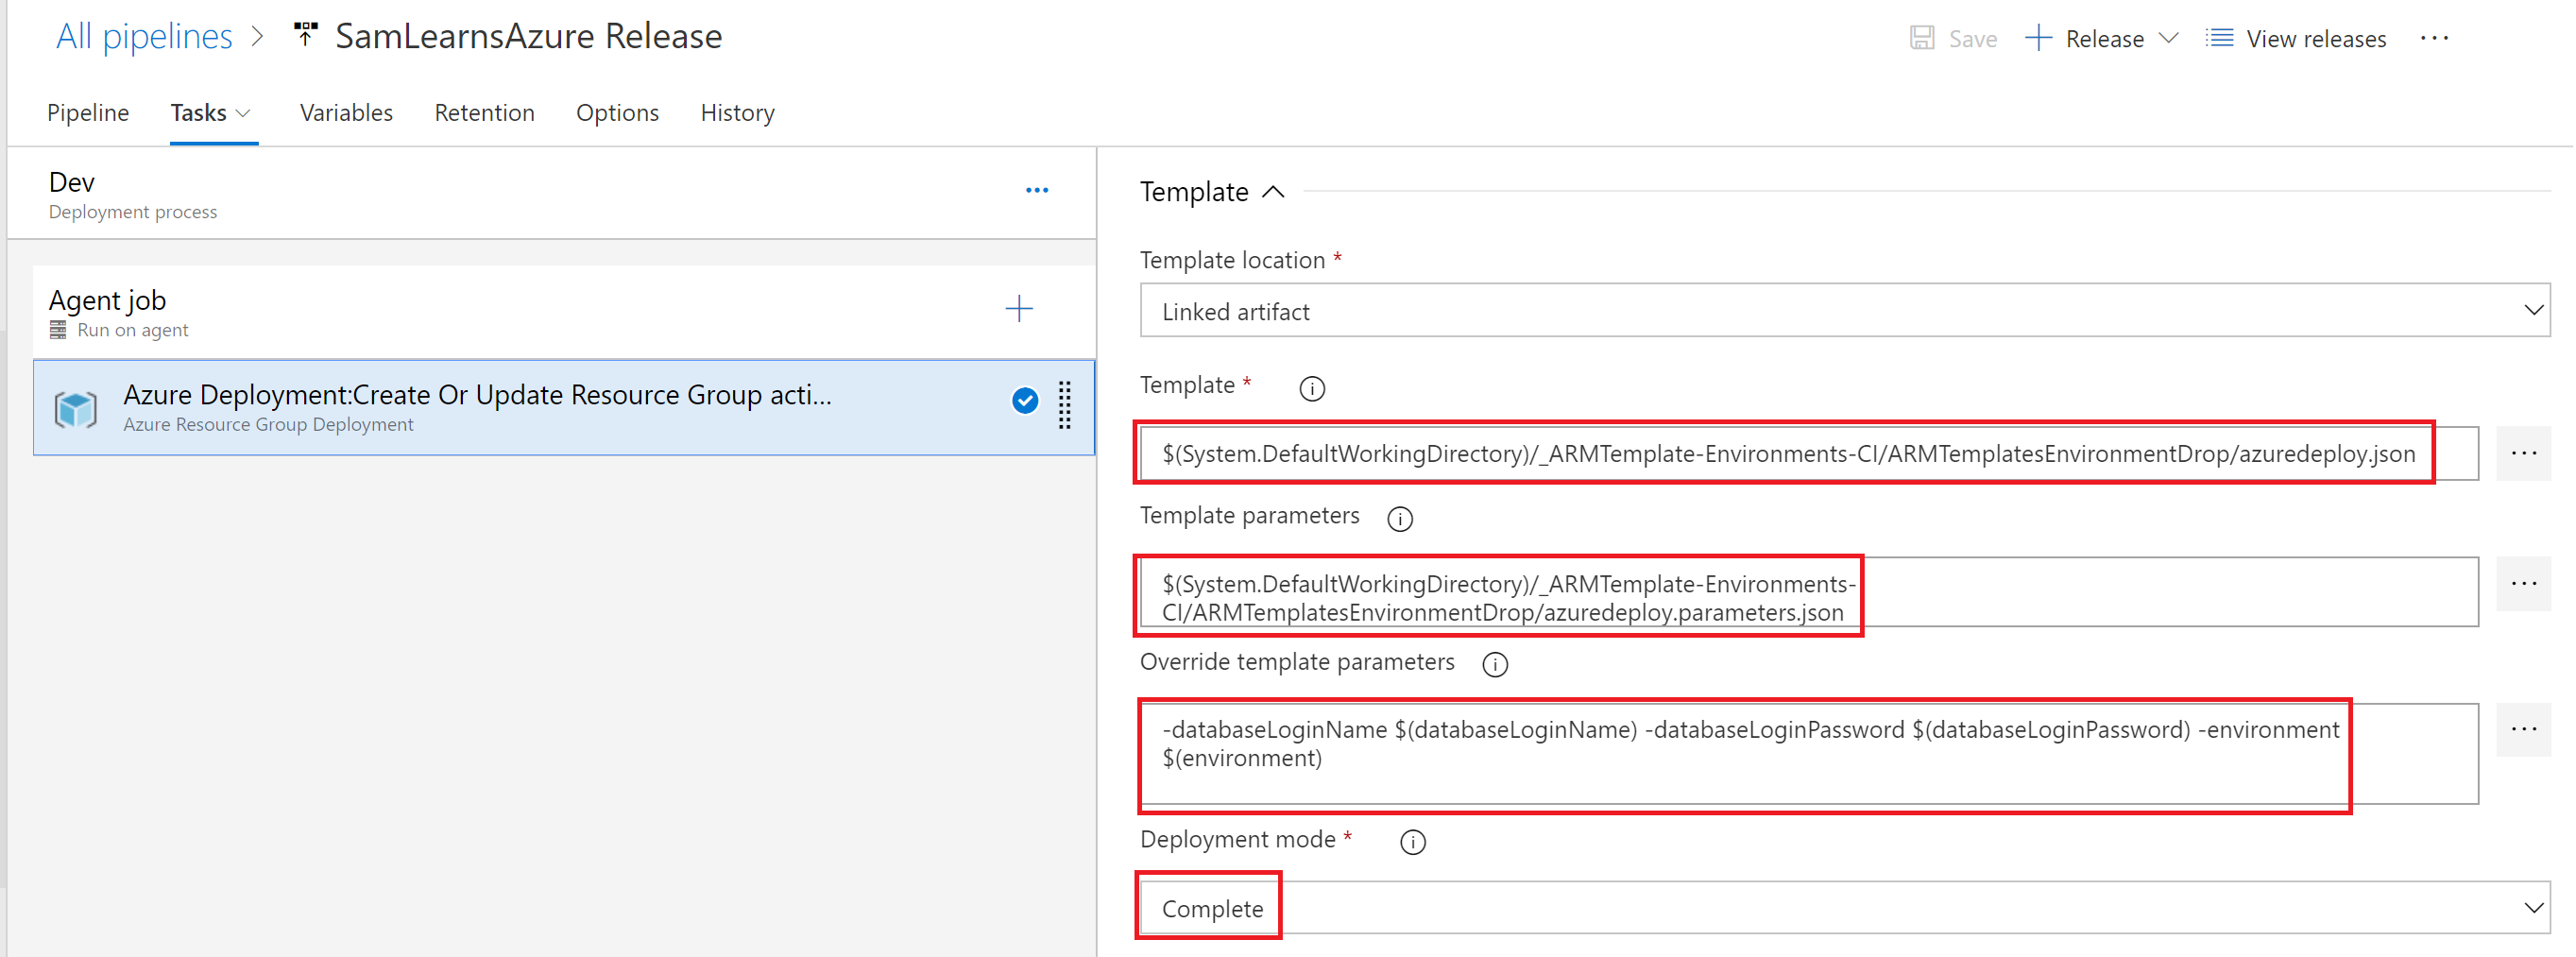
Finally we are ready to add the new add the new “Azure Resource Group Deployment” task, which deploys an ARM Template.

Once added to the release environment, we edit the Azure details, setting the subscription, (this drop down asked us to authenticate before continuing). We can then update Resource Group, setting it to “SamLearnsAzureDev”, and confirming the location as “East US”.

Next, scrolling down on the task, we can set the Template details. Here we browse the build artifact to select the template and template parameters files. Then we can set any overrides – where we specify the database login name, database login password, and the environment, all using variables (accessed with the syntax “$(variablename)”. Finally we change the deployment mode to “Complete” – this updates the resource group to match the ARM template, fixing an important issue with infrastructure – “configuration drift”, and helps to ensure that all of our environments will be identical.
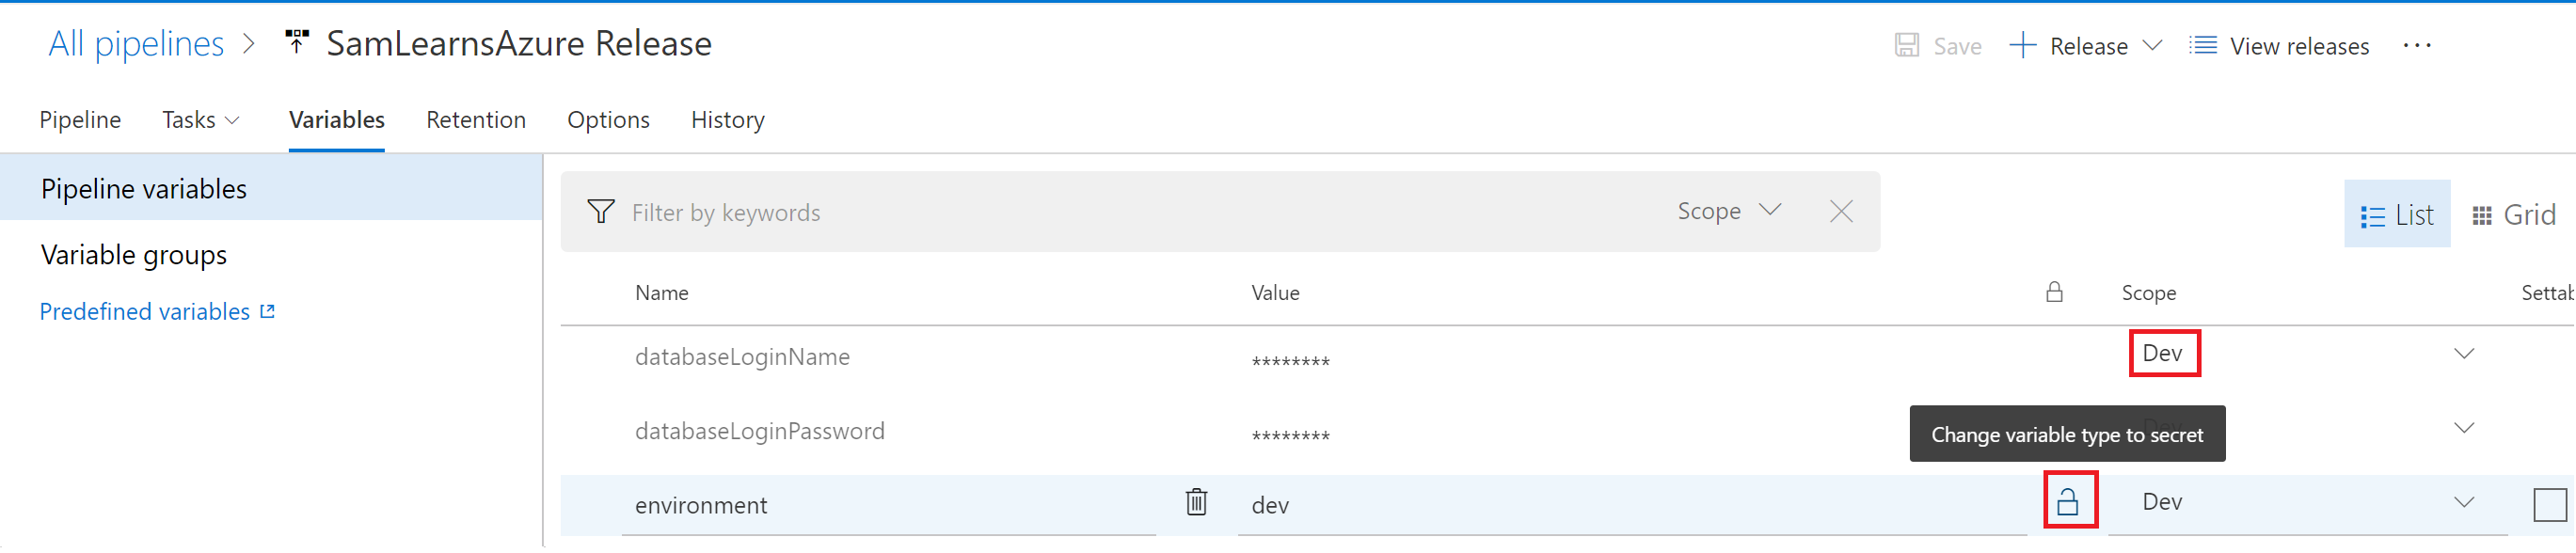
To set the variables, for now, we are going to set the variables in the “Pipeline variables” section of the release. For both the database login name and database login password, we also click the lock icon so the name and password is not visible and is secure. We also set the scope to “Dev”. Note that later we will move these secrets/variables into a Key Vault, but this works for our initial setup (and we haven’t deployed our Key Vault yet!!).
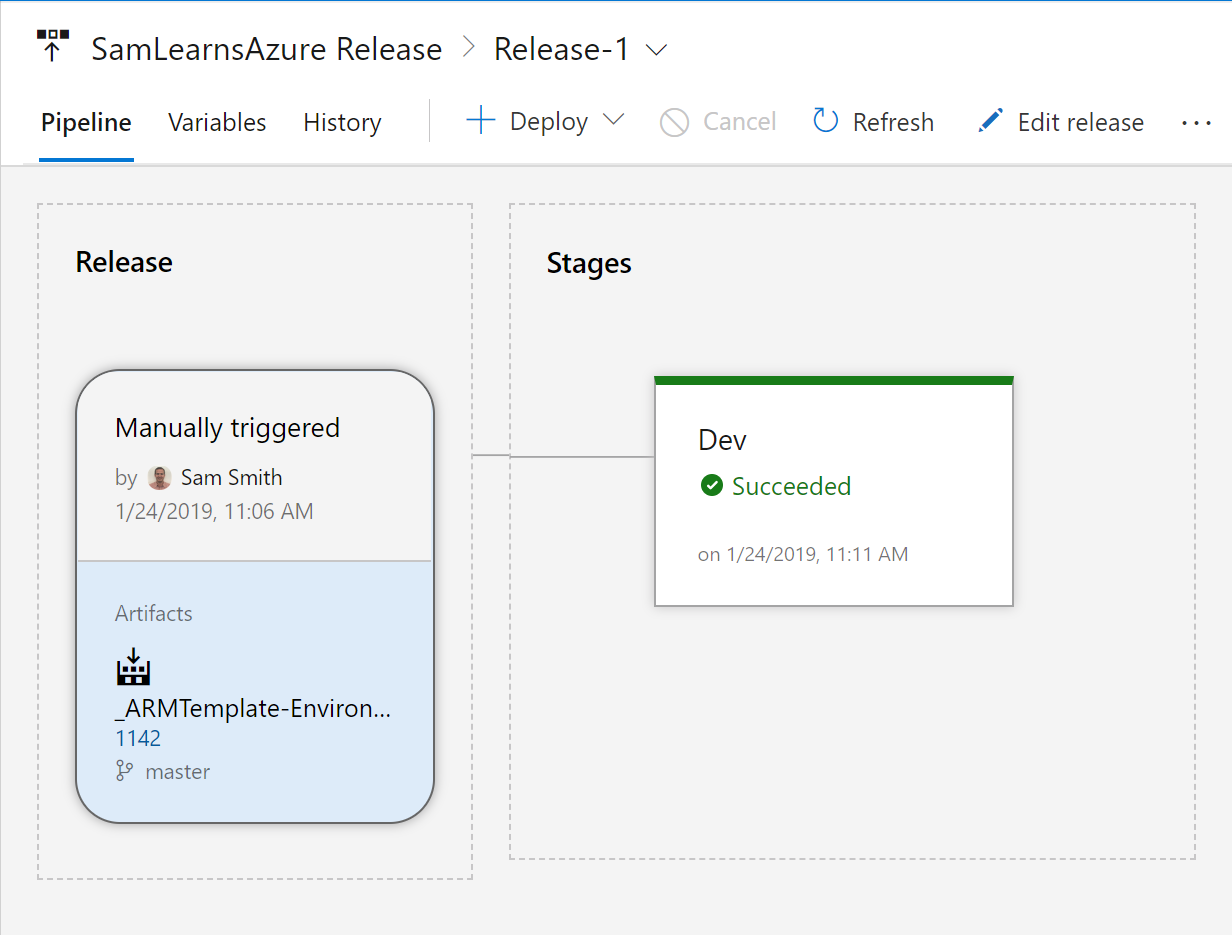
The release is done, we queue it and watch it complete.
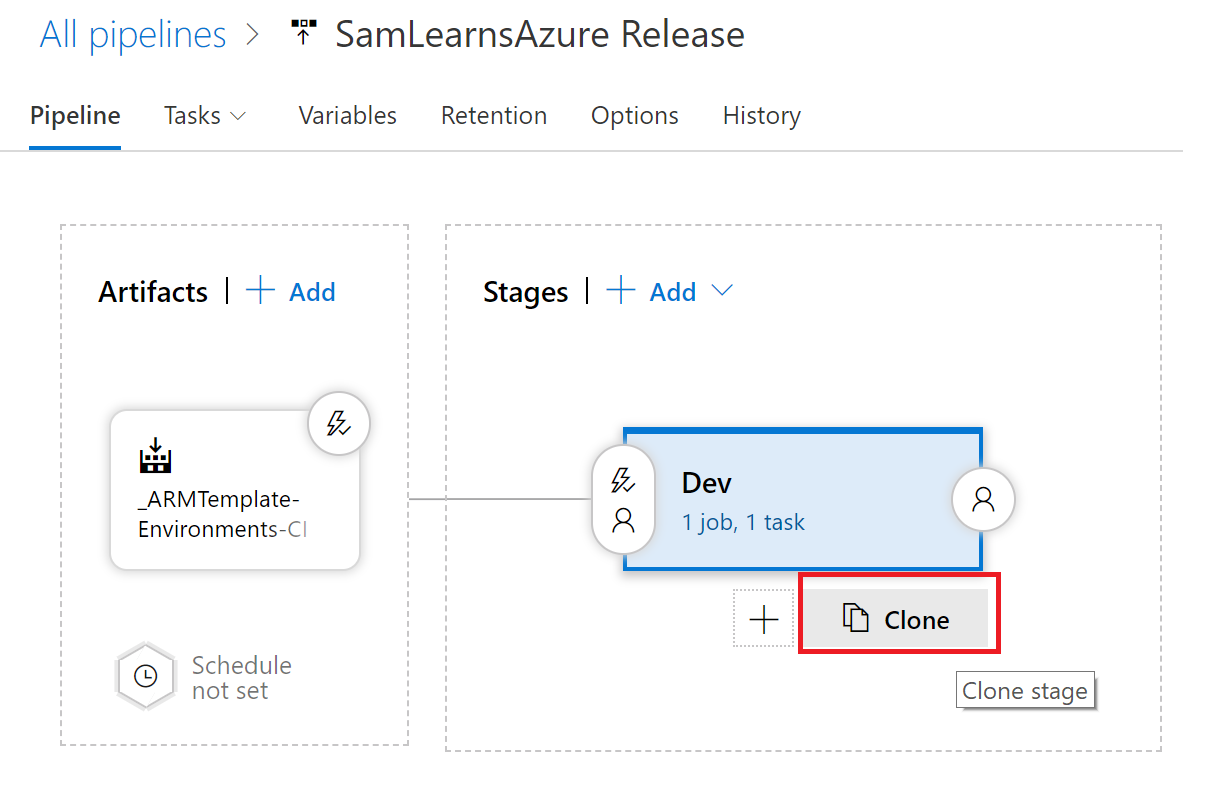
With Dev setup, we want to create a pipeline that also deploys to QA and Production too. Having all of our environments helps us to develop. When we watch any changes release successfully to Dev and QA, we can be that much more confident that our production release will also be successful. We can do this on the pipeline tab by selecting the Dev environment and clicking the “Clone” button. Once we’ve create this new “Copy of Dev” environment, we’ll want to clone that one again too.
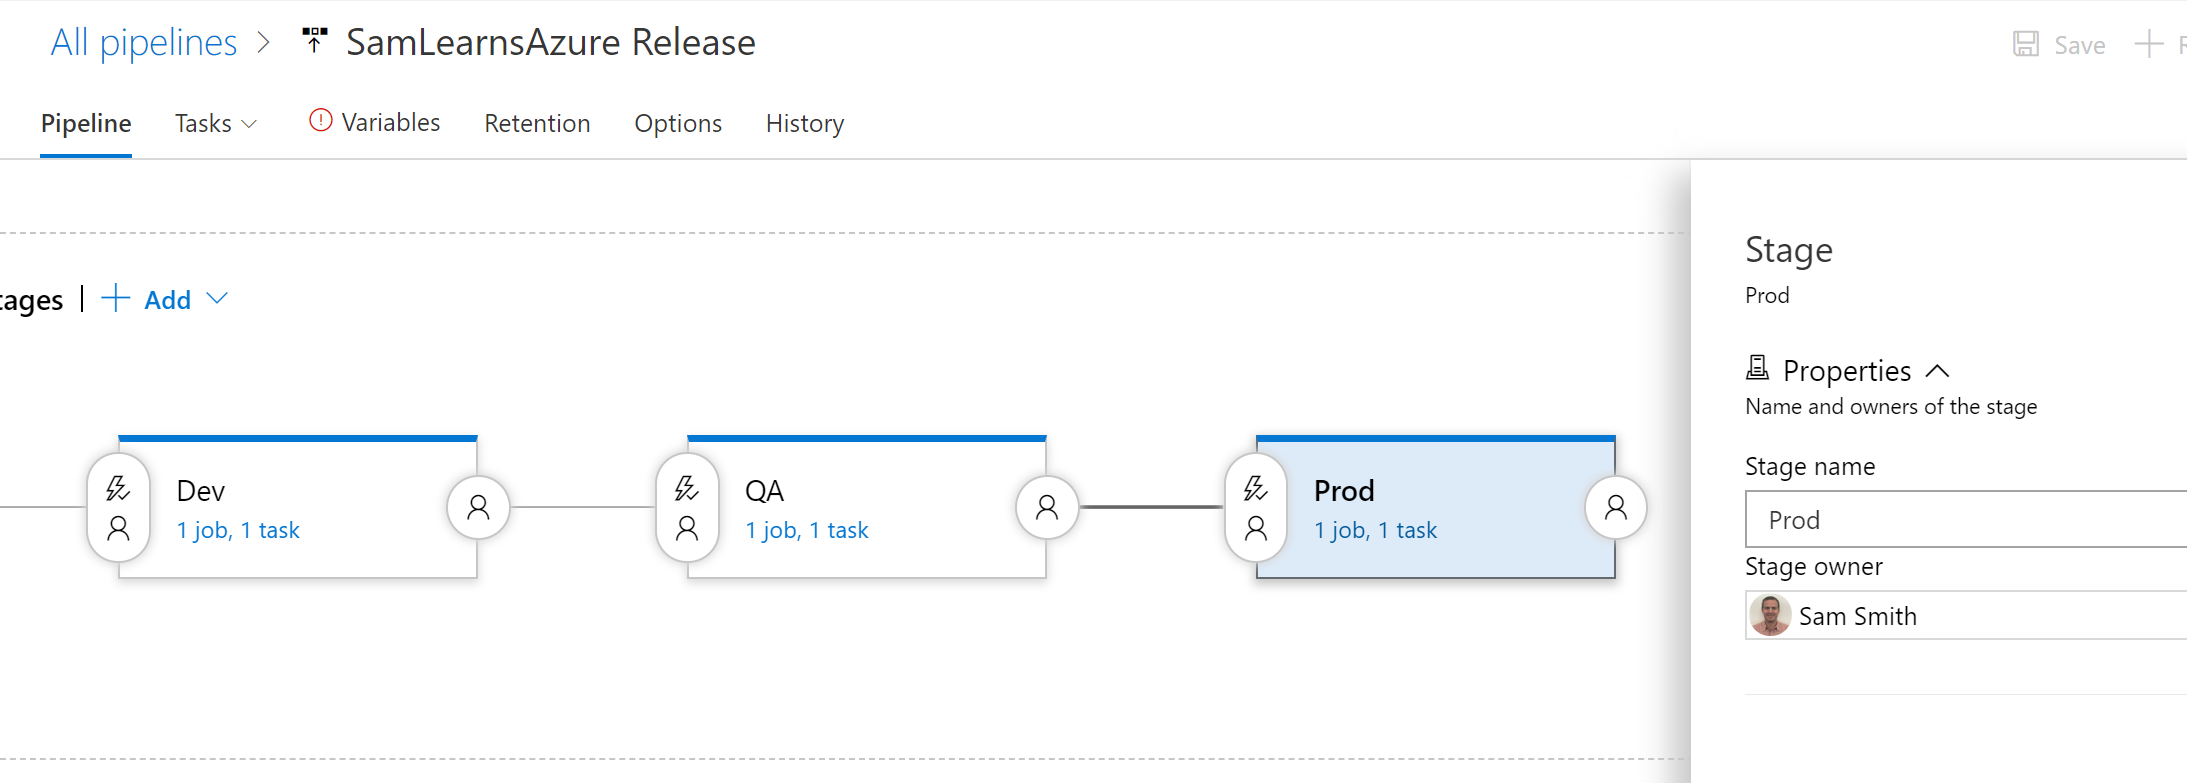
This creates a workflow where we can rename the two new environments to QA and Prod.
As we cloned each environment, it also created a new set of variables for each scope. We set all of the user names, passwords and environments (using the lock to keep them secrets), to populate the correct variables into each environment.

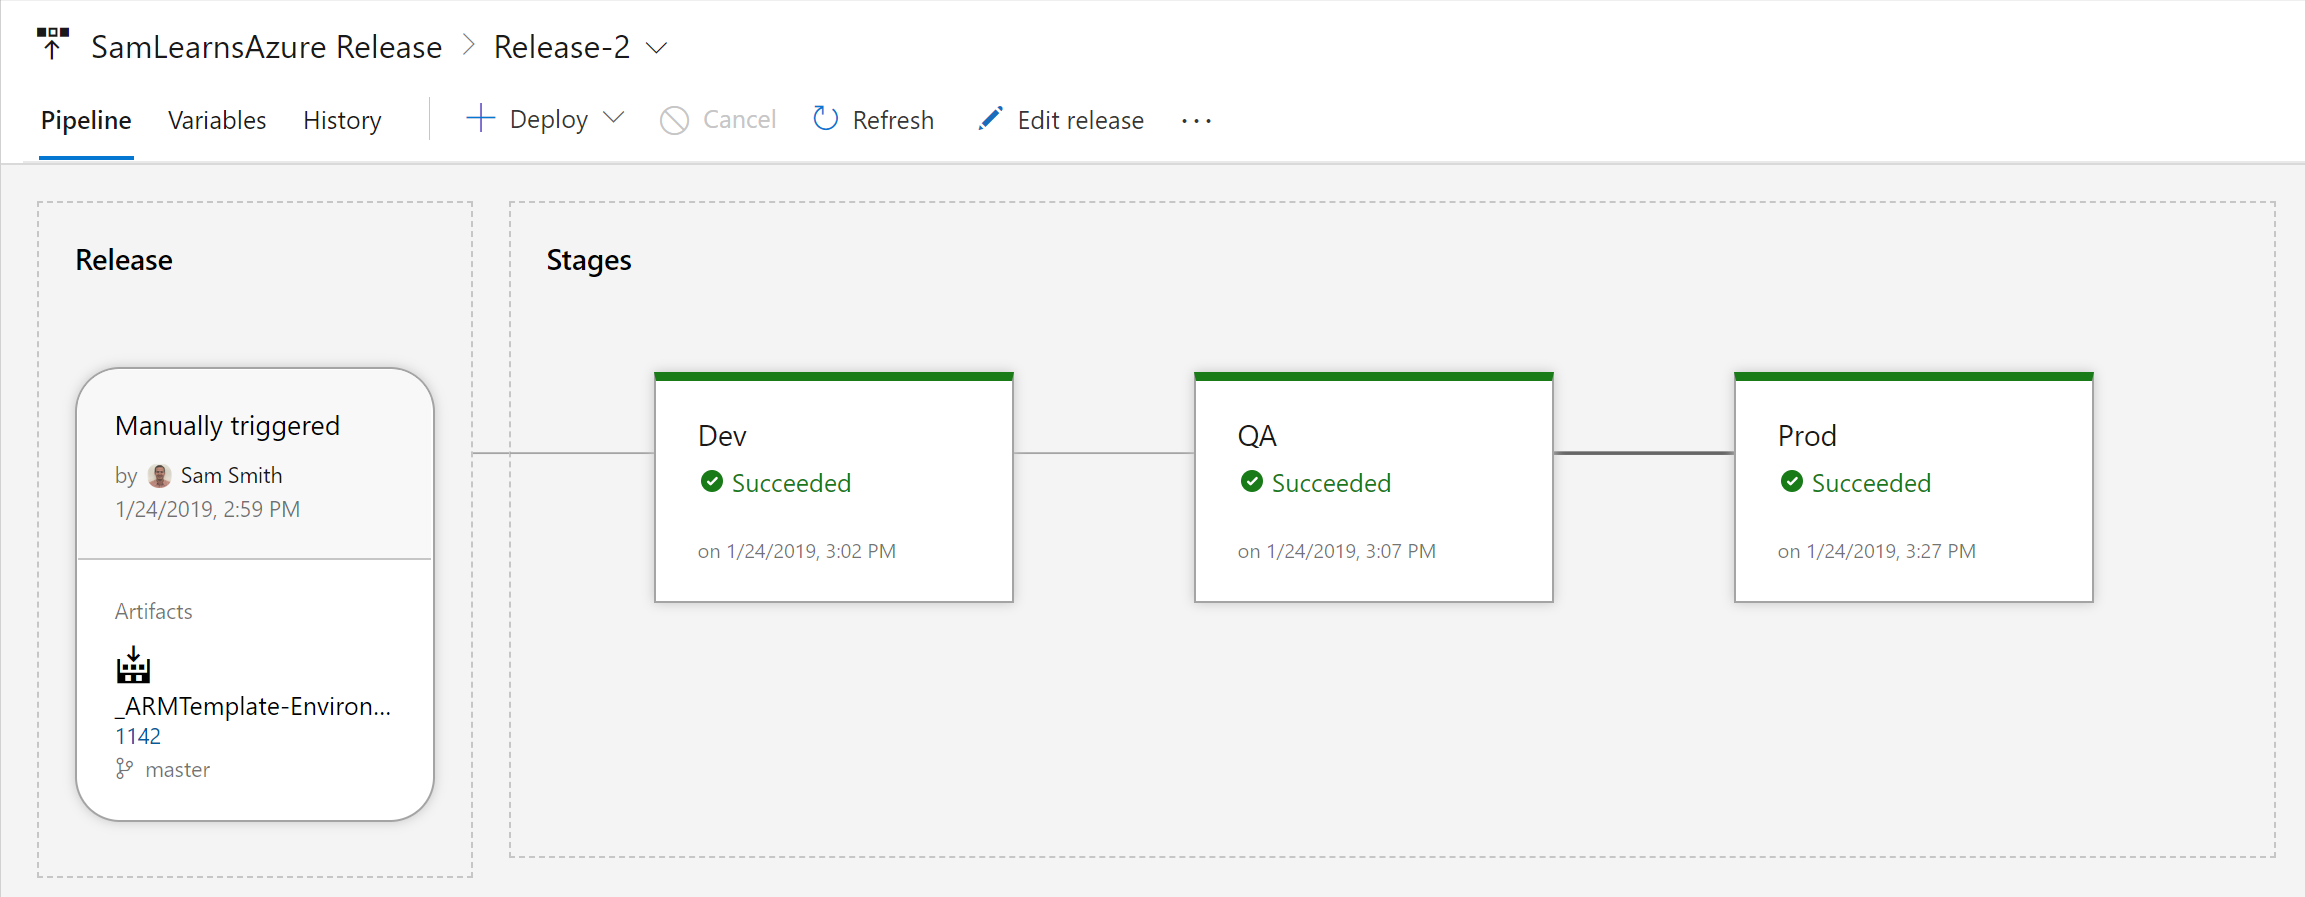
We are ready to queue our second release. We queue it up, and watch it release to Dev (again), then QA, and finally Prod. We are successfully deploying our infrastructure as code!
Wrapup
Today we did a lot. We built out our first Infrastructure as code in ARM Templates, pushed this to Azure DevOps, setup a build, and setup a release to Dev, QA, and Production!
As we continue to work, we can be confident that (any changes to) our infrastructure will be identical on each environment, our changes are tracked in source control, and our Dev and QA environments allow us to test changes to ensure that deployments to production are less likely to break. All of this helps to make our team and stakeholders comfortable that we can deliver value quickly and confidently.
References
- Infrastructure as code and ARM templates: https://blogs.msdn.microsoft.com/azuredev/2017/02/11/iac-on-azure-an-introduction-of-infrastructure-as-code-iac-with-azure-resource-manager-arm-template/
- ARM Template Projects: https://docs.microsoft.com/en-us/azure/azure-resource-manager/vs-azure-tools-resource-groups-deployment-projects-create-deploy
- ARM templates and Azure DevOps: https://russellyoung.net/2016/04/15/arm-cd-vsts/
- “Azure Resource Group” projects: https://docs.microsoft.com/en-us/dotnet/azure/dotnet-tools?view=azure-dotnet&tabs=windows
Azure Basic Architecture: https://docs.microsoft.com/en-us/azure/architecture/reference-architectures/app-service-web-app/basic-web-app - Deploying Azure Resources with ARM: http://www.tech-coffee.net/deploy-azure-resources-with-json-template/
- Azure Service Principle: https://docs.microsoft.com/en-us/powershell/module/azurerm.resources/get-azurermadserviceprincipal?view=azurermps-6.13.0
- Azure User Principle: https://docs.microsoft.com/en-us/powershell/module/azurerm.resources/get-azurermaduser?view=azurermps-6.13.0

Hi Sam. thanks for the sharing.
I think this is one of the amazing technology sharings associated with devops. When i tried to follow your arm templates, i received the resource not found error related to Key Vault. I tried to search the issue and found the following link. https://stackoverflow.com/questions/58258673/azure-arm-template-resourcenotfound-error-when-referencing-managed-identity-in-k
I replaced the following lines in azuredeploy.json file.
* old one –> “objectId”: “[reference(concat(resourceId(‘Microsoft.Web/sites’, variables(‘serviceAPIName’)), ‘/providers/Microsoft.ManagedIdentity/Identities/default’), ‘2015-08-31-PREVIEW’).principalId]”,
* new one –> “objectId”: “[reference(resourceId(‘Microsoft.Web/sites’, variables(‘serviceAPIName’)), ‘2016-08-01’, ‘Full’).identity.principalId]”,
Thanks a lots!!
LikeLiked by 1 person
Good catch! Thanks for the pointer.
LikeLike