

Today, we are going to add external authentication to our website, enabling us to restrict some features to logged in users. As we don’t want to manage users and passwords ourselves, we will utilize other authentication services, such as Microsoft Live/Account, Google, Twitter, and Facebook. Today, we will setup the infrastructure and connect to the Microsoft account, and then next week, show how to connect to Google, Twitter and Facebook too.
Upgrading to .Net Core 2.2
Before we start to add the authentication code, we are quickly going to upgrade to .Net Core 2.2, from 2.1. This was surprisingly easy for us – perhaps because of our automated testing. We didn’t have to update any code, except for the compatibility line in startup.cs in our web service and web site. This also gave us an opportunity to upgrade all of the NuGet packages to their latest versions. The automated tests all passed, verifying that our code was good to release.
services.AddMvc().SetCompatibilityVersion(CompatibilityVersion.Version_2_2);
Adding authentication to our website
The easiest and cleanest way to add authentication to a website, is to add the “-au Individual” property when we create our new .Net core website.
dotnet new mvc -au Individual
Unfortunately, we already have our website… so what are our options? We created a lot of branches to test each of the methods, and ended up throwing them all away. You can, in theory, add “Identity” scaffording, however, this didn’t work for us. We tried to create a side project and then copy over the right files, however this didn’t work. In the end, we created a new “SamLearnsAzure.Web” project in a separate folder, then copied and pasted it over my existing project, doing file comparisons on all of the file changes to ensure that we could merged in all changes. This finally worked.
This was a mixed experience, and the method that worked for us will vary for everyone. It’s clearly much easier to plan for what you need and run that simple command at the outset of our project creation. This is a lesson going forward – authentication is hard, adding authentication to an existing infrastructure is even harder, select the correct authentication when creating your project.
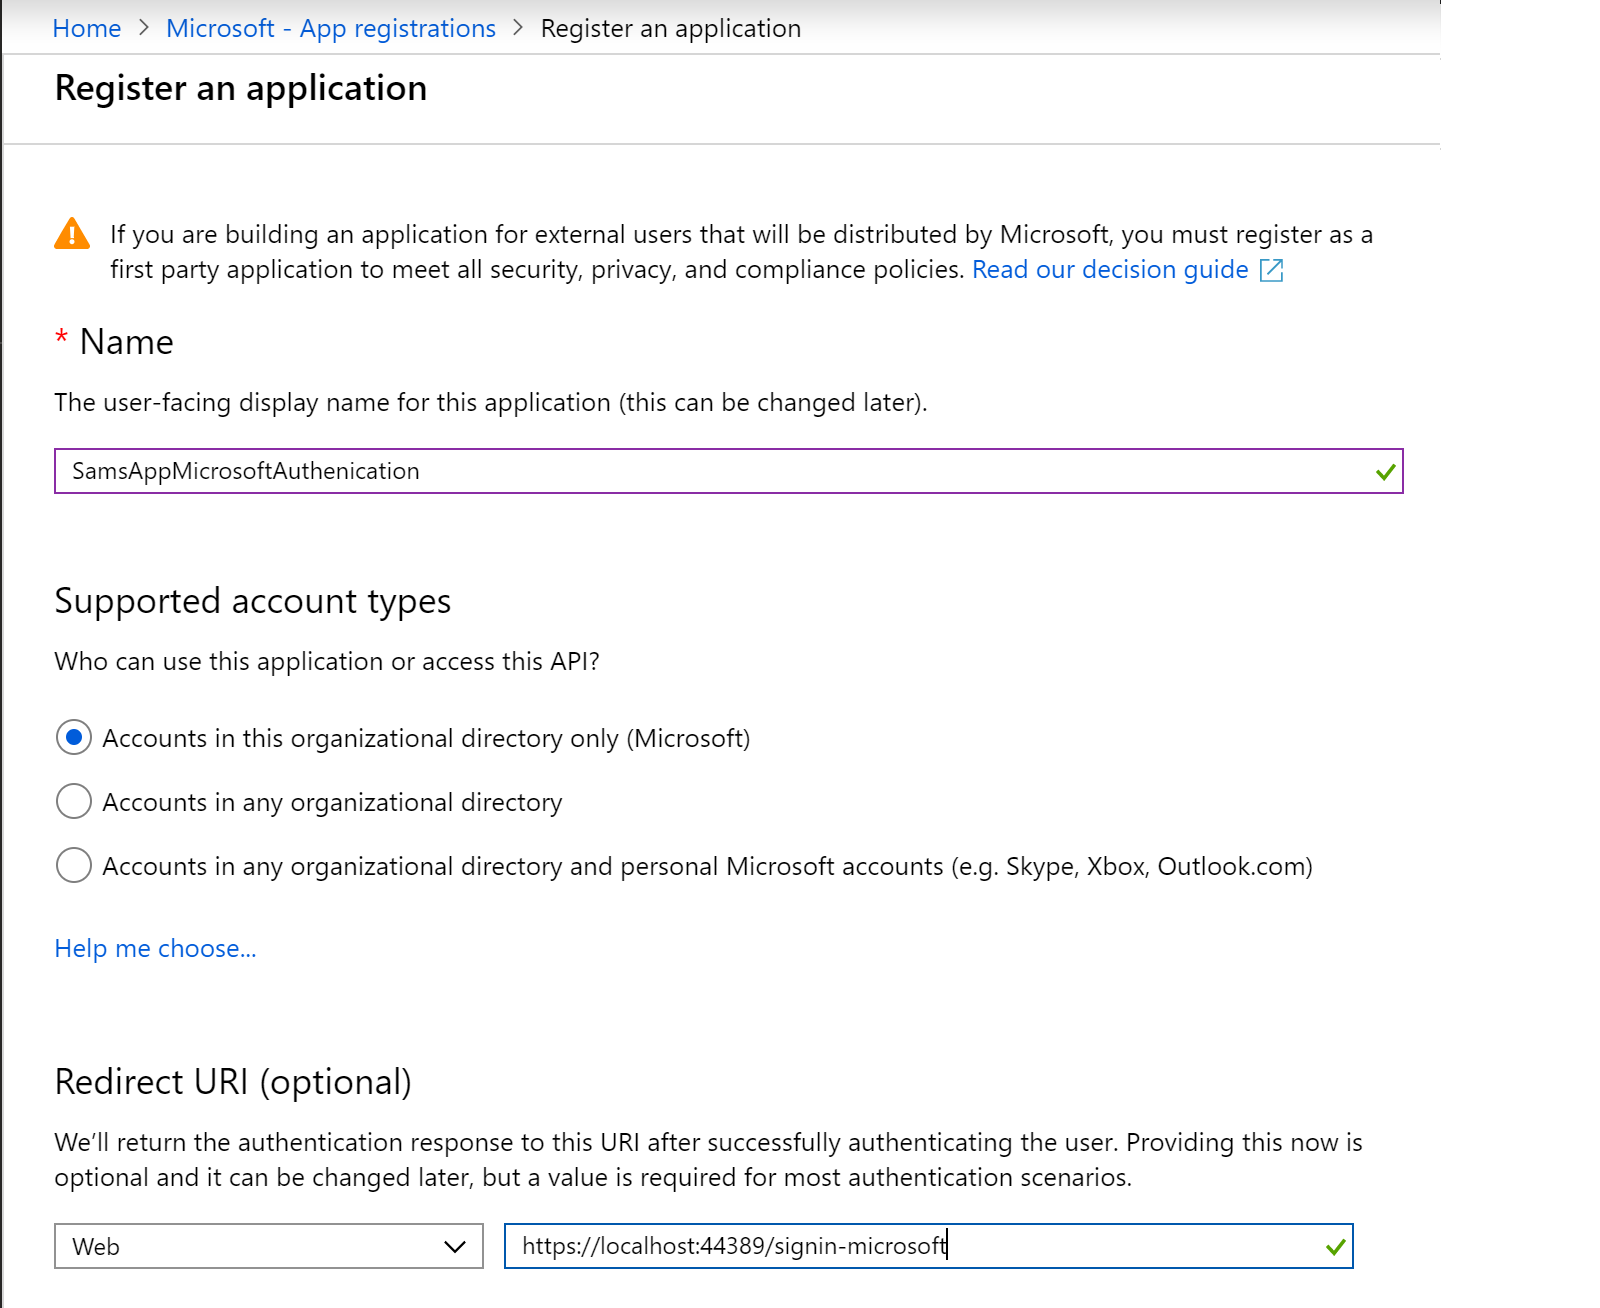
Setting up the application registration
Now we need to setup the connector between our application and a Microsoft Account. We do this in the Azure Portal, in Azure Active Directory, and register a new application. Here we added a description for the authentication, and added a redirect URI. The redirect should be our current website URL (https://localhost:44355), and then the suffix “/signin-microsoft”, which is how our website will know we are trying to login with a Microsoft account. In the newly created registration, we also record the client id for later.
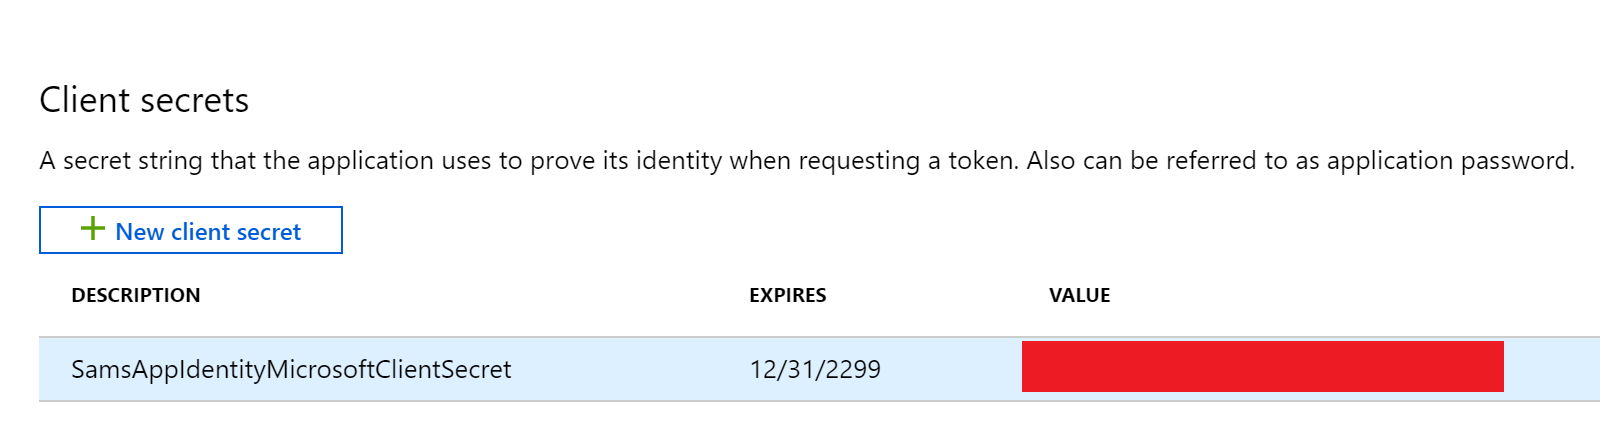
In the left pane, we select “Certificates & secrets”, and then select “new client secret”

In the popup, we add a description, and select the expiration date, selecting “never”…
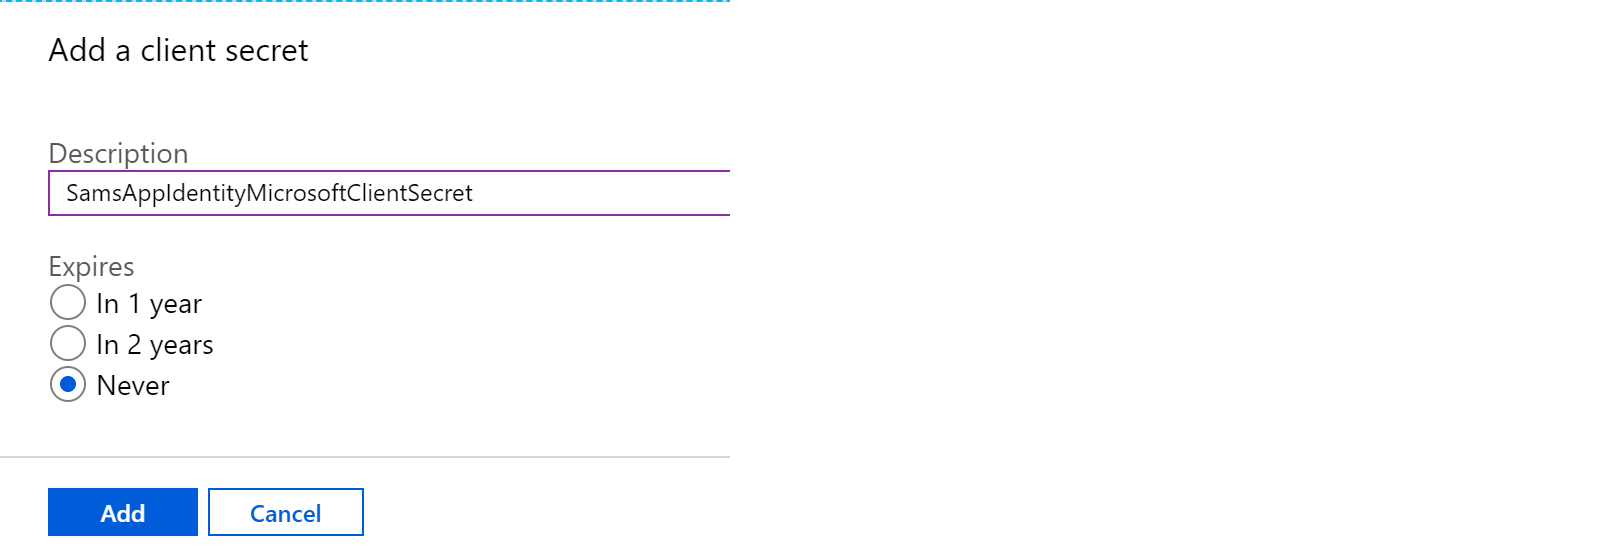
Make a note of this client secret – we will need it later and can’t view it again.
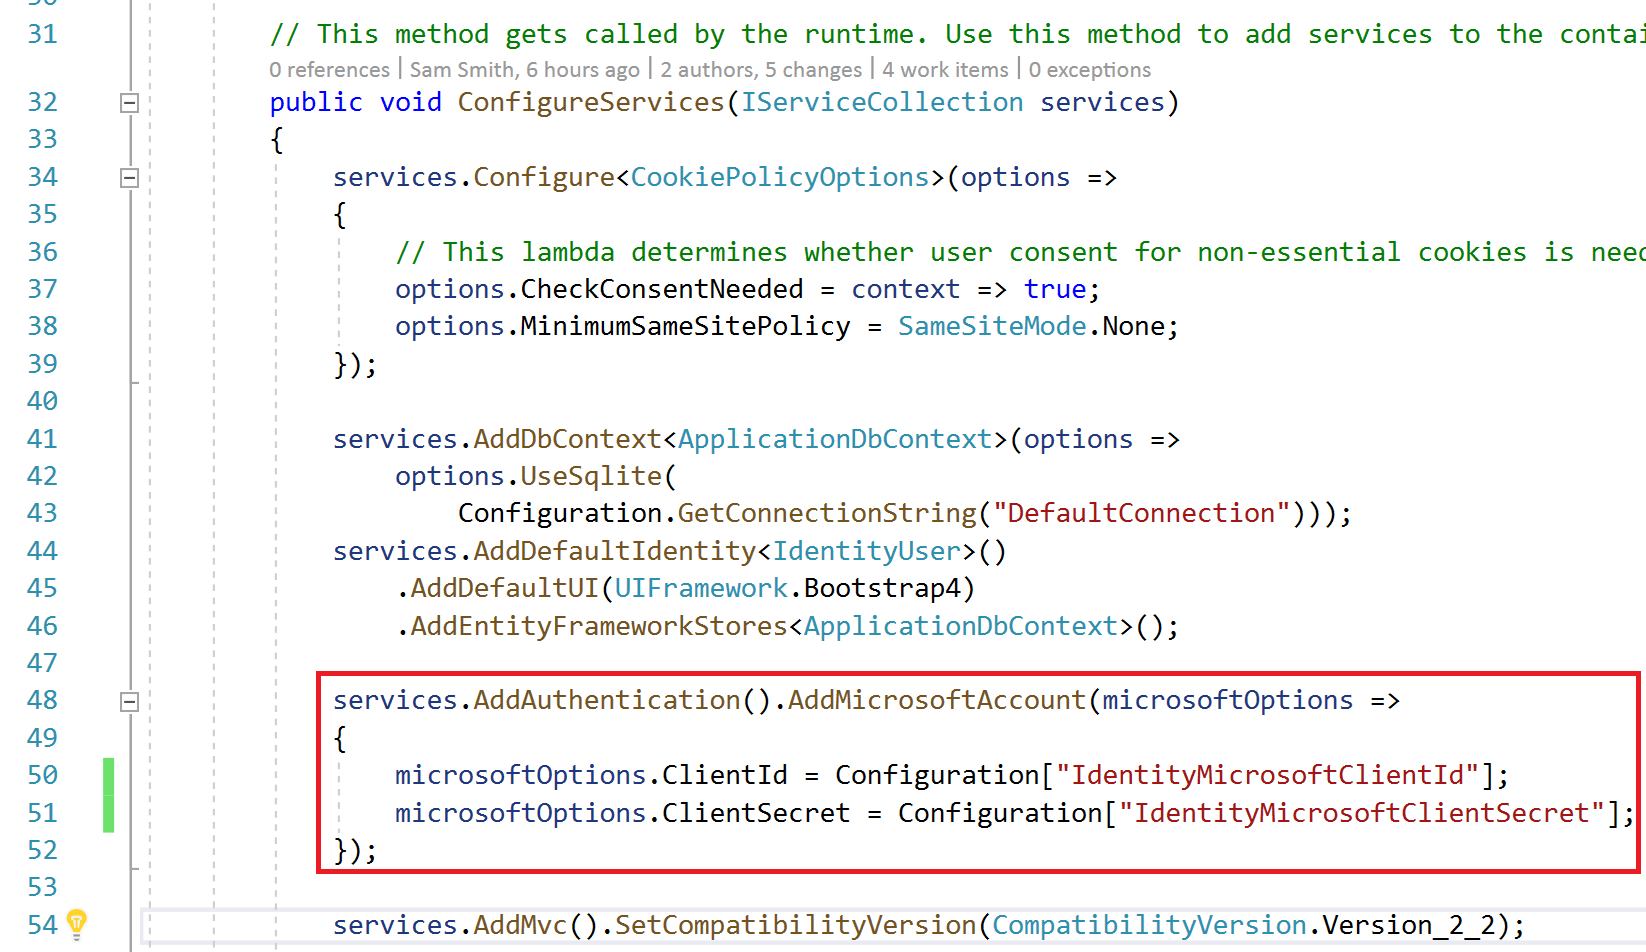
With our client id and client secret, we are add these to our key vault, so we don’t have to store these secrets in our code and can use them when we need to. We will also add the required security code to access the vault to our website, using exactly the same methods our web service uses. Finally, we add this code in configure services method in startup.cs. This will add the authentication to access the Microsoft account with our new client id and client secret from the key vault.
    services.AddAuthentication().AddMicrosoftAccount(microsoftOptions =>
    {
        microsoftOptions.ClientId = Configuration["IdentityMicrosoftClientId"];
        microsoftOptions.ClientSecret = Configuration["IdentityMicrosoftClientSecret"];
    });
This is how the ConfigureServices function looks with all of the code:
Logging in with Microsoft authentication
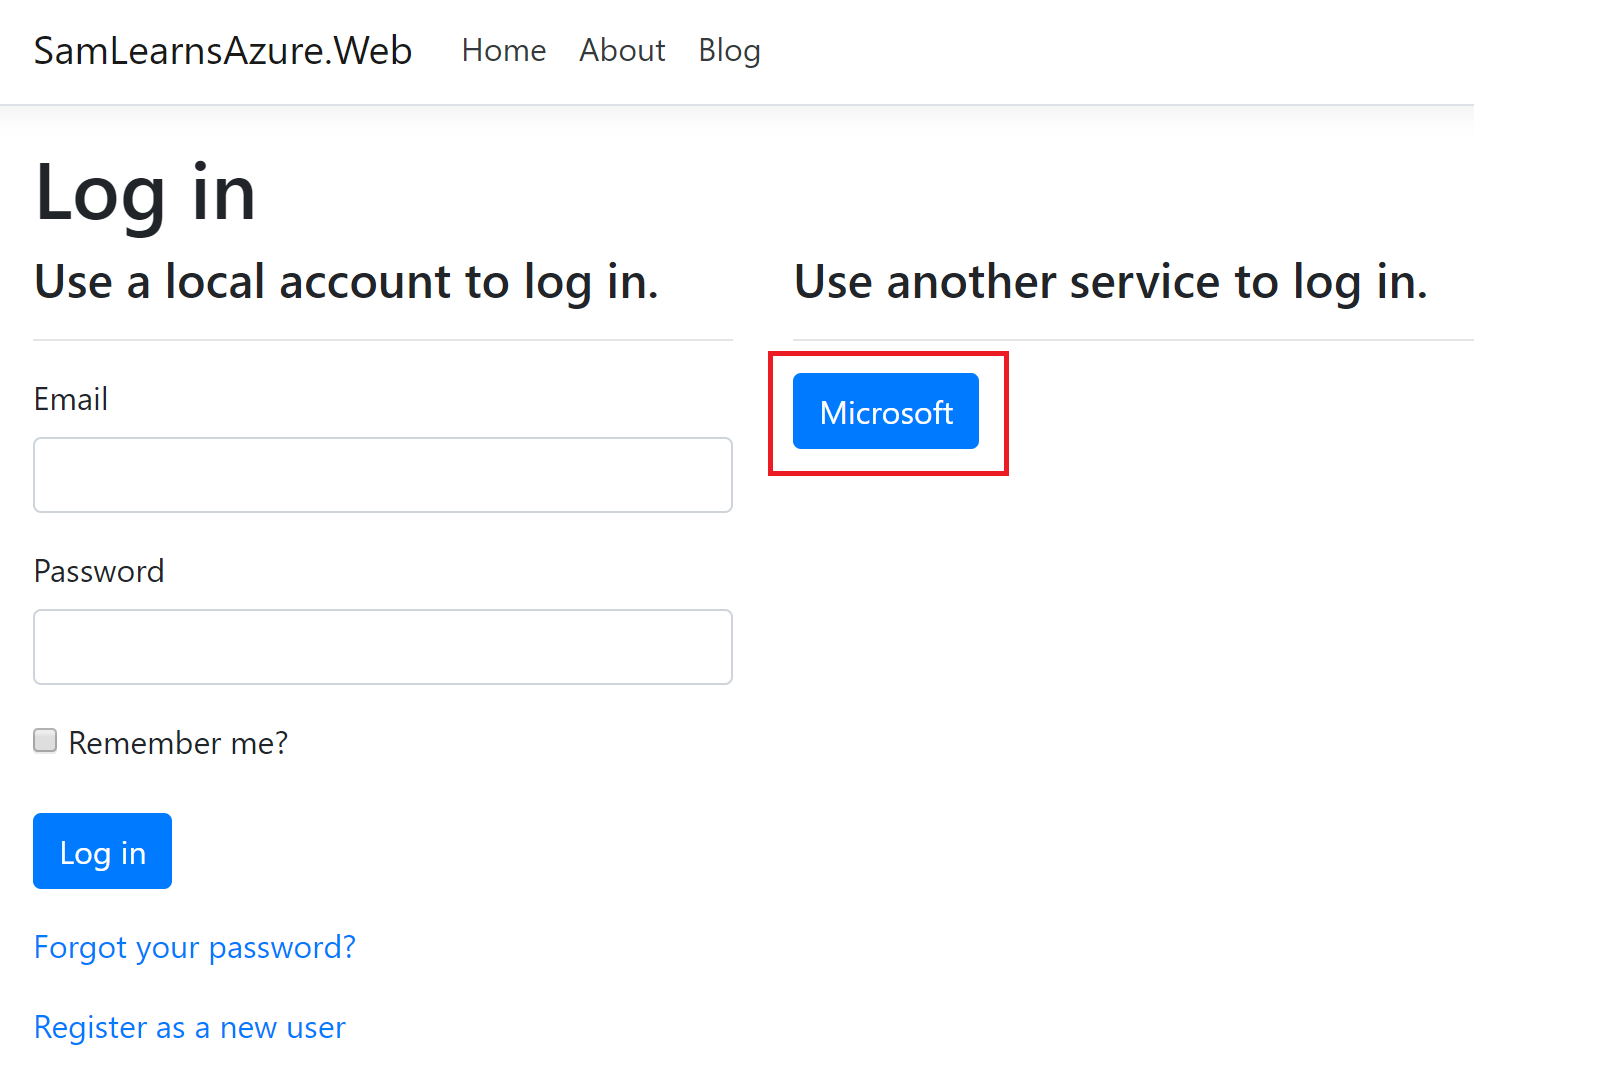
With our code complete, we start the website, and click on the login button in the top right

We are presented with a generic log in account for “local accounts”, that we are not going to use today, and a second column with other services – in this case, Microsoft!
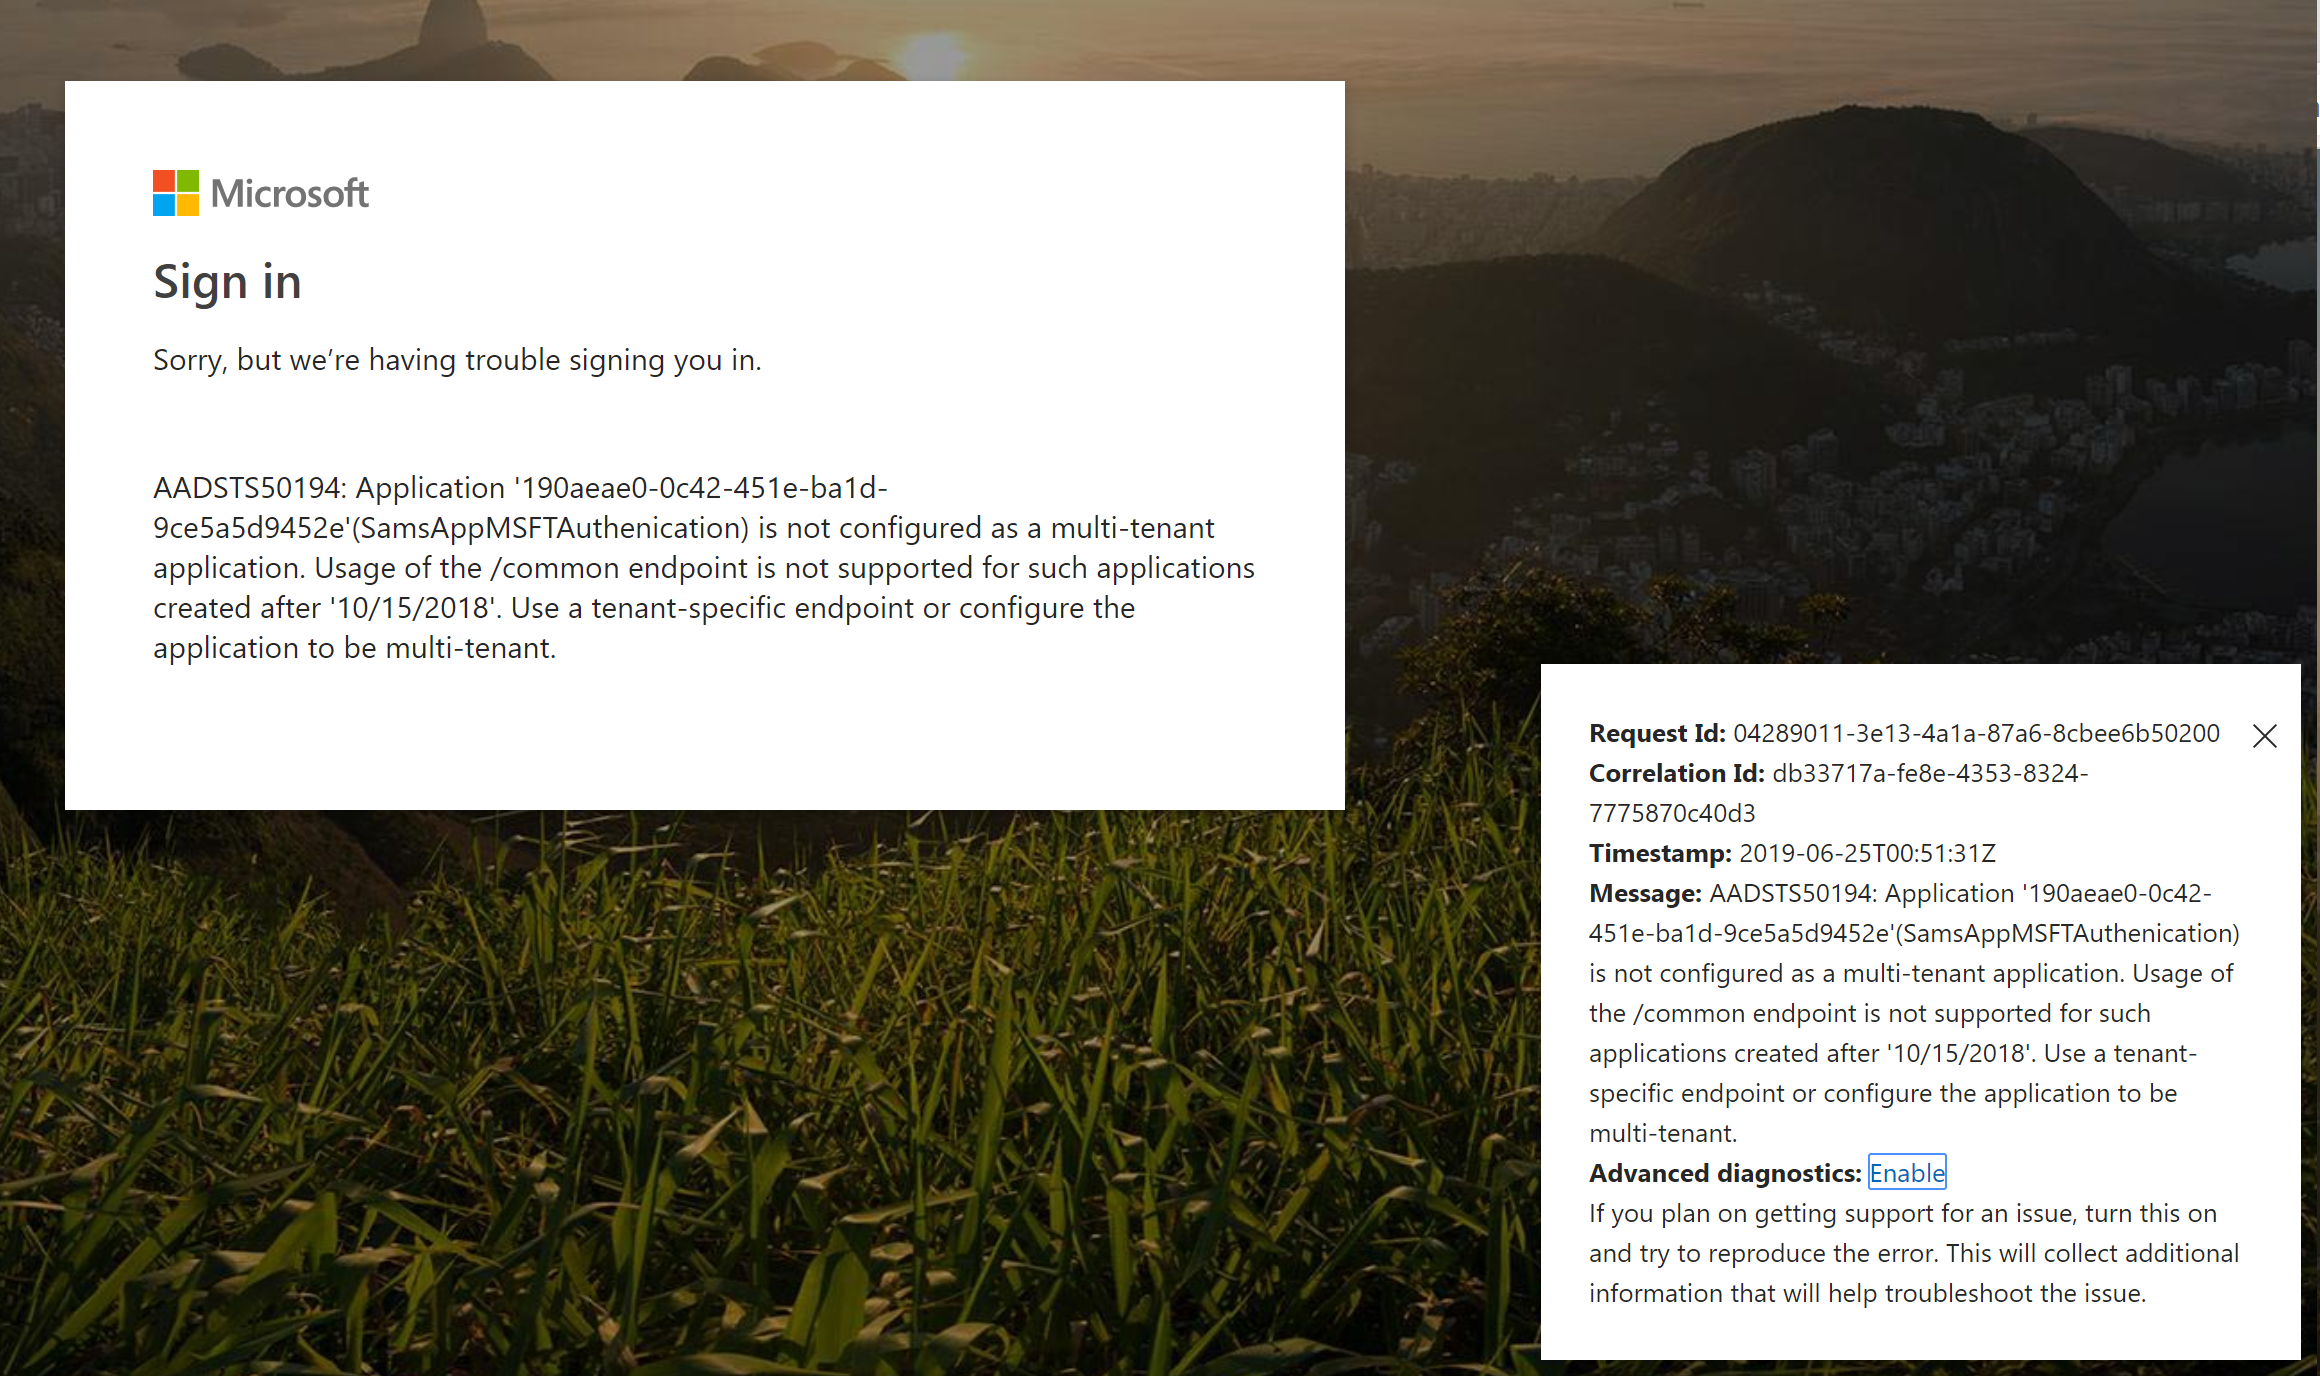
Unfortunately we were then presented with an error about our app registration not being configured as a multi-tenant application
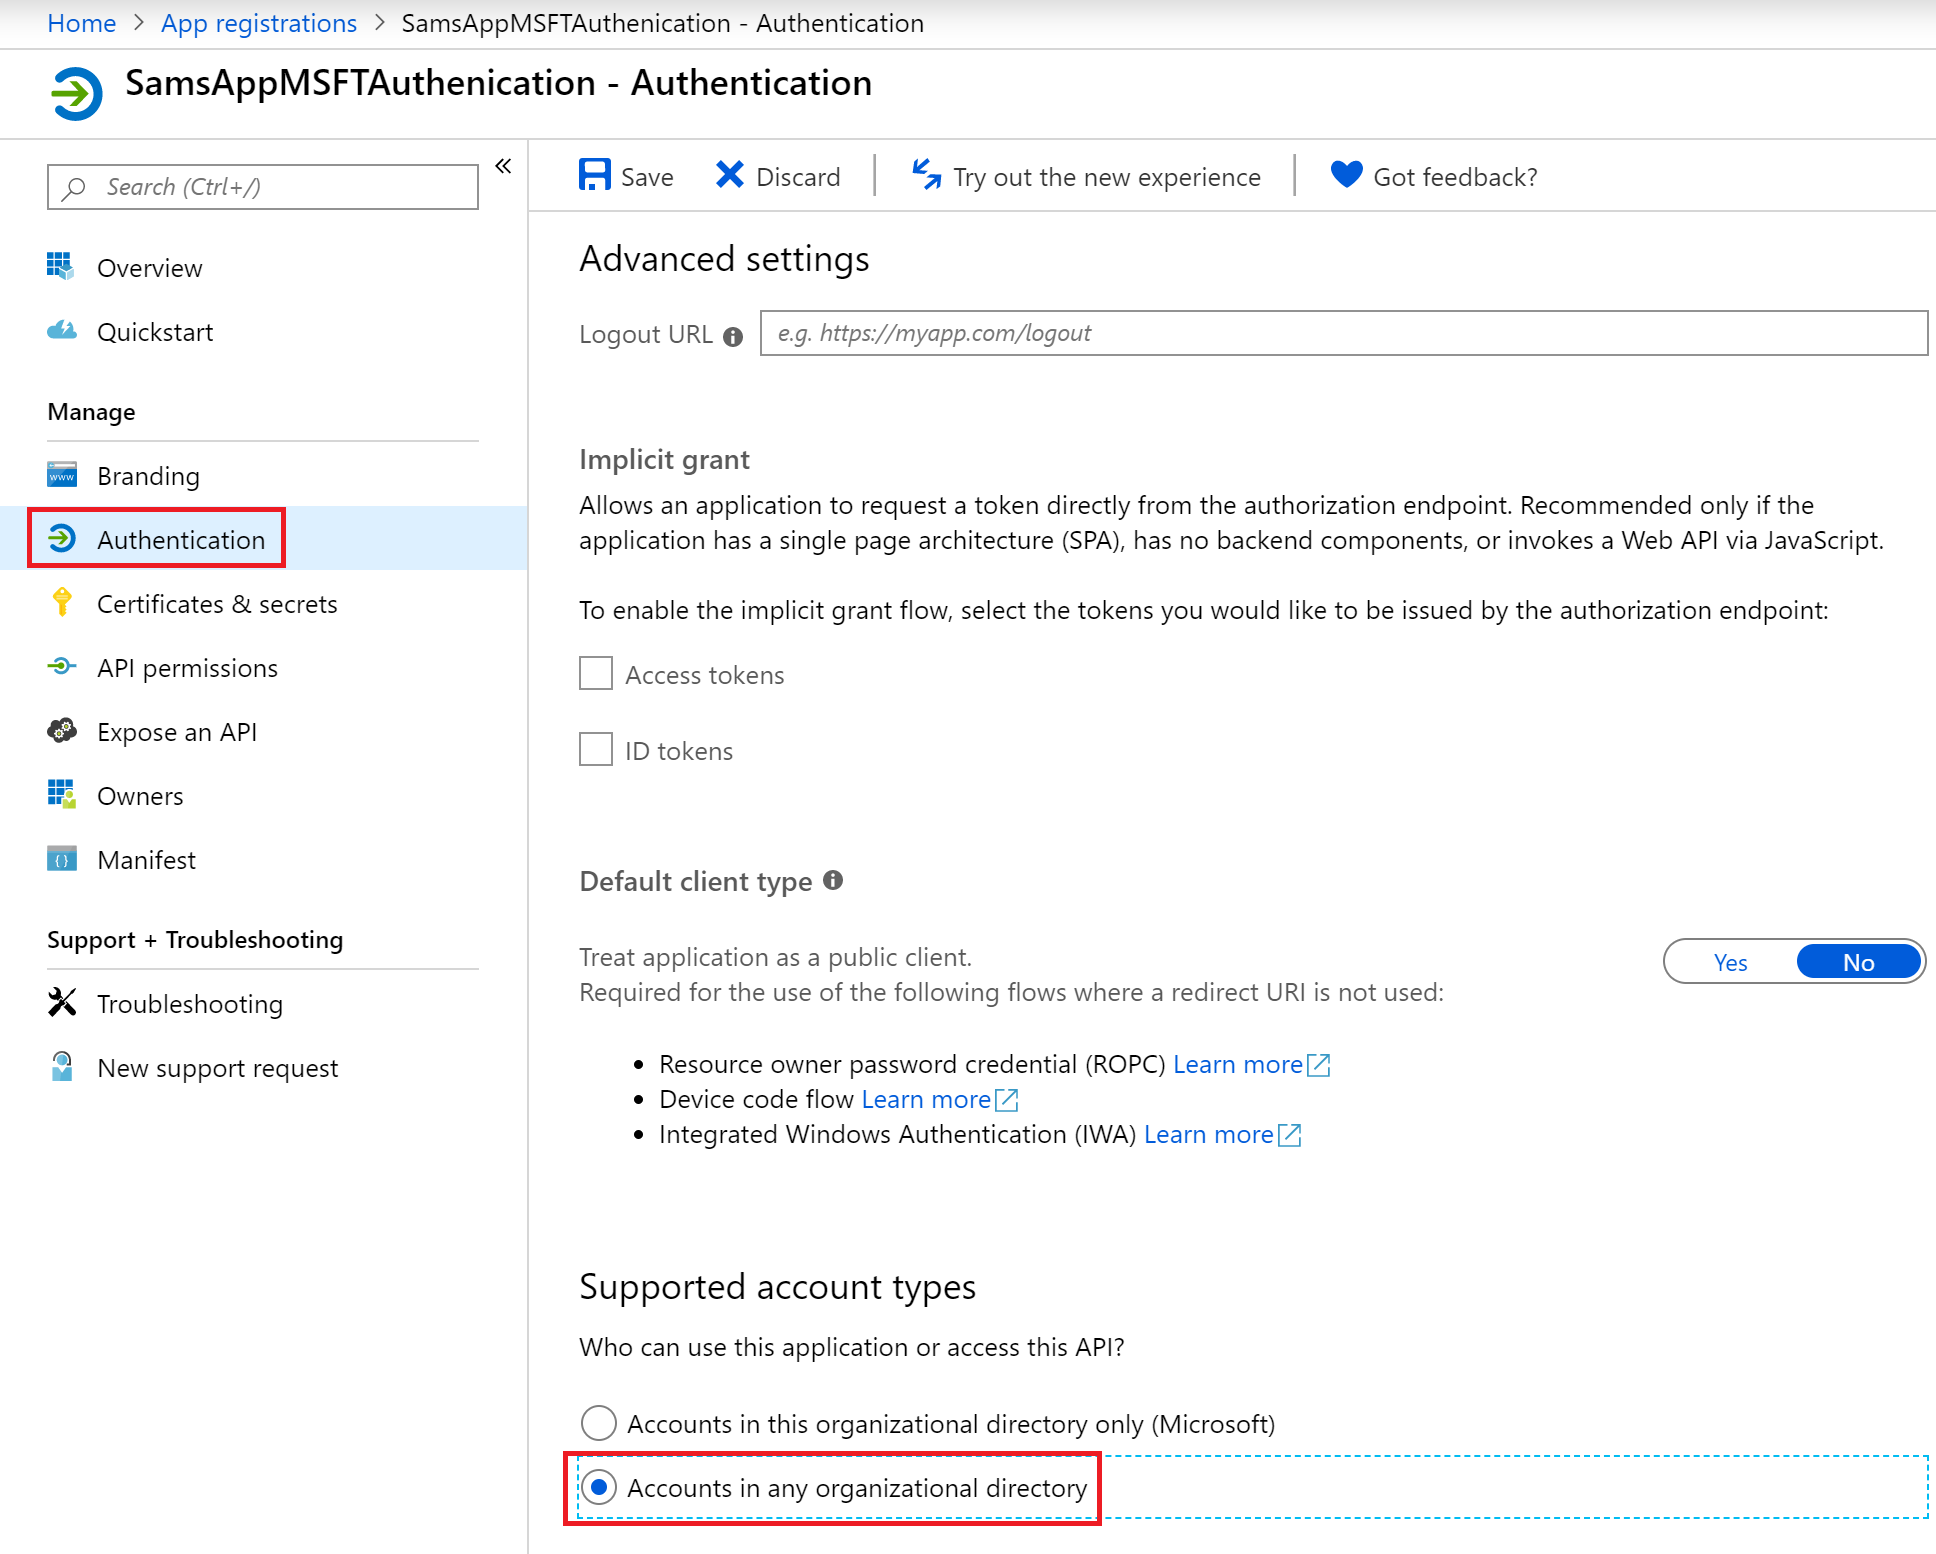
To resolve, we go back to our app registration, select the “Authentication” section, and then in “Supported account types”, select “Accounts in any organization directory”. This will mean anyone with a Microsoft account can use our website, not just people in our organization.
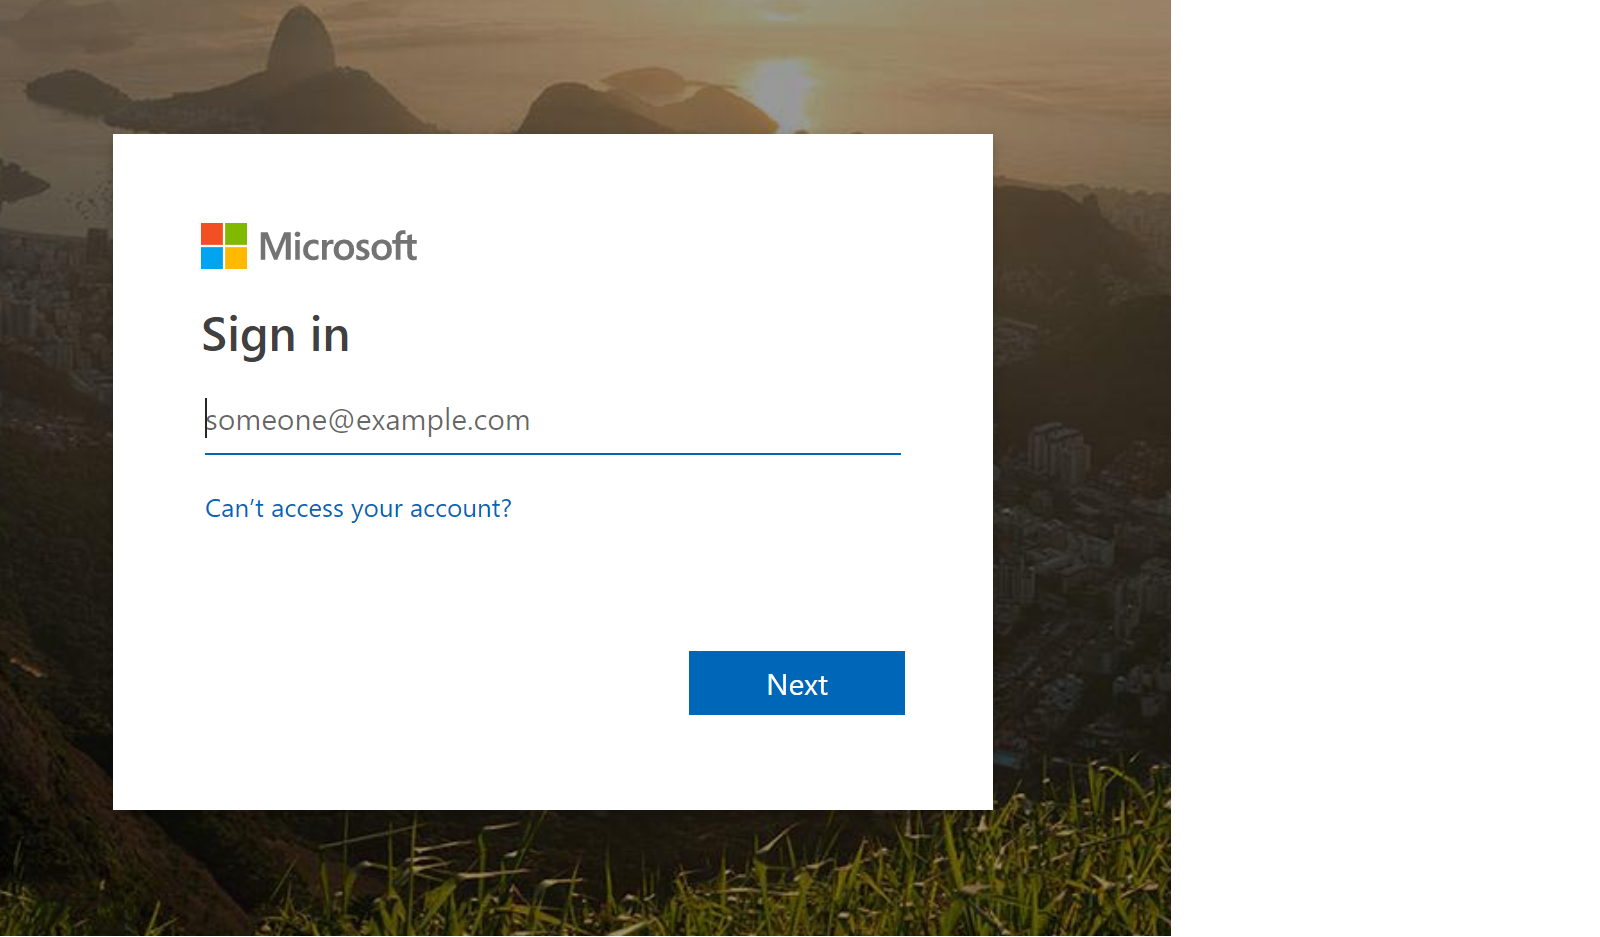
When we restart the website, it now displays the familiar Microsoft log in dialog. We log in with our user name and password
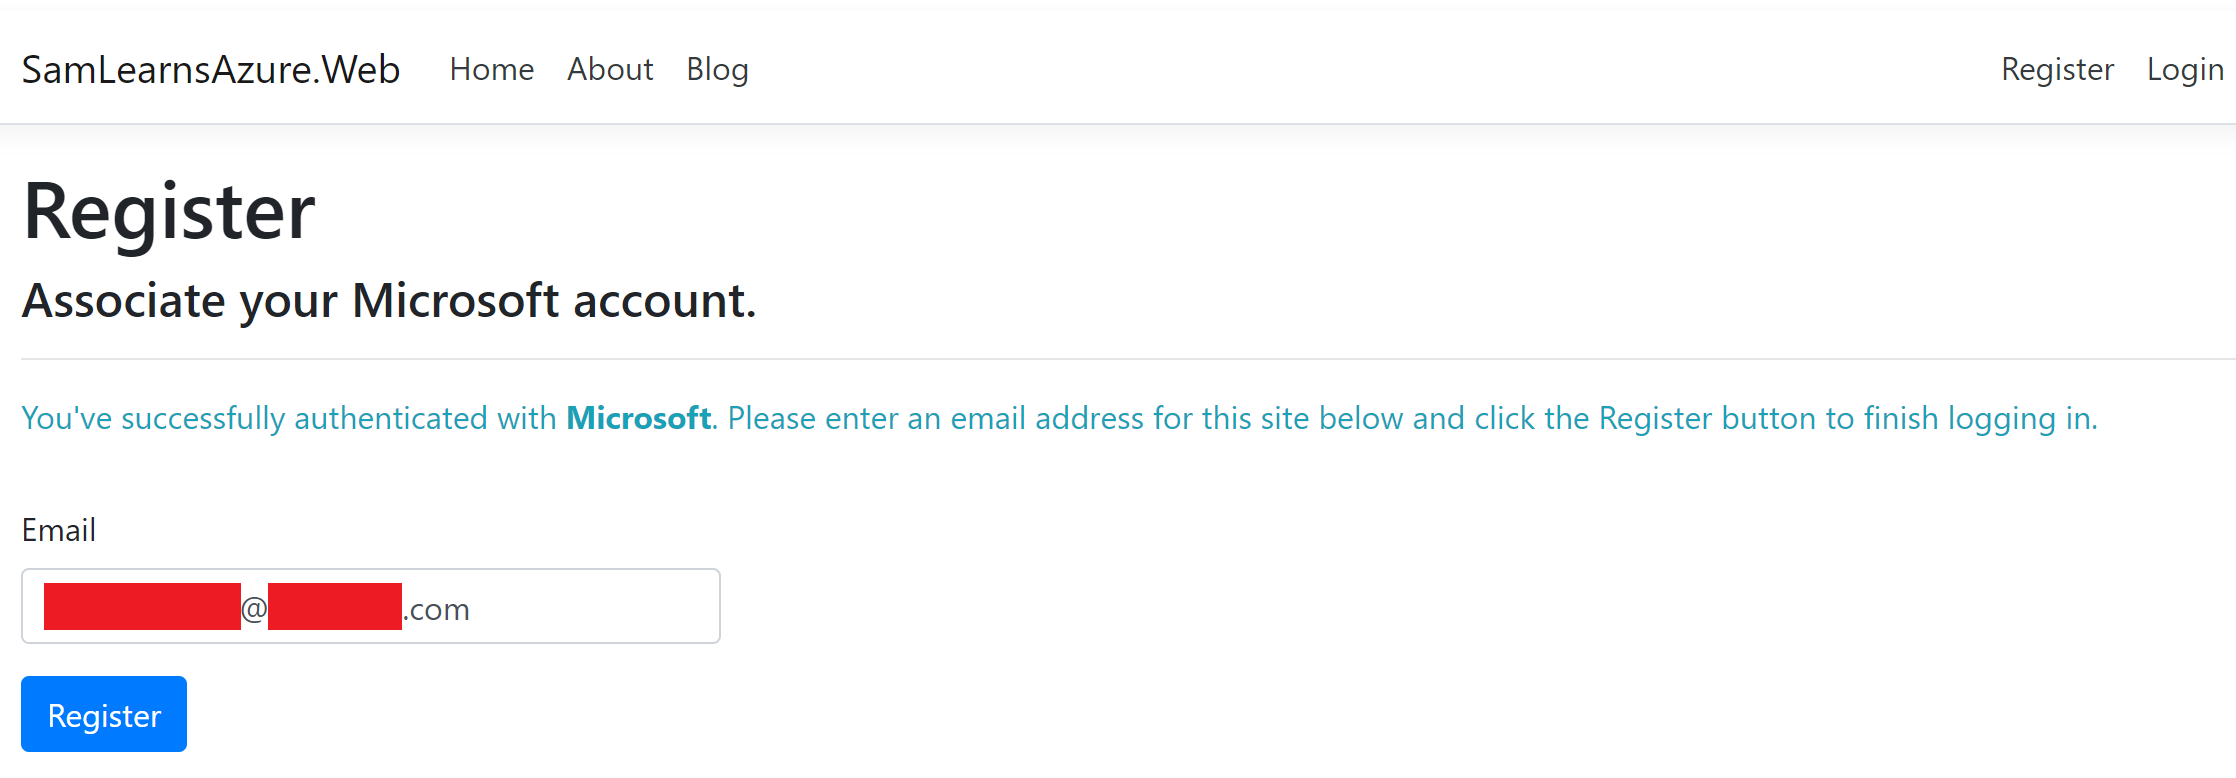
…And we are presented with an “associate your Microsoft account” page. Here we can enter any email address the application will use to associate with our log in. We use our log in email address and register.
We are now authenticated with Microsoft and logged in!

Controlling access to logged in users
Now we are authenticated, we can use this to control access to certain features. For example, on our set page, we currently have an “update set image” link, to change the set image. However, we don’t necessarily want any random person on the internet to use this link, and want to restrict this to only logged in users. Fortunately, we need to make just two changes to implement this.

First, we want to control the visibility of the “Update set image” link. In the view, we add a condition to check that “User.Identity.IsAuthenticated” is true. If the user is logged in, it will show the “Update set image” link, if the user is not logged in, it will not show this link.

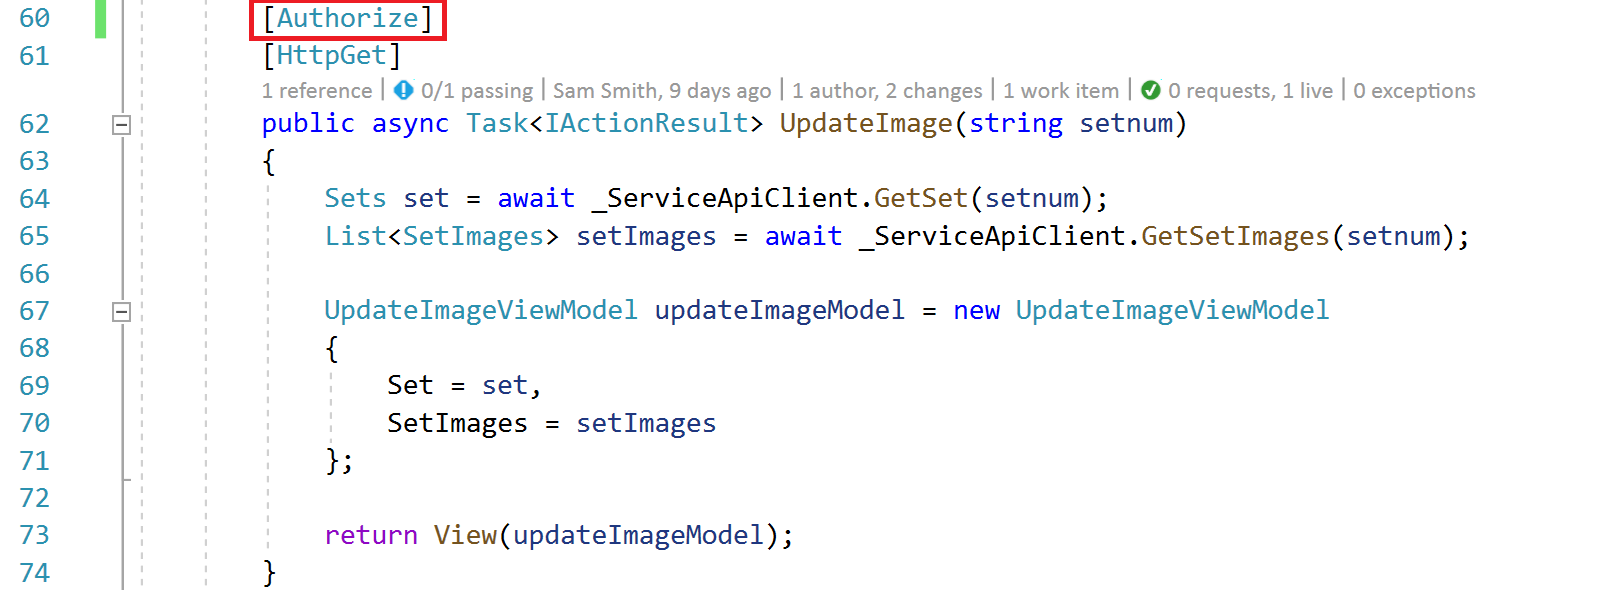
Secondly, we want to prevent people from guessing the URL and accessing the page. To achieve this, we add an “[Authorize]” tag to the relevant “UpdateImage” action. This restricts access from the server side, requiring a logged in user to continue.
With these two adjustments, if a user not logged in browses to the same page, the update set page is not visible. If the user tries to paste in the direct URL, the controller will recognize the user isn’t logged in, and redirect them to the log in page.

A note about testing
Testing a logged in service is hard. We either have to create test users, or a back door. We are going to create a test user, and store their credentials in our key vault. Due to the Azure Key Vault managed service issue we had earlier, we are going to use the client id/client secret method we used for our integration tests. The test will log into the website, and test the update image page functionality. Of course it goes without saying that we will also have a healthy mix of unit and integration tests.
A note about customizing the log in pages
As of ASP.NET Core 2.1, the log in pages are created in code, utilizing the Microsoft.AspNetCore.Identity.UI namespace. The disadvantage with this new method is that the login pages are generated with code, and can’t be easily edited, unlike previous ASP.NET methods. We aren’t going to customize the login pages today, as our goals are to add functionality, and not worry too much about the UI and small details. Fortunately, there is plenty of documentation about how to do this.
Wrap up
We have added authentication to our basic website. We also upgraded our projects to .Net Core 2.2. Next week we will add Google, Twitter, and Facebook authentication too, and add some roles. We will also link up the sets with each login.
References
- How to add identity to an existing project: https://docs.microsoft.com/en-us/aspnet/core/security/authentication/scaffold-identity?view=aspnetcore-2.2&tabs=visual-studio
- Adding Microsoft authentication: https://docs.microsoft.com/en-us/aspnet/core/security/authentication/social/microsoft-logins?view=aspnetcore-2.2
- Authorization in controllers: https://docs.microsoft.com/en-us/aspnet/core/security/authorization/introduction?view=aspnetcore-2.2
- Authorization in views https://docs.microsoft.com/en-us/aspnet/core/security/authorization/views?view=aspnetcore-2.2&tabs=aspnetcore2x
- Customizing prebuild UI: https://devblogs.microsoft.com/aspnet/aspnetcore-2-1-identity-ui/
- Featured image credit: https://www.dreamhost.com/blog/wp-content/uploads/2017/09/wp_website_security.jpg

Reblogged this on Neel Bhatt and commented:
Very nice article: Adding external authentication with a Microsoft account
LikeLike